Author Archives: DAP Admin
Author Archives: DAP Admin
1) Create a child product and make sure to designate it as child in dap admin -> credit store -> storefront settings page.
2) Also make sure to set ‘allow users to redeem individual content’ to yes for the child product in credit store -> storefront settings page.
3) Add all the content that belongs to the child in dap products page -> content responder tab.
Make sure to add the right number of credits to each content that you add.
4) Now when you go to the store, you should find all the content under the same child and users can redeem access to individual content.
To use the new cart, you need to be on dap 4.5.2 / LL 1.9.2 (or a later version), and the NEW DAP Shopping Cart – 1.4 (or a later version).
If you want to just offer a ‘checkout with paypal’ option using the New DAP Shopping Cart, then please do the following:
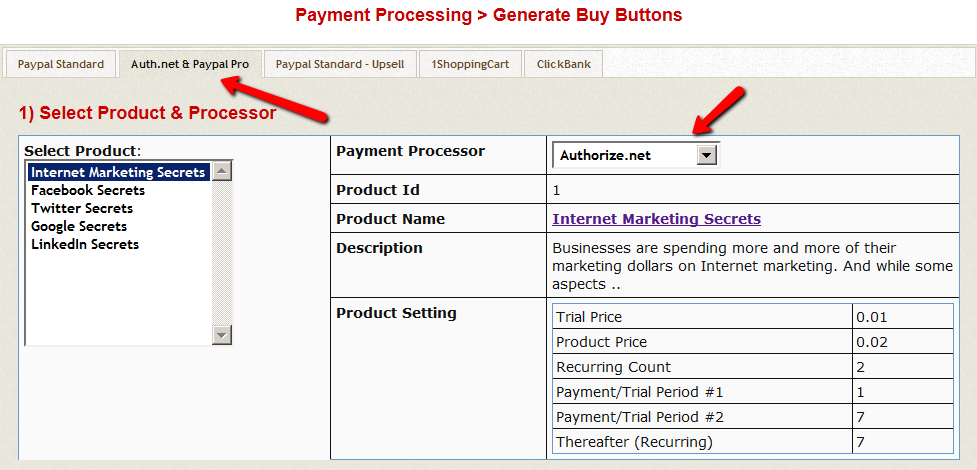
1) Go to DAP admin -> payments -> Generate buy buttons page -> DAP Shopping Cart tab.
2) In the step 1 – Select Product & Processor, you can select any option (authorize.net, paypal pro or stripe in the dropdown). It does not matter. Whatever option you pick here, will be ignored if you want to offer just the ‘checkout with paypal’ option in the next step.
3) In the next step (Generate “Primary” Buy Button => Credit Card / Checkout With Paypal ), select ‘Allow Checkout with Paypal only’ as shown below:
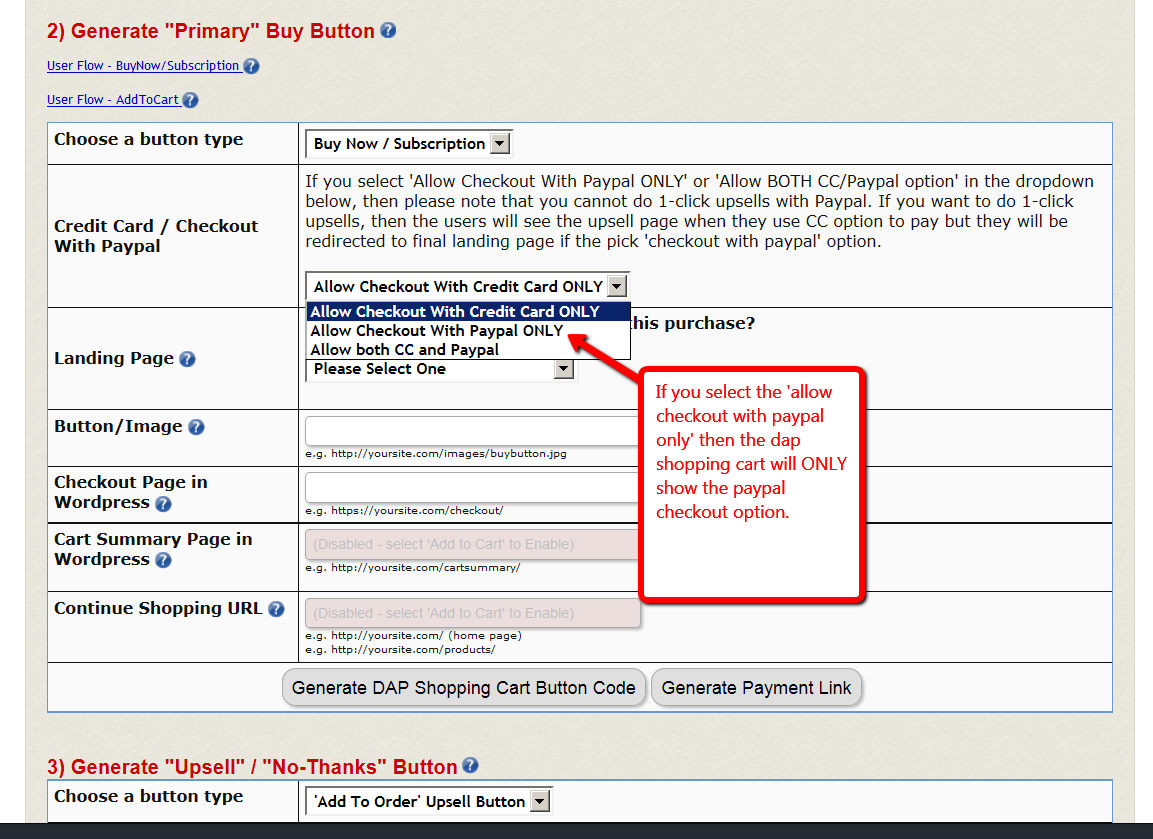
4) In the generated ‘payment button code’ or ‘payment link’, you can replace all occurrences of ‘https’ with ‘http’.
You do not need to enable https on your site if you only sell using paypal standard. You only need to use https if you allow users to enter CC info on the cart checkout page.
5) Also make sure to integrate your paypal standard account with DAP using this documentation otherwise the paypal IPN will not be connected to DAP.
That’s it.
See this blog post on the other great features that the DAP cart offers even if you just have a Paypal Standard account.
Please refer this document to install VB 5.
You can integrate it the exact same way as VB 4.x. The only difference is in the /dap/dap-config.php.
Instead of entering something like this:
define(‘VBFORUMPATH’, ‘/home/…/yoursite.com/forum’); // path to your forum
Enter:
define(‘VBFORUMPATH’, ‘/home/…/yoursite.com/forum/core’); // path to your forum’s core folder
Instructions here:
1) http://www.digitalaccesspass.com/doc/vbulletin-integration/
2) http://www.digitalaccesspass.com/doc/vbulletin-setup/
Here’s how you can customize the DAP Shopping Cart -> Checkout page.
Customize the Template
You will find the checkout.html in
/wp-content/plugins/dapshoppingcart/includes/templates/dapcart/template1 folder
or if you are using template2, then you’ll find it in this folder:
/wp-content/plugins/dapshoppingcart/includes/templates/dapcart/template2 folder
Create a copy of checkout.html. Save it as customcheckout.html.
Edit whatever you need to in customcheckout.html
Upload it back to /wp-content/plugins/dapshoppingcart/includes/templates/dapcart/template1 or template2 folder.
Now the changes you made should show up on the checkout page.
Customize CSS
You will find the buynow.css file in
/wp-content/plugins/dapshoppingcart/includes/templates/dapcart/template1/css folder
or if you are using template2, then you’ll find it in this folder:
/wp-content/plugins/dapshoppingcart/includes/templates/dapcart/template2/css folder
Create a copy of buynow.css. Save it as custombuynow.css.
Edit whatever you need to in custombuynow.css.
Upload it back to /wp-content/plugins/dapshoppingcart/includes/templates/dapcart/template1/css folder (or under /template2/css folder if you are updating template2 css).
Now the style changes you made should show up on the checkout page.
There are many reasons why an email is not delivered to the recipient.
And the list goes on!
That should give you an idea why email delivery is so tricky and complicated, which is what created a niche for the email delivery industry, and which is why companies like Aweber, MailChimp and GetResponse even came into existence and have thrived while charging a hefty fee for what you would think is the simple act of delivering email over the interwebs.
When you use DAP for sending out emails (whether autoresponder or broadcast emails), the “From Name” and “From Email” you set up in the DAP Config are used to send out the emails.
If you use your own web host as the “carrier”, then your web host’s email server is the one that carries the email and tries to deliver to the inbox of the recipient. And web hosts are generally not very good at the intricate science of email delivery, which is why if you’re going to use DAP, we recommend that you bypass your web host and have a third-party email system like Amazon SES deliver your emails.
Regardless of the carrier (web host, Amazon SES, AuthSMTP.com, etc), all bounced and undeliverable emails come back to the “From Email” that you have used under DAP Config.
DAP by itself does not do anything with those emails, as those emails don’t come back to DAP, but they go straight to the inbox of whatever “From Email” you have specified.
We will surely address this in the future. But for now, you will have to manually review those email bounces, see which one of them sound more serious (like, say, recipient email id not found, or domain no longer in use, etc), and then de-activate those email id’s from your DAP database.
When you use Amazon SES, Amazon by itself also monitors email id’s that have a consistent history of bouncing back, and will automatically suppress those email id’s and won’t even deliver email to those email id’s even if DAP did send the actual email to those id’s.
If you want a redeem button to show up on your sales page or any other page to allow users to redeem access to a product, then just place the REDEEMCREDITS shortcode on the page and automatically a redeem button will appear on the page. We also have shortcodes for CREDITSAVAILABLE and CREDITSREQUIRED that you can place on any WP page.
1) [CREDITSREQUIRED] Shortcode
[CREDITSREQUIRED productid=4 msg='You can get access to this content for just=' errmsgtemplate=''][/CREDITSREQUIRED]
Here you can replace productId with the DAP product Id of the product that you want to allow users to redeem using credits. This shortcode will display the number of credits required to redeem the product using credits.
2) [CREDITSAVAILABLE] Shortcode
[CREDITSAVAILABLE msg="Credits Available=" errmsgtemplate='<strong><a style="text-decoration: underline;

color: blue;" href="http://YOURSITE.com/login/">Login Here To See Available Credits</a></strong>'][/CREDITSAVAILABLE]
This shortcode will display the number of credits the credit store users have in their dap account.
Replace http://YOURSITE.com/login/ in the shortcode above with the dap login page url on your site.
3) [REDEEMCREDITS] Shortcode
This shortcode will allow users to get access to products using credits (instead of cash) by clicking on the REDEEM button.
[REDEEMCREDITS productid=4 msg='
If you are a member, please "Login Here To Redeem Credits".
It you are not a member, you can GET Access To Content by Clicking on the Redeem Button Here' imagesrc='http://YOURSITE.com/wp-content/plugins/dapcreditstorefront/categories/html/1column/images/btn_redeem.png' errmsgtemplate=''][/REDEEMCREDITS]
Replace YOURSITE.com above with the name of your site.
Credit Store Child Product
1. The product that the users can get access to by redeeming their credits (in the store) is what we refer to as CHILD product.
2. You can give any name to the product (does not have to be called ‘child’).
3. Each product that needs to serve as child needs to be designated as Credit Store Child in DAP products page OR in DAP Admin->Credit Store->Storefront Settings page.
4. You cannot use regular dripping if you make a product a Credit Store Child Product.
5. Users can earn credits by purchasing master product and then spend the credits to get access to child products in the credit storefront.
6. Users can redeem the entire product in the store and get access to all the content that belongs to the child product (added in content responder tab) OR
7. Users can redeem just the content that they are interested in by redeeming access to individual content instead of full product.
8. How to add setup a Child Product?
If your users want to redeem access to child, then as long as they have enough credits in their account, they can login to their membership, visit the storefront page and redeem credits. They can earn credits by purchasing the master product. You can create multiple master products each allowing different number of credits (5-credits, 10 credits, 50 credits etc). This way the users can purchase the master and get 5, 10, 50.. credits and then visit the store to redeem it.
If you have purchased our Credit Store plugin, you can use it ONLY if you are on DAP v4.5.2 / DAPLiveLinks 1.9.2 or above.You can find your DAP version number in your dap admin dashboard footer area. You can find DAPLiveLinks version number in WP admin -> Plugins area.
The document below explains how to setup the DAP Credit Store.
Here are the steps to setup the DAP Credit Store:
STEP 1: Install DAP Credit Store Plugin:
See this document/video on how to install the DAP Credit Store Plugin.
STEP 2: Create Credit Storefront page:
See this document on how-to-create-creditstorefront-page-in-Wordpress.
STEP 2: Create Payment Button
1. Select Product.
2. Select Payment Processor.
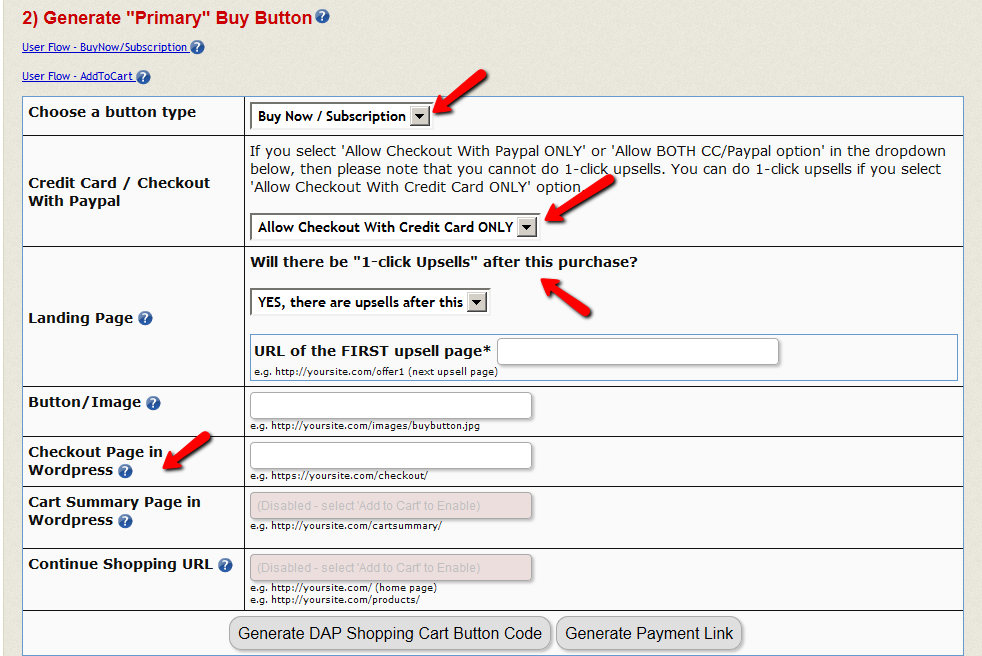
3. Choose a button type (BuyNow/Subscription, AddToCart).
4. Configure payment method. 5. Set the . If you are going to send the users to an upsell page after they click on checkout/buynow, then set the landing page URL to point to your upsell page. Say the upsell page is called http://YOURSITE.com/upsell1. You can set the landing page url to /upsell1. If no upsells, then you can set this to point to a thank you page.
Set the Checkout page in WordPress to http://YOURSITE.com/buynow (check STEP 1 above on how to create buynow page). If you do not have a WP based Checkout page, you can set it to : http://YOURSITE.com/wp-content/plugins/dapshoppingcart/buynow.php.
6. Now you can generate a Payment Button or a Payment Link.
PLEASE NOTE : The buynow/checkout page must be on HTTPs/SSL. Your entire site does not need to be SSL enabled but the checkout/buy now page where Credit Card is collected MUST BE on https for SECURITY reasons. If you ONLY configure ‘Checkout With Paypal’ to show up on Checkout Page, then you DO NOT need https. You only need to have HTTPs enabled checkout page if you offer Credit Card checkout option. Your web host can enable HTTPs for your site. The exact cost of SSL is web host dependent. Please check the pricing details with your web host.
TESTING: If you are waiting on your web host to enable SSL but want to start testing the CART, you can look for ‘https’ in the button code and update all occurrences of https with http for testing. Please remember to change back to https before you go LIVE with the button.
STEP 3: Upsells – Create Upsell Button
* If you want to offer upsells, please ONLY use the Credit Card payment option on the checkout page. Do not offer ‘Checkout with Paypal’. Upsells will not work with Paypal Standard checkout.
* Say your first upsell page URL is http://YOURSITE.com/firstupsell. Use the URL of the FIRST upsell page (/firstupsell) as the ‘LANDING PAGE URL’ when you generate your MAIN/INITIAL button for the sales page. This way, when the users click on the main payment button, the user’s payment will be processed, and instead of users getting redirected to the thank you page, they will land on the FIRST upsell page.
* You need to have 2 buttons on the upsell page:
Add To Order (Yes, I want to add this to my purchase) / No, Thanks (No, I will skip this wonderful offer)
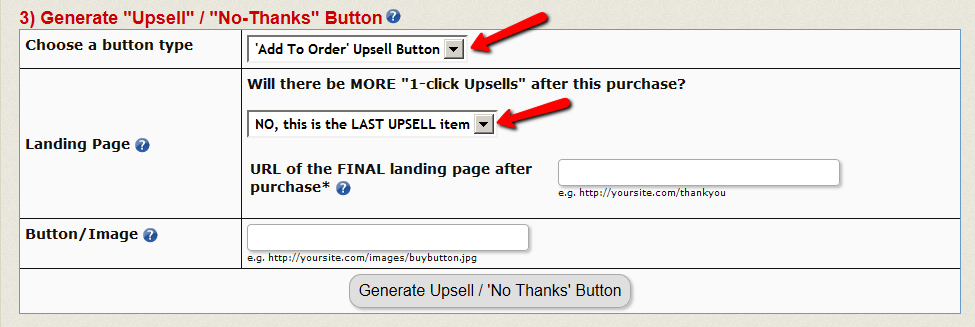
* You can generate the UPSELL / DOWNSELL buttons for all your upsell / downsell offers in the DAP admin -> Payment Processing > Generate Buy Buttons -> Authnet & Paypal PRO tab. Make SURE to select the RIGHT product in the button generation page BEFORE you generate button.
STEP 4: CART OPTIONS
Last STEP in your checkout page configuration process.
– Go to DAP admin -> Payment Processing > Cart Options page.
You will find several checkout page customization options on this page including options for ‘Choose a Password (pre-registration)’, ‘Require Billing Info for Paypal’, ‘Custom fields’ etc. You can enable options as needed for your site for the product you are trying to sell. Remember to first select the product in the select box on the left before picking options.

That’s it for BuyNow or Subscription buttons. Instructions for AddToCart button will be covered later in this document.
Go to DAP products/Levels and create the product that you want to use to ‘sell’ credits to your users.
See this video for more detail:
1. The product that the users buy to earn credits is what we refer to as MASTER product.
2. You can give any name to the product (does not have to be called ‘master’).
3. Each product that needs to serve as master needs to be designated as Credit Store Master in DAP products page OR in DAP Admin->Credit Store->Storefront Settings page.
4. After you create the product, designate it as master and complete the rest of the product setup (price, content dripping etc) in DAP Admin -> Products page. All other settings for master needs to be completed in DAP admin->Credit Store->Storefront Settings page.
5. Different Types of Master
6. The buyers get the credits right away upon purchase or upon signup.
IMPORTANT : Please make sure to visit the DAP Admin -> Credit Store -> Store Front Settings page to assign credits to the Master product and complete rest of the master product setup.
1. Login to WP admin dashboard.
2. Click on Pages -> Add New.
3. Click on Visual tab.
4. You will notice a CS Editor Icon as shown below:
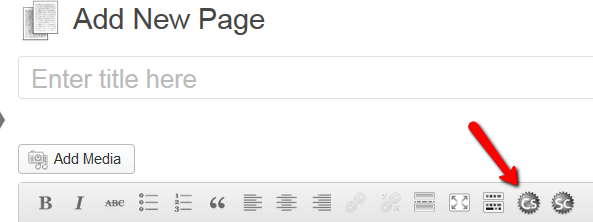
5. Click on CS editor icon and fill up the form to create a storefront page.

– Enter The Number of Products You Want Displayed Per Row
Please NOTE: Currently the ONLY valid values are 1, 2 or 3.
If you allow content level credits for any products in the display category, then you cannot use multiple products per row layout. You will have to user 1 product per row.
– You will also notice various customization options for text color, background color, font, width etc that you can configure if needed or you can just use the defaults.
– Pick a store category for the storefront page: If you select the “ALL” option, then all the child products associated with the categories will be displayed in the storefront page.
– Enter payment link or sales page link to allow users to purchase additional credits: Enter the link to your sales page url or the buy button LINK for the master product.
When a user clicks on the payment link, they can complete payment and accumulate more credits.
OR
You can ENTER sales page URL to send users to a page where they can find multiple payment buttons/links for credits purchase (for ex – 10-credits, 100-credits etc). The ‘buy credits’ image will automatically appear on the store page. When a user clicks on the image, they will get redirected to the sales page to purchase additional credits.
Users need to be logged in to their membership to access the credit storefront page. Otherwise dap will not know who the user is.
7. After you pick all the options and click on INSERT button, you will notice the [DAPCreditStoreFront]…[/DAPCreditStoreFront] shortcode. Save the WP page that has the shortcode. And now when you open the page in a browser, it will show all the products you have set up as ‘redeemable products’.
If you have setup the store already and want to make some updates to the settings, you can select everything from the start tag ([DAPCreditStoreFront] ) to the end tag ([/DAPCreditStoreFront] ) and click on CS icon and it will remember the previous settings.