Aweber To DAP Integration
Follow the documentation below on this page for Aweber-to-DAP integration, only if you’re using DAP 4.4 or later. (For DAP v4.3.1 or older, click here)
Subscriber Flow
The flow of subscriber in this model, is “FROM Aweber TO DAP“. User gets added to Aweber first, then arrives at DAP via Aweber “thank you page”, at which point she gets added to DAP.
Now, if the flow is from DAP-to-Aweber, and are using email parsing to integrate DAP and Aweber, then your Aweber list will always be double-opt-in (as per Aweber policy, nothing to do with DAP).
But if you want your Aweber list to be single-opt-in, or you want your sign ups to be added to Aweber first and then to DAP, then use this flow. HEre, you can use an Aweber signup form on your squeeze page (instead of the DAP sign-up form) and then have Aweber add users to DAP.
NOTE: You cannot use this flow for Paid members – because paid members will need to have paid first, which means DAP needs to process their payment first, and if successful, it can add them to Aweber. So for paid members and paid content, always use the other DAP-to-Aweber flow.
But for free signups (say, like when you’re trying to build a list), you can add them to Aweber first using the flow explained below, just so you can take advantage of making your Aweber list single-optin, and then have Aweber add the subscriber to DAP on the other end. So this way, DAP can then create a free account for them, email them their login/password, and give them access to the “Free” content (that is, content available only to “Registered” users, so to speak), etc.
So here are the steps…
Aweber To DAP Integration
1. Go to DAP Dashboard > Products > Manage page.
2. Note down the Product Id of the product to which you want to sign-up the users (after adding them Aweber first, of course). Let’s call this PRODUCTID

Aweber List Is Single-Optin
If your Aweber list is single-optin, then follow the steps below. If not, skip ahead to “Aweber List Is Double-Optin” flow further below.
(The old steps 3 & 4 no longer exist. To keep the image below in sync, follow the rest of the steps starting Step 5.)
5. Now login to your AWeber account.
5A) From the “Current List” drop-down, select the list that you wish to sign up users to.
5B) Click on “Web Forms” in the menu at the top.
5C) Edit existing form by clicking on the name of the list.

6. On the next page – the list form generator page – click on ‘Go to Step 2’ towards the bottom of the page.

7. On the next, page…
7A) Click on the thankyou page dropdown and select ‘Custom’.
7B) Set the thank you Page URL to http://YourSite.com/dap/signup_submit.php?productId=PRODUCTID
Replace YourSite.com with the name of your site.
Replace PRODUCTID with the Product Id of the product you noted in step 2.
So, if the Product Id of the product in DAP is 2, then the thankyou page URL will be…
http://YourSite.com/dap/signup_submit.php?productId=2
7C) Where it says “Pass Form Data”, check the check box so that Aweber can “Forward subscriber information to your thank you page” – which essentially is DAP, so that DAP can add the subscriber to your membership site.

That’s it!
Aweber List Is Double-Optin
In this flow, set up your Web Form as usual, with no DAP-specific settings required.
Only change required is in the Aweber list’s main “List Settings” page.
5. Now login to your AWeber account.
6. From the “Current List” drop-down, select the list that you wish to sign up users to.
7. Go to My Lists > List Settings

8. Go to “Confirmed Opt-In” tab

9. Scroll down to “3: Success Page“.
9A) Set the “Confirmation Success Page URL” to http://YourSite.com/dap/signup_submit.php?productId=PRODUCTID
Replace YourSite.com with the name of your site.
Replace PRODUCTID with the Product Id of the product you noted in step 2.
So, if the Product Id of the product in DAP is 2, then the thankyou page URL will be…
http://YourSite.com/dap/signup_submit.php?productId=2
9B) Check the check-box that says “Pass subscriber info for personalizing this page”. Ignore the comment that says “Not recommended for WordPress users”, because this is going to point to a DAP script, and not a WordPress page.
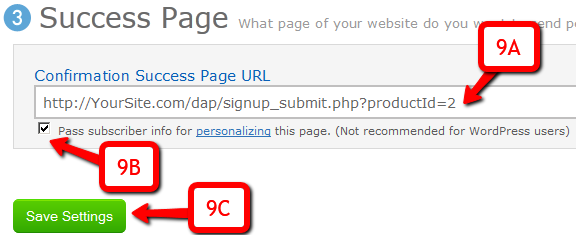
9C) Click on “Save Settings”.
That’s it!
Using Custom Redirect URL
If you want the user to be logged in automatically (either after single-optin or double-optin) and instead of being logged into the member’s area, you want the user to be redirect to your own custom URL, then your thank-you URL should be:
http://YourSite.com/dap/signup_submit.php?productId=PRODUCTID&redirect=http://yoursite.com/your-custom-thankyou-page
OR
http://YourSite.com/dap/signup_submit.php?productId=PRODUCTID&redirect=/your-custom-thankyou-page
Additional Notes
Now that you’ve set up DAP to integrate with your Aweber list (single- or double-optin), you may use the Aweber web form directly on your squeeze page for signing up subscribers
(instead of DAP’s “Direct Signup Form”).
Now, every time a subscriber signs up via the Aweber form, they will automatically be added to DAP.
If your list is single-optin, then the subscriber will be added to DAP instantly after sign-up.
If your list is double-optin, then the subscriber will be added to DAP only AFTER they’ve clicked on the Aweber double-optin confirmation link.
In both cases, if they’re a new user to DAP, they will be auto-logged in to the member’s area.
You may also configure the DAP Product’s “Welcome Email” to send out the DAP email and password via DAP itself.
-OR-
You can leave the Welcome Email in DAP Product page as blank. And then configure DAP to generate a default password (DAP Admin > Setup > Config > Default Password) as shown below, and then enter that same pre-chosen password in to your very first Aweber follow up email that goes out to your subscribers, so that they can receive their dap id/password details directly from your Aweber list.

For more details about this default password, please see this post.