Bounces and Invalid Emails
There are many reasons why an email is not delivered to the recipient.
- Auto-responses and Vacation Replies
- Email delivered to “Junk” or “Spam” folder of recipient
- General undeliverable emails with no error specified by recipient’s server
- Recipient email server is down or unreachable
- “Connection timed out”
- Recipient mail box full
- Recipient email address not found
- Temporary non-delivery (server will keep trying for a few more days)
- Your server IP is blocked by recipient’s ISP (“Relaying Denied”)
- Your server IP is blacklisted for suspected spam
And the list goes on!
That should give you an idea why email delivery is so tricky and complicated, which is what created a niche for the email delivery industry, and which is why companies like Aweber, MailChimp and GetResponse even came into existence and have thrived while charging a hefty fee for what you would think is the simple act of delivering email over the interwebs.
When you use DAP for sending out emails (whether autoresponder or broadcast emails), the “From Name” and “From Email” you set up in the DAP Config are used to send out the emails.
If you use your own web host as the “carrier”, then your web host’s email server is the one that carries the email and tries to deliver to the inbox of the recipient. And web hosts are generally not very good at the intricate science of email delivery, which is why if you’re going to use DAP, we recommend that you bypass your web host and have a third-party email system like Amazon SES deliver your emails.
Regardless of the carrier (web host, Amazon SES, AuthSMTP.com, etc), all bounced and undeliverable emails come back to the “From Email” that you have used under DAP Config.
DAP by itself does not do anything with those emails, as those emails don’t come back to DAP, but they go straight to the inbox of whatever “From Email” you have specified.
We will surely address this in the future. But for now, you will have to manually review those email bounces, see which one of them sound more serious (like, say, recipient email id not found, or domain no longer in use, etc), and then de-activate those email id’s from your DAP database.
When you use Amazon SES, Amazon by itself also monitors email id’s that have a consistent history of bouncing back, and will automatically suppress those email id’s and won’t even deliver email to those email id’s even if DAP did send the actual email to those id’s.
Downline Builder
Or also called as network builder. And we introduced this feature in DAP v4.4.
We call it DAP “Upline” – basically a shortcode called [DAPUpline] that allows you (site admin) to display the person’s upline’s affiliate code to the person. So in effect, it is a downline builder.
1) John joins your site
2) John fills out profile with (say) his ClickBank nickname
3) John refers Adam
4) When Adam logs in, he sees affiliate link to some xyz third party product, but CB nick in the affiliate link is replaced with John’s CB nickname.
5) Adam fills out his profile with his own CB nickname
6) Adam refers Jill
7) When Jill logs in, she sees affiliate link to same third party product, but cbnickname is replaced with Adam’s CB nickname.
This can be done with any number of third-party programs, as long as the nickname can be easily replaced with the info provided by the upline affiliate.
DAP even takes this one step further.
When Jill joins through Adam’s DAP affiliate link, if Adam has not filled out his CB nickname in his profile, then the third-party CB link shows CB Nickname of Site Admin in its place.
So if an affiliate fails to claim his affiliate link, then site admin gets credit for it (and all such links).
Here’s the documentation for [DAPUpline]
DAP to 1ShoppingCart List Integration
Q: How to automatically add a new user in DAP to a 1SiteAutomation.com (1SA) list (or other 1Shoppingcart – 1SC – private label)?
A: Every list in 1SA/1SC gets a unique email id – like 1sc-12345@autocontactor.com ).
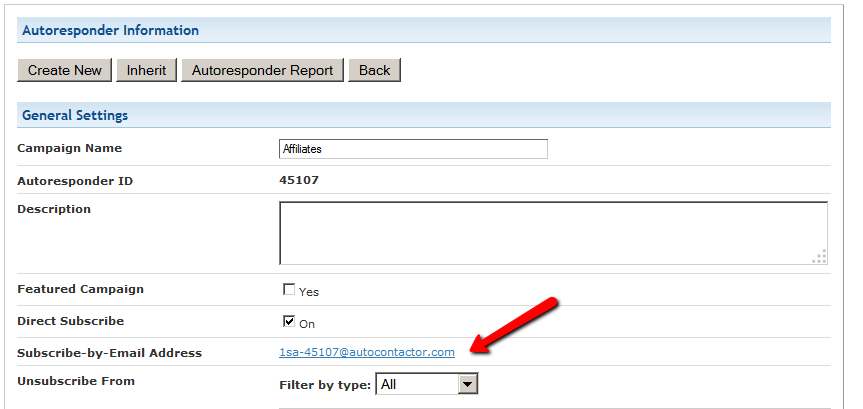
Add that to the “3rd-Party Notification Email Ids” field of the DAP product (under Products > Manage > “Notifications” tab)
And make sure you set the “Direct Subscribe” field in your 1SA/1SC list to be “On”.
Troubleshooting Amazon SES Integration
DAP’s Amazon SES integration has been heavily tested, and we use it ourselves at DigitalAccessPass.com . So you can rest assured that there are no “bugs” of any kind.
Here are some troubleshooting steps if SES integration is not working even after you’ve followed the documentation exactly.
Troubleshooting SES
- MOST COMMON MISTAKE: Have you whitelisted the DAP “From” email in Amazon? And have you used exact same “case” for the email id in both places (DAP and Amazon)? Double-check spelling and case in both DAP and Amazon – they must be EXACTLY the same. For eg., you@yoursite.com is NOT the same as You@YourSite.com as far as Amazon is concerned. So if you’ve set the “From Email” in DAP to be you@yoursite.com, then you must whitelist exactly the same email id you@yoursite.com within your Amazon SES account as well. If you are not sure, delete the whitelisted email in your SES account, then COPY the from-email from DAP config (be sure to copy, and not re-type) and then PASTE the exact from-email into your Amazon SES account and whitelist it again.
- IMPORTANT: Have you requested Amazon for “Production Access” to your SES account? Being in “Sandbox” mode has its disadvantages (you can only send “from” and “to” whitelisted” emails ONLY). So your account MUST, MUST, MUST be in “Production” mode before Amazon SES lets you send emails to your customers.
- Are you using the exact ports as mentioned in our documentation? Ignore the port #s that Amazon recommends.
- IMPORTANT: Double-check with your web host to make sure that they actually allow a plugin like DAP to connect to a third-party server like Amazon SES to send out emails. Some hosts don’t even allow that to begin with (like BlueHost, for eg.)
- Turn on the logs by setting DAP > Setup > Config > Log Level to “Log All Activity”.
- Then go to System > Logs and clear the logs. Then go to one of your test accounts, and edit the user.
- On the “User Edit” page, click on “Resend Login/Password”.
- Check the email inbox to see if you got the email. If you didn’t, go to System > Logs and take the entire logs shown there, and paste it into a support ticket, and don’t forget to give us your WP login info and FTP info (and if possible, Amazon login info as well), and we’ll troubleshoot it.
3
AuthSMTP Integration
If you’re having email delivery issues on your host, you can connect DAP to 3rd-party email systems like Amazon SES and AuthSMTP.
In this article, you’ll see how to integrate DAP with AuthSMTP.
- Signup for an account at AuthSMTP
- Log in to your AuthSMTP account
- Go to Registered From Address tab
- Take the email id from DAP Admin > Setup > Config > From-Email Id and enter that email here and register it here (basically, you’re whitelisting your DAP Admin email id as a registered sender – if you don’t do this, AuthSMTP will reject and discard all emails sent via DAP). You will need to “Confirm” the registration by clicking on an activation link that they will be sending you.
- In your AuthSMTP account, go to SMTP Details tab.
- Make a note of the SMTP Server (usually mail.authsmtp.com), SMTP Username, SMTP Password.

- Now log in to DAP Admin, and go to Email > SMTP
- On this screen, use the section Add a New SMTP Server to create a new SMTP row as follows:
Description: AuthSMTP
Server: mail.authsmtp.com (or from Step 6 above)
Port: 2525 (must be exactly that)
SSL: N (must be exactly that)
User Id: Your AuthSMTP Username (from Step 6 above)
Password: Your AuthSMTP Password (from Step 6 above)
Email Sending Limit Per Hour: 500
(Max 500 if on shared server. Max 2000 if VPS or dedicated server)
Activated: Y - Click on the “Add” button to create and save the new AuthSMTP server setting.
- And now you should see two rows under Manage Existing SMTP Servers: One for “Local Web Host” and another for “AuthSMTP”.
- For the “Local Web Host” row, be sure to set “Active” to “N” – because now that you have set up AuthSMTP, you want all instant welcome emails, autoresponder and broadcast emails to be sent out through AuthSMTP, and not your web host’s email server.
That’s it!
DAP Upsells With ClickBank PitchPlus
DAP integrates with ClickBank “PitchPlus”, which is their 1-Click Upsell process.
So you can basically start by selling one front-end product, and then if your buyer purchases that product, you can then upsell them more products right after, and since they’ve already entered their payment information once, ClickBank remembers this information and allows them to purchase further products without having to re-enter all of the information again.
Setting Up DAP & CB PitchPlus Integration
The basic idea is the same for DAP/CB integration, whether it’s one product, or multiple Upsell products .
- You start with CB integration as specified in this document: Integration DAP With ClickBank . That’s how you set up the first product.
- Now, if you were selling just one product, then you would normally send them to a static “Thank You” page where you would tell them to check their email inbox for login details, and by that time CB would have already notified DAP via their “Instant Notification Service” (INS – kind of like Paypal’s IPN), and DAP would have already sent them the welcome email to the buyer’s email address, which contains their login and password to the member’s area.
- But in this case, you are going to offer them an upsell. So instead of sending them to a thank-you page after the first purchase, you basically send them to the sales page of your next upsell, that’s all.
You basically do a one-time set up of INS and the secret key as explained here.
Once that’s done, then for every Front-end product or Upsell-product, they are all integrated with DAP the same way: You just make sure the “Item Name” in CB and the “Product Name” in DAP both match, that’s it!
And for the last product in your upsell, be sure to point it to a static page containing a message like “Thank You, please check your email inbox for login details”.
And since CB notifies DAP separately for each product purchased, right then and there, if they end up buying 3 products during checkout (1 main + 2 upsells), then DAP will send the user 3 separate welcome emails. Of course, that’s optional – you don’t have to send out a welcome email for all products, but we highly recommend that you do.
Plus since they would be using the same email id for all 3 purchases, DAP will give them access to all purchased products under a single DAP account. So they need to log in to just one account to access content from all products that they just purchased.
OptimizePress Issues
1) OptimizePress 1.x CSS Issue
Problem
You try to visit a protected page that you’re not eligible to view, and see an ugly page full of un-formatted links
Solution
- Create a custom error page in WP – like http://YourSite.com/error/
- When creating the above page, select the OptimizePress template “DAP Error Page”
- In the body of that error page, enter something like this:
Sorry, you do not have access to this content.
If you are already a member, click here to login.
If you are not a member yet, then click here to get access. - In the above example, link the text “click here to login” to your stand-alone DAP login page (eg., http://YourSite.com/login/). And link the “get access” text to your sales page.
- Then take this error page’s URL – which is http://YourSite.com/error/ – and enter it into the “Error Page URL” field of all DAP Products.
- Also enter this same URL into DAP Admin > Setup > Config > “Error Page URL (Global)”.
Save, and that will no longer display the ugly error page going forward. Instead, it will redirect the user to the above custom error page.
2) OptimizePress 2.x Content Protection Issue
Problem
You try to visit a protected page that you’re not eligible to view, yet you are still able to see all of the content. Or the page appears messed up with missing menu items or formatting issues.
Solution
- Make sure “Sneak-Peek” is turned OFF – it won’t work with OptimizePress 1.x or 2.x.
- Follow all of the same steps from Problem 1 and create a custom error page.
5
Gmail Integration With DAP
WARNING: Gmail integration may not work for everyone. Many factors – including, but not limited to, your physical location, the location associated with your Gmail account, location of server, IP address, etc – appear to play a role in whether or not this will work for you with your Gmail account. So please note, that if it doesn’t work for you, then there isn’t anything the DAP team can do to overcome or “fix” that. It’s Google, after all. We don’t know what rules and monitoring they have in place for this. So, if Gmail integration doesn’t work for you, then you may want to consider Amazon SES integration, which has a 100% success rate with DAP users at this time.
To increase deliverability of your autoresponder, broadcast and instant emails (like “Welcome” email), you can make DAP completely by-pass your web host’s email server, and send emails out through third-party email servers, like Gmail or Amazon SES. This article is about setting up DAP to send out emails through Gmail’s email servers.
Sending Email Through Google’s Gmail Servers
Before you start sending out mass emails through Google’s Gmail Servers, please note this…
Sending out emails through Gmail instead of your web host, will surely boost your deliverability, no doubt. But remember that Gmail is NOT meant to use for mass emails. It is not really meant to be used as a list service. Plus they have a very strict restriction of 500 emails per 24-hour period.
You exceed that quota even by one, and they probably will temporarily disable your Gmail account for about 24 hours. Sending a large number of un-deliverable emails (resulting in bounces) could also get your entire Gmail account permanently suspended. And if you lose your Google username, it may (no confirmation available) affect your other Google accounts too – like AdWords or AdSense.
Anyway, DAP has a round-robin emailing system – so you could set up and use multiple Gmail accounts – each with its own 500 email limit per day – and combine them to send out a larger broadcast. However, remember – we’re talking about Google here – which means they can suspend/cancel/delete your account for any reason at all, even more so when you’re going against their TOS.
So use Gmail with caution, and only for smaller lists. If you want a larger sending email limit, check out the DAP integration with Amazon SES which allows you to send out tens of thousands of emails a day.
- Log in to your DAP Admin Panel, and go to DAP Admin > Email > SMTP.
- On this screen, use the section Add a New SMTP Serverto create a new SMTP row as follows:Description: Gmail (can be anything really)
Server: tls://smtp.gmail.com (must be exactly that)
Port: 465 (must be exactly that)
SSL: N (must be exactly that)
User Id: youremail@gmail.com (your gmail email id)
Password: yourpassword (your gmail password)
Email Sending Limit Per Hour: 500 (don’t go more – less is ok) - Click on the Add button to create and save the new Gmail SMTP server setting.
- Once it is saved, now you will see 2 rows on the screen: One for “Localhost”, and the other is the new “Gmail”.
- Towards the end of each row, you’ll see a setting called “Activated?”. Set it to “N” for Localhost and “Y” for Gmail.
- That will now make all of your outgoing emails (listed below) go out only through Gmail, totally bypassing your web host’s email server. Which means, your email deliverability will go up substantially.
- List of outgoing emails for which your Gmail account will be used, include:
– Real-time Welcome Emails
– Third-party Notification Emails (to Admin, other third-parties, Aweber, etc)
– All notification and transactional emails to DAP Admin – like payment receipt, new user signup, error notifications, user unsubscription notifications, etc
– All autoresponder and broadcast emails
– etc…
37
Amazon Simple Email Service (SES) Integration With DAP
DAP/Amazon SES Integration
You can hook up DAP to Amazon’s Simple Email Service (Amazon SES) and have all of your emails go through Amazon’s beefed up, high-performance, high-deliverability email servers.
The document below explains how to connect DAP to Amazon SES. (troubleshooting info for DAP/SES integration)
- Go to http://aws.amazon.com/ses/ and sign up for Amazon SES. You must already have an Amazon account and you can add SES to that same account.
- Then go to https://console.aws.amazon.com/console/home , log in if required, and click on the SES link there.
- That will bring you to the SES “Dashboard”.

- When you first sign up for SES, you will be assigned a “Sandbox” account. Which means that you will only be able to send emails TO and FROM verified email addresses (a verified email address is something you add yourself to your SES account and then click on a confirmation link that Amazon sends you, to prove that you are the owner of that email id). Also, Sandbox access allows you to send out a maximum of just 25 emails per day, both FROM and TO verified email id’s only.
- So the first step is to add a Verified Sender. So click on the “Verified Senders” link in the menu on the left.

- That will bring you to this page. Click on the Verify a New Email Address link with the green check-mark next to it.

- In the popup, enter the email id that you wish to use as your FROM email id to send out emails. Please note that you can ONLY use verified email id’s to send out emails from your Amazon SES account. So whatever email id you wish to use in DAP Admin as the sender for outgoing emails (see DAP Admin > Setup > Config > From-Email Id : For all outgoing DAP emails), that’s the email id you should verify.IMPORTANT: The email address is case sensitive. So if you white-listed You@YourSite.com at Amazon SES, then you must enter the email address with the exact same cAsE within DAP Config too (You@YourSite.com is NOT the same as you@yoursite.com for the purposes of Amazon SES. Crazy, we know! But that’s how it is.)

- You will then receive an email from Amazon at that email id which has a confirmation link. Once you click on that link, your email id in your Amazon SES account is now “Verified” (also known as whitelisted). Please note that at this time, you still have Sandbox access. Which means you can send email both FROM and TO the same verified email id. Not very useful, but that’s ok. Now time to go back to the SES Dashboard and Request Production Access.
- Click on Request Production Access and you will be taken to a form that you need to fill out and submit. Amazon then reviews it, and it can take up to 48 hours for your account to be granted Production Access – which basically means, you can now use SES and start sending out real emails, and your per-day limit is now 10,000 emails per day.
- Now, you need to get a SMTP Username and SMTP password for sending out emails. This username & password is NOT the same as your Amazon account email and password. Neither does it have anything to do with your Amazon Public or Secret keys. This is a completely different (and new) username and password used JUST for sending emails, and it needs to be generated newly.
- To generate a new set of SMTP Username and Password, click on the SMTP Settings link in the menu. And then on the next page, click on Create My SMTP Credentials.

- In the resulting popup, click on Create.

- That will create your SMTP credentials. But to see it, you have to click on Show User SMTP Security Credentials

- Once you click on Show User SMTP Security Credentials, you will be shown your SMTP Username and Password.

- Be sure to note down the username and password in a safe place where you can get to it again, because Amazon will not show this same set of username and password ever again. If you lose them, of course, you can always generate a new set of username/password again for free, but you’ll never get the same pair again – it will be a fresh pair.
- Go to the SMTP Settings link in the menu and note down the Server Name.
It will be one of the following:
email-smtp.us-east-1.amazonaws.com (as in the image below)
email-smtp.us-west-1.amazonaws.com
email-smtp.eu-west-1.amazonaws.com (European Union users)
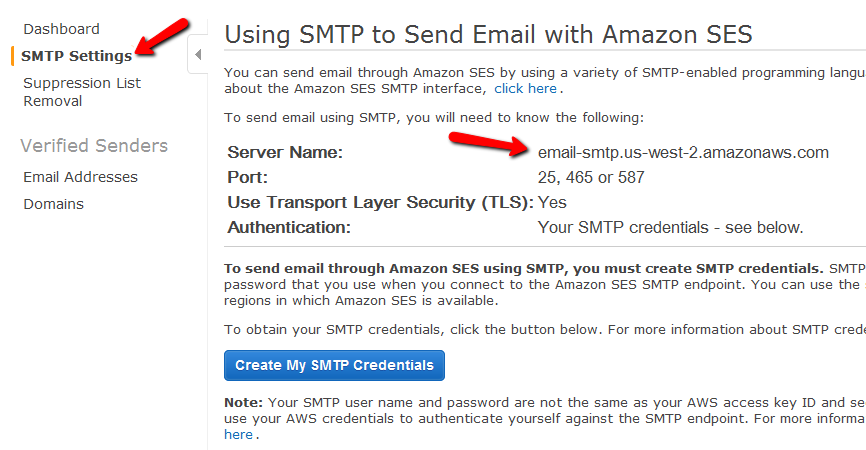 You need to determine what your host name is, and then add the text “ssl://” to it at the front.
So if the server name displayed in your Amazon SES account is this…
email-smtp.us-east-1.amazonaws.com…then the text you would enter into the DAP Email > SMTP page is this…
ssl://email-smtp.us-east-1.amazonaws.com - Now log in to your DAP Admin Panel, and go to DAP Admin > Email > SMTP.
- On this screen, use the section Add a New SMTP Server to create a new SMTP row as follows:

(Click on image above to see full-size screenshot)
Description: Amazon SES
Server: <what you noted down above>
Port: 465 (must be exactly that – ignore port numbers recommended by Amazon SES)
SSL: N (must be exactly that)
User Id: Amazon SMTP Username (that you generated and noted down in Step 15 above)
Password: Amazon SMTP Password (that you generated and noted down in Step 15 above)
Email Sending Limit Per Hour: 500 (ideal number – don’t go more – less is ok)Click on the “Add” button to create and save the new Amazon SES SMTP server setting in DAP. - Once it is saved, now you will see 2 rows on the “Email > SMTP” screen. One is for the server “Localhost”, and the other is the new “Amazon SES”.
- Towards the end of each row, you’ll see a setting called “Activated?”. Set it to “N” for Localhost and “Y” for Amazon SES.
- That will now make all of your outgoing emails (listed below) go out only through Amazon SES, totally bypassing your web host’s email server. Which means, your email deliverability will go up substantially.
- List of outgoing emails include:
– Real-time Welcome Emails
– All transactional emails to DAP Admin – like payment receipt, new user signup, error notifications, user unsubscription notifications, etc
– All autoresponder and broadcast emails
– etc…

Watch this video for details:
1
Leveraging Multiple Affiliate Networks
DAP is so powerful and flexible, that you can sell access to your membership through different payment processors, all at the same time.
And we often get asked how to leverage different affiliate networks like ClickBank and JVZoo and Warrior Plus at the same time while making sure no affiliate commissions are lost, and every affiliate gets credited their commissions for sending potential buyers to your site.
The Big Picture
1) If buyer arrives ONLY through DAP affiliate link, and ends up purchasing through ANY payment processor, then DAP affiliate will get credit.
2) If buyer arrives ONLY through CB affiliate link, and ends up purchasing through CB payment processor, but the buyer has a different DAP affiliate’s cookie from a link he clicked on at some point before (but did not purchase at that time, say), then both CB affiliate and DAP affiliate will get credit (double commissions on same purchase, but to two different affiliates).
If there’s no DAP cookie on his computer, then only CB affiliate will get the commission.
If the DAP affiliate “chains” two of his own affiliate links – his DAP affiliate link and CB affiliate link – like shown below, then same affiliate will get both CB commission as well as DAP commission. Again, double commissions but to same person.
http://YourSite.com/dap/a/?a=1234&p=http://hop.clickbank.net…./
3) If buyer arrives ONLY through JVZOO affiliate link, and ends up purchasing through JVZOO payment processor, but the buyer has a different DAP affiliate’s cookie from a link he clicked on at some point before (but did not purchase at that time, say), then both JVZOO affiliate and DAP affiliate will get credit (double commissions on same purchase, but to two different affiliates).
If there’s no DAP cookie on his computer, then only JVZOO affiliate will get the commission.
If the DAP affiliate “chains” two of his own affiliate links – his DAP affiliate link and JVZOO affiliate link – like shown below, then same affiliate will get both JVZOO commission as well as DAP commission. Again, double commissions but to same person.
http://YourSite.com/dap/a/?a=1234&p=http://jvzoo.com/c/1944/17
The Right Setup For Multiple Affiliate Networks
To make sure that you’re not paying double-commissions on purchases, and also to make sure that sales don’t get lost between affiliate networks (and your affiliates losing their commissions in the process), you have to set things up the right way.
The main thing to do, is to create a separate set of the following for each affiliate network:
- A separate DAP product
- A separate Sales Page
- A network-specific buy button on that sales page
- If it’s a product that is sold through CB or JVZoo or DigiResults (or any of the affiliate networks), then DO NOT set up commissions for that Product in DAP. So that will prevent you paying a commission to, say, a CB affiliate as well as a DAP affiliate for the same purchase.
So the net effect of this, is…
If a CB affiliate sends traffic to a page, that page must have a CB buy link ONLY on that page. If you have, say, a JVZoo button on that same page, and the buyer buys through the JVZoo link, then the CB affiliate will get no commissions for that purchase. Which means, they will stop promoting your product because you’re basically funnelling off their visitors to a different affiliate network.
Similarly, the landing page for JVZoo affiliates must have only JVZoo buy buttons.
Landing page for a regular payment processor – like Paypal or Authorize.net – should have only a Paypal and/or Authorize.net buy button (and no CB or JVZoo buy buttons). In this case, for these products in DAP, you should set up an affiliate commission row on the “Affiliates > Manage” screen, so that your DAP affiliates can get credited for sales made through your regular web site.