Bounces and Invalid Emails
There are many reasons why an email is not delivered to the recipient.
- Auto-responses and Vacation Replies
- Email delivered to “Junk” or “Spam” folder of recipient
- General undeliverable emails with no error specified by recipient’s server
- Recipient email server is down or unreachable
- “Connection timed out”
- Recipient mail box full
- Recipient email address not found
- Temporary non-delivery (server will keep trying for a few more days)
- Your server IP is blocked by recipient’s ISP (“Relaying Denied”)
- Your server IP is blacklisted for suspected spam
And the list goes on!
That should give you an idea why email delivery is so tricky and complicated, which is what created a niche for the email delivery industry, and which is why companies like Aweber, MailChimp and GetResponse even came into existence and have thrived while charging a hefty fee for what you would think is the simple act of delivering email over the interwebs.
When you use DAP for sending out emails (whether autoresponder or broadcast emails), the “From Name” and “From Email” you set up in the DAP Config are used to send out the emails.
If you use your own web host as the “carrier”, then your web host’s email server is the one that carries the email and tries to deliver to the inbox of the recipient. And web hosts are generally not very good at the intricate science of email delivery, which is why if you’re going to use DAP, we recommend that you bypass your web host and have a third-party email system like Amazon SES deliver your emails.
Regardless of the carrier (web host, Amazon SES, AuthSMTP.com, etc), all bounced and undeliverable emails come back to the “From Email” that you have used under DAP Config.
DAP by itself does not do anything with those emails, as those emails don’t come back to DAP, but they go straight to the inbox of whatever “From Email” you have specified.
We will surely address this in the future. But for now, you will have to manually review those email bounces, see which one of them sound more serious (like, say, recipient email id not found, or domain no longer in use, etc), and then de-activate those email id’s from your DAP database.
When you use Amazon SES, Amazon by itself also monitors email id’s that have a consistent history of bouncing back, and will automatically suppress those email id’s and won’t even deliver email to those email id’s even if DAP did send the actual email to those id’s.
DAP to 1ShoppingCart List Integration
Q: How to automatically add a new user in DAP to a 1SiteAutomation.com (1SA) list (or other 1Shoppingcart – 1SC – private label)?
A: Every list in 1SA/1SC gets a unique email id – like 1sc-12345@autocontactor.com ).
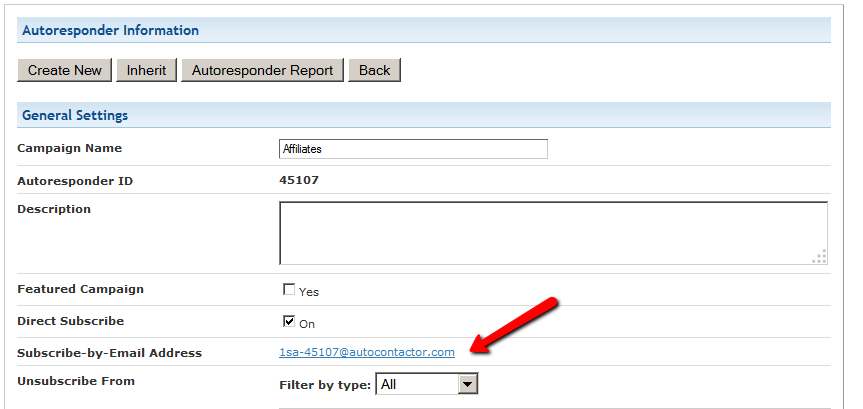
Add that to the “3rd-Party Notification Email Ids” field of the DAP product (under Products > Manage > “Notifications” tab)
And make sure you set the “Direct Subscribe” field in your 1SA/1SC list to be “On”.
Troubleshooting Amazon SES Integration
DAP’s Amazon SES integration has been heavily tested, and we use it ourselves at DigitalAccessPass.com . So you can rest assured that there are no “bugs” of any kind.
Here are some troubleshooting steps if SES integration is not working even after you’ve followed the documentation exactly.
Troubleshooting SES
- MOST COMMON MISTAKE: Have you whitelisted the DAP “From” email in Amazon? And have you used exact same “case” for the email id in both places (DAP and Amazon)? Double-check spelling and case in both DAP and Amazon – they must be EXACTLY the same. For eg., you@yoursite.com is NOT the same as You@YourSite.com as far as Amazon is concerned. So if you’ve set the “From Email” in DAP to be you@yoursite.com, then you must whitelist exactly the same email id you@yoursite.com within your Amazon SES account as well. If you are not sure, delete the whitelisted email in your SES account, then COPY the from-email from DAP config (be sure to copy, and not re-type) and then PASTE the exact from-email into your Amazon SES account and whitelist it again.
- IMPORTANT: Have you requested Amazon for “Production Access” to your SES account? Being in “Sandbox” mode has its disadvantages (you can only send “from” and “to” whitelisted” emails ONLY). So your account MUST, MUST, MUST be in “Production” mode before Amazon SES lets you send emails to your customers.
- Are you using the exact ports as mentioned in our documentation? Ignore the port #s that Amazon recommends.
- IMPORTANT: Double-check with your web host to make sure that they actually allow a plugin like DAP to connect to a third-party server like Amazon SES to send out emails. Some hosts don’t even allow that to begin with (like BlueHost, for eg.)
- Turn on the logs by setting DAP > Setup > Config > Log Level to “Log All Activity”.
- Then go to System > Logs and clear the logs. Then go to one of your test accounts, and edit the user.
- On the “User Edit” page, click on “Resend Login/Password”.
- Check the email inbox to see if you got the email. If you didn’t, go to System > Logs and take the entire logs shown there, and paste it into a support ticket, and don’t forget to give us your WP login info and FTP info (and if possible, Amazon login info as well), and we’ll troubleshoot it.
5
Gmail Integration With DAP
WARNING: Gmail integration may not work for everyone. Many factors – including, but not limited to, your physical location, the location associated with your Gmail account, location of server, IP address, etc – appear to play a role in whether or not this will work for you with your Gmail account. So please note, that if it doesn’t work for you, then there isn’t anything the DAP team can do to overcome or “fix” that. It’s Google, after all. We don’t know what rules and monitoring they have in place for this. So, if Gmail integration doesn’t work for you, then you may want to consider Amazon SES integration, which has a 100% success rate with DAP users at this time.
To increase deliverability of your autoresponder, broadcast and instant emails (like “Welcome” email), you can make DAP completely by-pass your web host’s email server, and send emails out through third-party email servers, like Gmail or Amazon SES. This article is about setting up DAP to send out emails through Gmail’s email servers.
Sending Email Through Google’s Gmail Servers
Before you start sending out mass emails through Google’s Gmail Servers, please note this…
Sending out emails through Gmail instead of your web host, will surely boost your deliverability, no doubt. But remember that Gmail is NOT meant to use for mass emails. It is not really meant to be used as a list service. Plus they have a very strict restriction of 500 emails per 24-hour period.
You exceed that quota even by one, and they probably will temporarily disable your Gmail account for about 24 hours. Sending a large number of un-deliverable emails (resulting in bounces) could also get your entire Gmail account permanently suspended. And if you lose your Google username, it may (no confirmation available) affect your other Google accounts too – like AdWords or AdSense.
Anyway, DAP has a round-robin emailing system – so you could set up and use multiple Gmail accounts – each with its own 500 email limit per day – and combine them to send out a larger broadcast. However, remember – we’re talking about Google here – which means they can suspend/cancel/delete your account for any reason at all, even more so when you’re going against their TOS.
So use Gmail with caution, and only for smaller lists. If you want a larger sending email limit, check out the DAP integration with Amazon SES which allows you to send out tens of thousands of emails a day.
- Log in to your DAP Admin Panel, and go to DAP Admin > Email > SMTP.
- On this screen, use the section Add a New SMTP Serverto create a new SMTP row as follows:Description: Gmail (can be anything really)
Server: tls://smtp.gmail.com (must be exactly that)
Port: 465 (must be exactly that)
SSL: N (must be exactly that)
User Id: youremail@gmail.com (your gmail email id)
Password: yourpassword (your gmail password)
Email Sending Limit Per Hour: 500 (don’t go more – less is ok) - Click on the Add button to create and save the new Gmail SMTP server setting.
- Once it is saved, now you will see 2 rows on the screen: One for “Localhost”, and the other is the new “Gmail”.
- Towards the end of each row, you’ll see a setting called “Activated?”. Set it to “N” for Localhost and “Y” for Gmail.
- That will now make all of your outgoing emails (listed below) go out only through Gmail, totally bypassing your web host’s email server. Which means, your email deliverability will go up substantially.
- List of outgoing emails for which your Gmail account will be used, include:
– Real-time Welcome Emails
– Third-party Notification Emails (to Admin, other third-parties, Aweber, etc)
– All notification and transactional emails to DAP Admin – like payment receipt, new user signup, error notifications, user unsubscription notifications, etc
– All autoresponder and broadcast emails
– etc…
37
Amazon Simple Email Service (SES) Integration With DAP
DAP/Amazon SES Integration
You can hook up DAP to Amazon’s Simple Email Service (Amazon SES) and have all of your emails go through Amazon’s beefed up, high-performance, high-deliverability email servers.
The document below explains how to connect DAP to Amazon SES. (troubleshooting info for DAP/SES integration)
- Go to http://aws.amazon.com/ses/ and sign up for Amazon SES. You must already have an Amazon account and you can add SES to that same account.
- Then go to https://console.aws.amazon.com/console/home , log in if required, and click on the SES link there.
- That will bring you to the SES “Dashboard”.

- When you first sign up for SES, you will be assigned a “Sandbox” account. Which means that you will only be able to send emails TO and FROM verified email addresses (a verified email address is something you add yourself to your SES account and then click on a confirmation link that Amazon sends you, to prove that you are the owner of that email id). Also, Sandbox access allows you to send out a maximum of just 25 emails per day, both FROM and TO verified email id’s only.
- So the first step is to add a Verified Sender. So click on the “Verified Senders” link in the menu on the left.

- That will bring you to this page. Click on the Verify a New Email Address link with the green check-mark next to it.

- In the popup, enter the email id that you wish to use as your FROM email id to send out emails. Please note that you can ONLY use verified email id’s to send out emails from your Amazon SES account. So whatever email id you wish to use in DAP Admin as the sender for outgoing emails (see DAP Admin > Setup > Config > From-Email Id : For all outgoing DAP emails), that’s the email id you should verify.IMPORTANT: The email address is case sensitive. So if you white-listed You@YourSite.com at Amazon SES, then you must enter the email address with the exact same cAsE within DAP Config too (You@YourSite.com is NOT the same as you@yoursite.com for the purposes of Amazon SES. Crazy, we know! But that’s how it is.)

- You will then receive an email from Amazon at that email id which has a confirmation link. Once you click on that link, your email id in your Amazon SES account is now “Verified” (also known as whitelisted). Please note that at this time, you still have Sandbox access. Which means you can send email both FROM and TO the same verified email id. Not very useful, but that’s ok. Now time to go back to the SES Dashboard and Request Production Access.
- Click on Request Production Access and you will be taken to a form that you need to fill out and submit. Amazon then reviews it, and it can take up to 48 hours for your account to be granted Production Access – which basically means, you can now use SES and start sending out real emails, and your per-day limit is now 10,000 emails per day.
- Now, you need to get a SMTP Username and SMTP password for sending out emails. This username & password is NOT the same as your Amazon account email and password. Neither does it have anything to do with your Amazon Public or Secret keys. This is a completely different (and new) username and password used JUST for sending emails, and it needs to be generated newly.
- To generate a new set of SMTP Username and Password, click on the SMTP Settings link in the menu. And then on the next page, click on Create My SMTP Credentials.

- In the resulting popup, click on Create.

- That will create your SMTP credentials. But to see it, you have to click on Show User SMTP Security Credentials

- Once you click on Show User SMTP Security Credentials, you will be shown your SMTP Username and Password.

- Be sure to note down the username and password in a safe place where you can get to it again, because Amazon will not show this same set of username and password ever again. If you lose them, of course, you can always generate a new set of username/password again for free, but you’ll never get the same pair again – it will be a fresh pair.
- Go to the SMTP Settings link in the menu and note down the Server Name.
It will be one of the following:
email-smtp.us-east-1.amazonaws.com (as in the image below)
email-smtp.us-west-1.amazonaws.com
email-smtp.eu-west-1.amazonaws.com (European Union users)
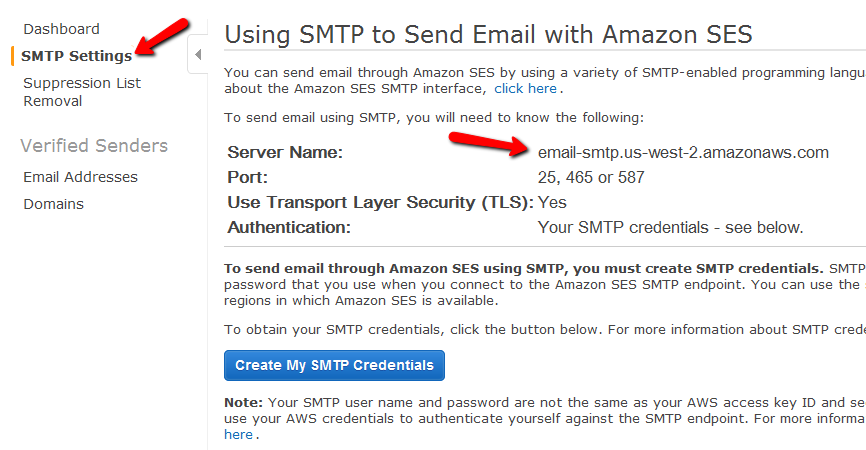 You need to determine what your host name is, and then add the text “ssl://” to it at the front.
So if the server name displayed in your Amazon SES account is this…
email-smtp.us-east-1.amazonaws.com…then the text you would enter into the DAP Email > SMTP page is this…
ssl://email-smtp.us-east-1.amazonaws.com - Now log in to your DAP Admin Panel, and go to DAP Admin > Email > SMTP.
- On this screen, use the section Add a New SMTP Server to create a new SMTP row as follows:

(Click on image above to see full-size screenshot)
Description: Amazon SES
Server: <what you noted down above>
Port: 465 (must be exactly that – ignore port numbers recommended by Amazon SES)
SSL: N (must be exactly that)
User Id: Amazon SMTP Username (that you generated and noted down in Step 15 above)
Password: Amazon SMTP Password (that you generated and noted down in Step 15 above)
Email Sending Limit Per Hour: 500 (ideal number – don’t go more – less is ok)Click on the “Add” button to create and save the new Amazon SES SMTP server setting in DAP. - Once it is saved, now you will see 2 rows on the “Email > SMTP” screen. One is for the server “Localhost”, and the other is the new “Amazon SES”.
- Towards the end of each row, you’ll see a setting called “Activated?”. Set it to “N” for Localhost and “Y” for Amazon SES.
- That will now make all of your outgoing emails (listed below) go out only through Amazon SES, totally bypassing your web host’s email server. Which means, your email deliverability will go up substantially.
- List of outgoing emails include:
– Real-time Welcome Emails
– All transactional emails to DAP Admin – like payment receipt, new user signup, error notifications, user unsubscription notifications, etc
– All autoresponder and broadcast emails
– etc…

Watch this video for details:
10
DAP Plugin Framework
How To Setup Notifications/Triggers From DAP to 3rd Party APIs
We have now created a plugin framework that will allow DAP to trigger calls to 3rd party services when a user is added to a product (subscription/registration event) or when a user loses access to product (unsubscribe/unregister event).
In fact, we used the same framework to develop DAP -> Mailchimp integration in DAP 4.1.
Here’s the steps :
1) If you want DAP to trigger calls to the APIs/methods you wrote upon an addUserToProduct event or removeUserFromProduct event in DAP, then in the DAP products page – > notify plugin field, use the following format to integrate the APIs/class files. You can integrate multiple systems with DAP using this framework.

Say you want to integrate classname1 (that has the necessary APIs to register/unregister users to 3rd party service like Mailchimp ) and classname 2 (that has the necessary APIs to register/unregister users to another 3rd party service like GetResponse), then use this format in the notify plugins field above.
classname1:VALUE 1 you want to pass to the api: VALUE 2 you want to pass to the api: VALUE 3 you want to pass to the api
If you want DAP to call multiple APIs/ Classes, then just create a comma seperated list of classes that DAP should notify.
classname1:VALUE 1 you want to pass to the api: VALUE 2 you want to pass to the api: VALUE 3 you want to pass to the api,
classname2:VALUE 1 you want to pass to the api: VALUE 2 you want to pass to the api,
classname3:VALUE 1 you want to pass to the api
Whatever values (VALUE1, VALUE2.. ) you put next to the class name (all values should be “:” separated), DAP will forward those params/values to your APIs when a user is added to product or user is removed from product.
To integrate say classname1 which consists of the methods/apis to talk to your 3rd party services, create a folder called classname1 under /dap/plugins folder. Then under the classname1 folder, create a php script called classname1.class.php (just the way you notice a folder called mailchimp and under mailchimp a class file called mailchimp.class.php).
So you will have something like this:
/dap/plugins/classname1/classname1.class.php
Here’s what you need to have in classname1.class.php ( skleton class implementation ) :
< ?php
class classname1 {
function classname1() // constructor
{ }
//======== USER REGISTRATION===========
// this function is called by dap when a user is added to a product
function register($userId, $productId, $params) {
logToFile(“classname1.class.php: register(): “, LOG_INFO_DAP);
$dapuser = Dap_User::loadUserById($userId);
$email = trim($dapuser->getEmail());
$username = trim($dapuser->getUser_name());
$firstname = trim($dapuser->getFirst_name());
$lastname = trim($dapuser->getLast_name());
$data = explode(“:”,$params);
}
function unregister($userId, $productId, $params)
{
logToFile(“classname1.class.php: register(): “, LOG_INFO_DAP);
$dapuser = Dap_User::loadUserById($userId);
$email = trim($dapuser->getEmail());
$data = explode(“:”,$params);
}
}
?>
NOTE:
You MUST have same name methods (called register() and unregister() ) and the exact method signature as you see above.
You can call other methods/functions from register/unregister and/or
You can call 3rd party APIs from register/unregister methods and/or
You can include other class files.
Whatever values you pass (VALUE1, VALUE2 etc) via notify plugin, you can access those values in these methods. The values are available in the $params array.
That’s it.
You can add a test user to a product in DAP (via dap admin -> add users) and see if things work as expected.
18
GetResponse Integration
DAP integrates with GetResponse very easily.
DAP to GetResponse Integration
If you are on DAP 4.1, then DAP can connect with getresponse using the APIs provided by getresponse.
So when someone buys or signs up for that Product, then DAP will automatically notify your GetResponse list, and add the buyer or subscriber (if it’s a free sign-up) to your GetResponse list.
So basically, user gets added to DAP first, and then DAP adds them to GetResponse.
If you want the other flow (subscriber gets added to GR first, and then GR adds them to DAP, then see this GetResponse-to-DAP flow)
1) Retrieve the getresponse API Key from this URL:
http://www.getresponse.com/my_api_key.html
2) Then go to DAP > Products > Manage, select the product, go to “Notifications” tab, then in the Plugin Notification upon User “Add” field, add the following:
getresponse:<API Key>:<campaign name>
For example:
getresponse:89kjhjgjfh1734dap:fbsecrets
That’s it.
Now go to DAP admin -> add users page and add a brand new user / email and see what happens.
The added user should first receive the confirmation email from GetResponse, and upon confirmation, the user should get added to GetResponse.
If it does not work, then…
- Set the dap log level to 5,
- Go to DAP > System > Logs.
- Empty logs, and rerun the test.
- Then send us the log text from DAP > Sytem > Logs.
31
Mailchimp Integration
Subscriber Flow
The flow of subscriber is “FROM DAP TO Mailchimp“. User signs up at DAP first, then DAP automatically adds the user to Mailchimp list.. Admin removes the user’s access to a product, and DAP automatically removes the user from Mailchimp list. This feature is available starting DAP v4.1.
How it works
[s3mv]mailchimp.mp4,640,378,false,false[/s3mv]1. Login to your account at http://admin.mailchimp.com/account/api/ and note down the API Key.
Image 1:

2. Go to http://admin.mailchimp.com/lists/ and grab your List’s Unique Id. Click the “settings” link for the list – the Unique Id is at the bottom of that page.
Image 2:

3. Log in to your DAP Admin Dashboard -> Products Page and select the product (whose members you wish to add automatically to your Mailchimp list.
4. If the list Id of the mailchimp list that you want to integrate with a DAP product/membership is say “ffffffffff”, and say your Mailchimp API Key is ‘ffffffffffffffffffffffffffffff-us2’ then add the following to the “Notify Plugin upon User -> Product Activation (Add)” in DAP products page and HIT Save/Update Product.
mailchimp:ffffffffffffffffffffffffffffff-us2:ffffffffff
Image 3:

That’s it!
Save the product and this completes the DAP->Mailchimp integration.
How This Works
So let’s say you picked the list “ffffffffff” in your Mailchimp account, and the DAP Product “Example Subscription Product” (as shown in the screenshots above).
So once you add “mailchimp:ffffffffffffffffffffffffffffff-us2:ffffffffff” to the product’s “Notify plugin upon user->product activation” and “Notify plugin upon user->product de-activation” field and save it, every time someone gets access to the “Example Subscription Product” product (regardless of whether they buy it, or you give them access on the backend), DAP will automatically add them to the list – ffffffffff. And everytime you remove the user’s access to product (click on ‘Remove’ in DAP manage users page), DAP will automatically remove the user from the list.
df11c84ab4
26
How To Use DAP’s Default Password
DAP has a feature where you can ask DAP to always generate a pre-determined, default password of your choice for all new members.
So all new users will be assigned the same default password, which of course, they can change as soon as (or any time after) they login.
This is especially useful if you want a third-party service like Aweber – instead of DAP – to send out the new member’s “Welcome Email” which contains their email and password.
Since DAP is unable to pass the randomly generated password to Aweber, instead, you can setup a default password by going to
Setup > Config > Default Password
This can be found under the Miscellaneous section on that page.
So if you set this password to say, changethis, then DAP will give out the same password to all new users.
Then, in the welcome email you configure at, say, Aweber, you would put the Aweber merge code for email id, and then enter this pre-selected password (because you already know what it is) into your Aweber email, like this:
Hello {!firstname},
Welcome to Example.com. You may log in to your member’s area at:
Email: {!email}
Password: changethisThank you,
– Admin from Example.com
And if you ever change the default password in DAP, don’t forget to also change it in your welcome email at Aweber (or 3rd party email service).
Also, don’t use the default password in any subsequent emails, other than the Welcome email (very first email sent to member through Aweber), because the member may have already changed their password by then.
WARNING: You must have also set up DAP/Aweber integration first before you attempt to do this.
19
Importing Users In Bulk Into DAP
DAP allows you to easily import users in bulk from an external system or database.
Importing users in bulk is the same as adding users one at a time using the single-user-add feature. So whichever way you manually add users, DAP is going to all of the following…
- Create a new account for them using the email with which they’re being added
- Auto-generate a random, unique password for them
- Give them access to the product (into which they’re being imported or being added to)
- Send out the Welcome Email as per the product’s settings (this welcome email can be configured to send them the email & password to the member’s area along with anything else you want)
- Add them to the autoresponder series configured for that product
- … and so on.
When you do a single-user-add, all of this is done for that user in real-time. When you do a bulk-add, then all of the above happens for each user being imported, one at a time, when the DAP hourly cron job runs at the top of every hour. That’s the main difference.
Simple Import
Prerequisites For Simple Import
1) You must have already created the DAP Product into which the users will be imported
2) The user list has to be in a CSV (comma separated) format (one user per line)
For doing a simple import of user data containing just email, first and/or last name, the format of data (per user, per line) should be like this:
Email,FirstName,LastName
Email and FirstName are mandatory. But LastName is optional. So your user data row could be just…
Email,FirstName
Example:
Joe@example.com,Joe,Customer
Jill@anothersite.com,Jill
Bob@another.com,Bob,Member
How to do the actual Import

- Go to Users > Add > “Bulk-Add Multiple Users To A Product”
- Paste your CSV list into the large text area
- Select the Product into which you want to import the users
- Check the “Mark Users as Paid” checkbox if you want them to have “Paid” access to the content (just as if they are actual paying members). If you don’t check it, they will all have access as a “Free” user (instead of a “Paid” user), which means they will only have access to content within the Product that you have marked as “Free”.
- Click on the “Bulk Add Users” button. That will first save this entire list as a CSV file in your /dap/bulk folder on your site. And then, the next time the Hourly cron (dap-cron.php) runs, it will add them one by one to the product, and send them emails as per your Product set up. So if your Product has the “Thankyou-Email” subject and body filled out, it will individually send out each of the users that thankyou email.
Extended Import
DAP will also allow bulk import of users with extended profile information. This includes their existing password and other profile data as detailed in this video (Bulk Add Users)
But please make sure you are using at least DAP v4.2.1 and LiveLinks v1.7, because what’s explained below is only available only since then.
Pre-requisites For Extended Import
1) You must have already created the Product into which the users will be imported
2) The user list has to be in a CSV (comma separated) format (one user per line), with the exact format being:
Email,Firstname,Lastname,Password,ProductName, Address,City,State,Zip,Country,Phone,Company, Flag (to indicate Paid or Free user), Access Start Date, Access End Date,UserName
Example:
joe@somesite.com,Joe,Member,test123,Example One-time Product,99 hill ave,Cityname,NY,10001,USA,,Plug and Play Inc,y,2011-03-16, 2012-03-15,JoeMember
The only required fields are Email, FirstName and ProductName. If you do not want to supply a value for any of the optional fields, but still wish to import certain others, then just leave those fields empty in the data row (but the commas should remain) as shown below.
Email,Firstname,,,ProductName,,,,,,,,Flag (to indicate Paid or Free user), Access Start Date, Access End Date,UserName
How to do the actual Import
Create a file with the name /dap/bulk/importusers.csv file so it has the users you want to import in the format specified above.
Run this script on your browser to complete the import, by visiting:
http://YourSite.com/dap/dap-bulkImport.php
Note:
* Replace “YourSite.com” with your actual domain name
* Limit the number of users you are importing with this method to not more than 500 users (rows) at a time. Otherwise the import may timeout, because the import occurs real time, because you’re running the script manually, and not via cron. If the user already exists in dap, then the script will just skip that user and move on to the next user in the bulk add list.