2
Custom Error Page-1
Problem
You try to visit a protected page that you’re not eligible to view, and don’t see the proper error message you are supposed to see.
Solution
- Create a custom error page in WP – like http://YourSite.com/error/
- In the body of that error page, enter something like this:
Sorry, you do not have access to this content.
If you are already a member, click here to login.
If you are not a member yet, then click here to get access. - In the above example, link the text “click here to login” to your DAP login page (eg., http://YourSite.com/login/). And link the “get access” text to your sales page.
- Then take this error page’s URL – which is http://YourSite.com/error/ – and enter it into the “Error Page URL” field of all DAP Products.
- Also enter this same URL into DAP Admin > Setup > Config > “Error Page URL (Global)”.
Save the changes.
Now, in a different browser, first visit your logout link – http://YourSite.com/dap/logout.php – so that the config changes can be reloaded. Now go back to that original protected page, and you should now be redirected to the above custom error page you created above.
5
Cache Plugin Setup
DAP works great with the WP Super Cache plugin. Probably works with others too – but we have officially tested it with just Super Cache at this time.
And this page below walks you through the full set up of the WP Super Cache plugin.
___________________________________________________________
Go to Settings > WP Super Cache
You are now on the “Easy” tab. Don’t do anything here just yet.
Go to Advanced tab.
Be sure to put a “Check” (or “Select” the radio button) next to each of the following items
Caching
Cache hits to this website for quick access. (Recommended)
Use mod_rewrite to serve cache files. (Recommended)
Miscellaneous
Compress pages so they’re served more quickly to visitors. (Recommended)
Don’t cache pages for known users. (Recommended)
Don’t cache pages with GET parameters. (?x=y at the end of a url)
Cache rebuild. Serve a supercache file to anonymous users while a new file is being generated. (Recommended)
Advanced
Clear all cache files when a post or page is published or updated.
Extra homepage checks. (Very occasionally stops homepage caching) (Recommended)
Only refresh current page when comments made.
List the newest cached pages on this page.
Click on Update Status button.
Keep scrolling down until you see the Accepted Filenames & Rejected URIs section.
You’ll see a big text area under the text “Add here strings (not a filename) that forces a page not to be cached”. +
There, add the following, one per line.
/dap/
/dap/.*\.php
/dap/admin/
/dap/admin/.*\.php
/login/
/members/
/my-profile/
/my-content/
Obviously, your member content page URL’s may be slightly different. So make sure you customize it to suit your own URL’s.
Next to back to Easy tab at the top.
Now you select the “Caching On” option and save.
That’s it for the setup.
Now, on to testing.
Content Organization Tips
If you organize all of your member content under a main parent page, say “members”, then all you need to exclude from caching, is /members/
For example, if your URLs include year and you don’t wish to cache last year posts, it’s enough to specify the year, i.e. /2004/. WP-Cache will search if that string is part of the URI and if so, it will not cache that page.
So basically, excluding just one single URL – /members/ – from caching, will make sure all of the following as well remain UN-CACHED.
/members/login/
/members/home/
/members/my-content/
/members/my-profile/
/members/my-affiliate-info/
/members/course-1/
/members/course-1/module-1/
/members/course-1/module2/
/members/course-2/module-1/
/members/course-2/module2/
You get the idea. When you exclude “/members/”, any URL that starts with that same text, will be excluded.
So here’s how you set up the “hierarchy” of the pages.
First, create the page “members“.
Then, when you create the “login” page, make sure you select the “parent” of the page, to be the “members” page.
So, instead of the login page URL looking like… http://YourSite.com/login/
… because the parent page is “members”, that also gets added to the URL, and the login page URL becomes like this:
http://YourSite.com/members/login/
If you created a page called “example” and made the “login” page as its parent, then the URL for this new page becomes:
http://YourSite.com/members/login/example/
So you see how that hierarchy works. Use that to arrange all of your member content under the main “ancestor”, which is “members”, here in our example.
But if you have already completed creation of all of your content, then you’re just going to have to do a little extra work to identify all of your pages and posts and exclude the member content from the list. DAP makes this a little bit easier as well.
Getting A Full List Of Pages & Posts
If you log in via FTP and go to the “dap” folder, inside, you will see a file called “dap_permalink_dump.php”. If you download that file to your desktop, and open it with any text editor (Notepad, Dreamweaver, etc), inside you will see a full list of URL’s of all posts and pages from your WordPress site. You can just take that list, remove separator text like “Posts” and “Pages”, and trim the list of URL’s down to just your member content, you can take that and paste it right into the WP Super Cache > Advanced tab > Accepted Filenames & Rejected URIs section.
Testing Caching Impact
Now open multiple browsers – like Firefox, Chrome and Internet Explorer (or Safari). Use at least 3 separate browsers.
Next, go to your login page in one of them, and then log in. Then go to same login page in another browser – make sure it doesn’t say “You are already logged in”. It should show you the DAP login form. Same on third browser.
Next go to the profile page while logged in as member. Do the same in other two browsers, while logging in as three different people. Each profile page should you show you different information.
If you crated 3 separate products, with 3 different users, then logging in as those 3 different users on the 3 different browsers, should show you 3 different sets of pages.
All this is just to make sure there’s no caching going on of your membership content, that’s all.
If all of this works, then you’re all set with caching for your non-membership content, and no caching for your dynamic member content.
2
Troubleshooting Hello World Post
Problem:
When you protect a page or post in DAP, and try to test whether the page or post is actually protected…
a) Instead of showing you a “Sorry…” message with the DAP padlock image, you instead see a “Hello World” post – or the content of some post completely irrelevant.
b) The formatting of the page appears messed up with missing menu items or post content.
Solution:
This has something to do with some special feature of either your theme or one of the plugins you are using, which is causing a conflict with the way DAP “replaces” protected content with an in-page error message that says “Sorry, you don’t have access to this content”.
The workaround for this is very simple.
- Create a new error page in WP – like http://YourSite.com/error/
- In the body of that error page, enter something like this:
Sorry, you do not have access to this content.
If you are already a member, click here to login.
If you are not a member yet, then click here to get access. - In the above example, link the text “click here to login” to your stand-alone DAP login page (eg., http://YourSite.com/login/). And link the text “click here to get access” text to your sales page, or wherever they can purchase your product.
- Then take this new page’s URL – which is http://YourSite.com/error/ – and enter it into the “Error Page URL” field of all DAP Products. And save all of the products as you make that change.
- Also enter this same URL into DAP Admin > Setup > Config > “Error Page URL (Global)”. Save changes to Config.
Now, in a new browser where you are not logged in as DAP admin or WordPress Admin, first visit the following logout URL:
http://YourSite.com/dap/logout.php
This is so that any cached URL’s will be flushed, and the DAP config will be reloaded.
Now, in that same browser window, go to any protected page, and you should now be automatically redirected to the above custom error page that you created above.
Troubleshooting Admin Home Page Reports
If you find something not right with the numbers on the admin home page reports, then it’s probably because…
1) You’ve not chosen a wide enough date range at the top of the page. So make sure you select a wider date range and click “Run All Reports” to load all reports on that page for the new date range
-OR-
2) You have manipulated some dates for one or more users, which is making the earnings report not match the member summary report. In that case, keep reading.
On the DAP Admin Home page, the Earnings Report by Product basically reports on all actual orders (payments received) based on transactions listed on the “Payment Processing > Orders” page.
However, the Member Summary report shows a summary of members based on start date, end date, and trans id (free/paid/actual number) of the users on the Users > Manage page.
So let’s a new member joined today.
Normally, on the Admin home page, if you chose the date range for all reports for just today’s date, then the order would show up under Earnings Report by Product for today’s date, and also shows as a new paid member under the Member Summary report.
However, if you went to the Users > Manage page, and manipulated the user’s start date to some date from last month, then the new order will still continue to show under Earnings Report by Product for today’s date, but now under Member Summary, number of new PAID members who joined today, would show as ZERO. That’s because you manipulated the dates such that DAP will now be reporting an extra member joining last month.
So if you truly want the data to match under both reports, then don’t manipulate the user’s data (so user paid today, but you moved his start date back by a few months just to test dripping or just to give him extra access).
Giving DAP Admin Access To All Products
By default, the DAP Admin User does not have access to all of the products you create.
This is a deliberate feature, because every time you protect content in DAP and try to visit it yourself while logged in as DAP admin and WP admin, we want you to see that the content is actually protected.
So, in order to be able to “see” the locked content yourself, you need to give yourself – the DAP Admin user – access to all of the DAP Products you create.
Identifying DAP Admin User
1) When you log in to DAP admin dashboard, click on the “Welcome <admin name>” link towards the top left corner of the DAP dashboard screen.
2) That will take you to the User > Edit page, where you can see the email id of the DAP Admin user. Copy the email id.
3) Go to Users > Manage page, and search for the email id.
4) Give yourself access to all of the products, one by one.
2
Redirect After Double-Optin Confirmation
If you are using double-optin for your DAP product, then you would normally have entered the text %%ACTIVATION_LINK%% in your email body, which is replaced by a unique confirmation link specific to that user.
Normally, when that activation link is clicked, the user is redirected to your login page configured under Setup > Config > Login URL.
But if you wanted them to be redirected elsewhere to a page of your choice, then in your double-optin email body, where you normally enter %%ACTIVATION_LINK%% , enter this instead:
%%ACTIVATION_LINK%%&redirect=http://link/to/landing/page/
Where “http://link/to/landing/page/” is the URL where you want them to be redirected to after they click on the double-optin activation link.
Disabling Login IP Security Check
DAP has a security check to prevent password sharing.
And starting DAP v4.4, you can turn this off at both a per-user level and also at a global site-wide leve.
Disabling IP Check For Individual Users
- Search for the user on the Users > Manage page
- Click on their email or user id, and you will now be taken to the “User Edit” page
- There, on their user profile, towards the bottom, set the field “Exclude from Login IP Check” to “Yes” and save.

This user will now be excluded from login IP check.
NOTE: If the user’s account is currently already locked, then you also need to unlock it this one time, but going forward, the account is now whitelisted, and will not get locked again.
Disabling IP Check For All Users (Site-wide)
If you wish to permanently disable this for all users in your membership site, then here’s how to do it:
- Go to DAP Admin > Setup > Config
- Set “IP Login Limit: Max. # of User Logins From Different IP’s” to a high number – like “100″.
- Set “Flush Login IP Records How Often? Every….. ?” to “Day” so that any accumulated IP records gets flushed every day.
That’s it!
2
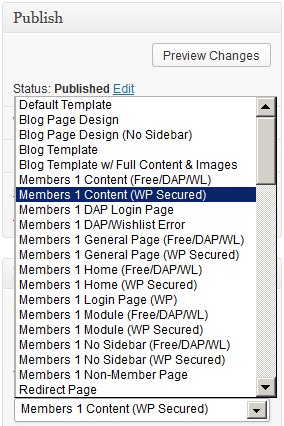
Troubleshooting OptimizePress Templates
If you’re using OptimizePress as your theme, make sure you’re only using membership templates that have the word “DAP..” in them.
DO NOT USE any template that has the words “WP” or “WP Secured“. That will cause members logging in via DAP, to not be able to access those pages.
Those templates are meant for OP’s own internal membership functionality, or built for other membership plugins. Those will not work with DAP.
Templates that are OK to use with DAP
- Members 1 Content (Free/DAP/WL)
- Members 1 DAP Login Page
- Members 1 DAP/Wishlist Error
- Members 1 General Page (Free/DAP/WL)
- Etc.. anything with the word “DAP” in it.
For the other squeeze page/sales page templates, it doesn’t matter which ones you pick.
This restriction applies only to the “Members…” templates.
Expiration Notifications / Renewal Reminders
We have a new feature starting DAP v4.4: “Reverse Dripping”
This is where you can drip emails “X” days (where “X” is a number of your choice) before the access to a product ends for a member. So this is what you would use to send expiration notification / renewal reminder emails to your members.
To setup a renewal reminder email, you would set up the email as usual, and drip it as a negative day. So if you set up the email to drip on Day “-1”, then it means the email will be sent out 1 day prior to product expiry (for that product).
If you set it up to drip on “-3”, it will be sent out 3 days prior to access end date.
If you set it up to drip on “-7”, it will be sent out 1 week prior to access end date.
Renewal Reminder Email Setup
Warning: This is something you should set up only for recurring products that require manual renewal. Do not set up these emails to go out for automated subscription products, because the members will be charged automatically on the designated day every month, and asking them to renew will only confuse them.
- Create a new Autoresponder email with the product expiration notice, at Email > Autoresponders. In this email, you would say something like “Hey, your subscription is expiring in 1 week, so click on this link to renew… (followed by link to renewal page)”.
- Create another email that says “Hey, your subscription is expiring tomorrow…”.
- Go to Products > Manage and choose product for which you wish to set up renewal reminder.
- Switch to “Autoresponder” tab.
- Select the 7-day renewal reminder email from step 1 and add it to the product.
- Then click on the “Edit” link and set the drip day as -7
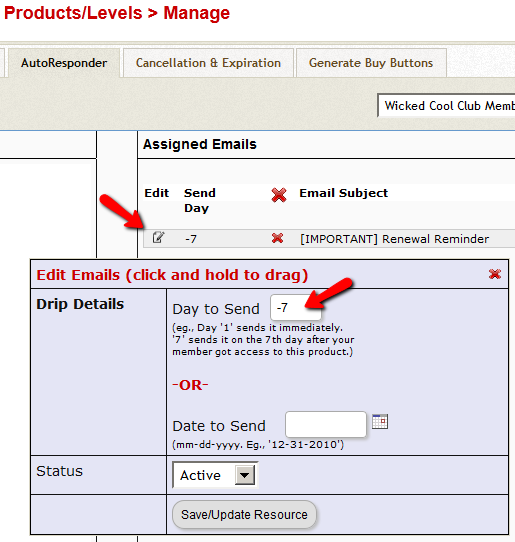
- Do the same for the 1-day reminder email as well, and this time set the dripping to be “-1”.
That’s it!
Log In As Member
Starting DAP v4.4, all passwords are encrypted. Previously, one of the main reasons that we had made it open, was because of many DAP admins asking for it to be that way so that they could log in “as” one fo their members to see what they’re seeing, for troubleshooting, etc.
But since the passwords are now encrypted, we have provided an alternate way for DAP admin to log in as a regular user/member.
Log In As Member (LIAM)
- If your primary browser is say Firefox where you’re normally logged in as WP admin and DAP admin, then open a separate browser window (like in Chrome or Safari)
- Go to http://YourSite.com/dap/loginAs.php
On that page, you will see 3 form fields as shown in the image below:

1) Email address of user/member that you wish to log in as
2) DAP Admin Email
3) DAP Admin Password
So once DAP verifies that it is indeed the DAP Admin trying to log in as someone else, DAP will log you into the site as that member whose email id you entered in (1) above.
NOTE: The Log In As Member (LIAM) feature does NOT mean that you can use just one browser to log in as both DAP Admin and regular member. You still need to use two separate browsers – one for DAP admin (like Chrome) another for regular member (Firefox). All LIAM does is to give you a workaround for logging in as someone else, because starting 4.4, the DAP Admin can no longer see what the member’s password is in order to log in as them.