DAP Admin Videos
1) DAP Admin Dashboard Tour
2) Managing Users
3) Email Autoresponders & Broadcasts
4) Affiliate Module
5) Payment Processing
2
Troubleshooting Hello World Post
Problem:
When you protect a page or post in DAP, and try to test whether the page or post is actually protected…
a) Instead of showing you a “Sorry…” message with the DAP padlock image, you instead see a “Hello World” post – or the content of some post completely irrelevant.
b) The formatting of the page appears messed up with missing menu items or post content.
Solution:
This has something to do with some special feature of either your theme or one of the plugins you are using, which is causing a conflict with the way DAP “replaces” protected content with an in-page error message that says “Sorry, you don’t have access to this content”.
The workaround for this is very simple.
- Create a new error page in WP – like http://YourSite.com/error/
- In the body of that error page, enter something like this:
Sorry, you do not have access to this content.
If you are already a member, click here to login.
If you are not a member yet, then click here to get access. - In the above example, link the text “click here to login” to your stand-alone DAP login page (eg., http://YourSite.com/login/). And link the text “click here to get access” text to your sales page, or wherever they can purchase your product.
- Then take this new page’s URL – which is http://YourSite.com/error/ – and enter it into the “Error Page URL” field of all DAP Products. And save all of the products as you make that change.
- Also enter this same URL into DAP Admin > Setup > Config > “Error Page URL (Global)”. Save changes to Config.
Now, in a new browser where you are not logged in as DAP admin or WordPress Admin, first visit the following logout URL:
http://YourSite.com/dap/logout.php
This is so that any cached URL’s will be flushed, and the DAP config will be reloaded.
Now, in that same browser window, go to any protected page, and you should now be automatically redirected to the above custom error page that you created above.
Troubleshooting Admin Home Page Reports
If you find something not right with the numbers on the admin home page reports, then it’s probably because…
1) You’ve not chosen a wide enough date range at the top of the page. So make sure you select a wider date range and click “Run All Reports” to load all reports on that page for the new date range
-OR-
2) You have manipulated some dates for one or more users, which is making the earnings report not match the member summary report. In that case, keep reading.
On the DAP Admin Home page, the Earnings Report by Product basically reports on all actual orders (payments received) based on transactions listed on the “Payment Processing > Orders” page.
However, the Member Summary report shows a summary of members based on start date, end date, and trans id (free/paid/actual number) of the users on the Users > Manage page.
So let’s a new member joined today.
Normally, on the Admin home page, if you chose the date range for all reports for just today’s date, then the order would show up under Earnings Report by Product for today’s date, and also shows as a new paid member under the Member Summary report.
However, if you went to the Users > Manage page, and manipulated the user’s start date to some date from last month, then the new order will still continue to show under Earnings Report by Product for today’s date, but now under Member Summary, number of new PAID members who joined today, would show as ZERO. That’s because you manipulated the dates such that DAP will now be reporting an extra member joining last month.
So if you truly want the data to match under both reports, then don’t manipulate the user’s data (so user paid today, but you moved his start date back by a few months just to test dripping or just to give him extra access).
Giving DAP Admin Access To All Products
By default, the DAP Admin User does not have access to all of the products you create.
This is a deliberate feature, because every time you protect content in DAP and try to visit it yourself while logged in as DAP admin and WP admin, we want you to see that the content is actually protected.
So, in order to be able to “see” the locked content yourself, you need to give yourself – the DAP Admin user – access to all of the DAP Products you create.
Identifying DAP Admin User
1) When you log in to DAP admin dashboard, click on the “Welcome <admin name>” link towards the top left corner of the DAP dashboard screen.
2) That will take you to the User > Edit page, where you can see the email id of the DAP Admin user. Copy the email id.
3) Go to Users > Manage page, and search for the email id.
4) Give yourself access to all of the products, one by one.
1
Automated Reminder Emails For Admin
In DAP, you can not only send automated pre-scheduled emails to your members (Autoresponders), but you can also set up similar pre-scheduled “Reminder” emails to be sent to you (the admin) every time a member reaches a day milestone.
Eg: Let’s say you (the admin) want DAP to send you or someone on your team a reminder email to follow up with each member by email once they reach day #7 – meaning, it’s been 7 days since they signed up for a specific product.
This is how you do it in DAP:
- Go to DAP Admin > Emails > Autoresponders
- Click on “Compose New Email“
- For subject, enter (say) “Follow Up with %%FIRST_NAME%%”
- In the body of that email, you may use merge-tags for the member – like “Be sure to email %%FIRST_NAME %%LAST_NAME%% , ask them about their progress, see how they’re doing and upsell Platinum Coaching program. Their email id is: %%EMAIL_ID%%”
- Further below on that page, in the “Send to 3rd Party (instead of member)” field, select “Yes (like admin or staff)” and you will see an additional text box show up below, where you can enter your (or your staff’s) email id where you want the reminder to be sent.
- Save the email.
- Go to the DAP Product where you want this email to be added to the sequence.
- Go to “ContentResponder” tab.
- Add this new email to the product, click on the “Edit” icon, and set it to be dripped on Day #7.
That’s it!
Now for each member that signs up for that product, regardless of when they join, every time they reach day #7, the reminder email will be sent to the 3rd party email id specified for that message (instead of being sent to member).
Reverse Dripping
If you want to be sent this same email say 3 days before member’s access expires to that Product, then set the email to be dripped on day “-3”. (See Expiration Notifications / Renewal Reminders)
Emailing Expired Users
You can send an email broadcast to expired users of a product/level, on the DAP Admin > Email > Broadcasts page, by selecting Group #4.
The same feature works for sending emails to those who have “Cancelled” their subscription or trial.
Go to DAP Admin > Email > Broadcasts
Select Group #4.
1st drop-down: Select Product Name
2nd drop-down: Select “Have Already Expired”
3rd text field: Enter within how many days the users should’ve expired – as in, expired in the “Last X Days”
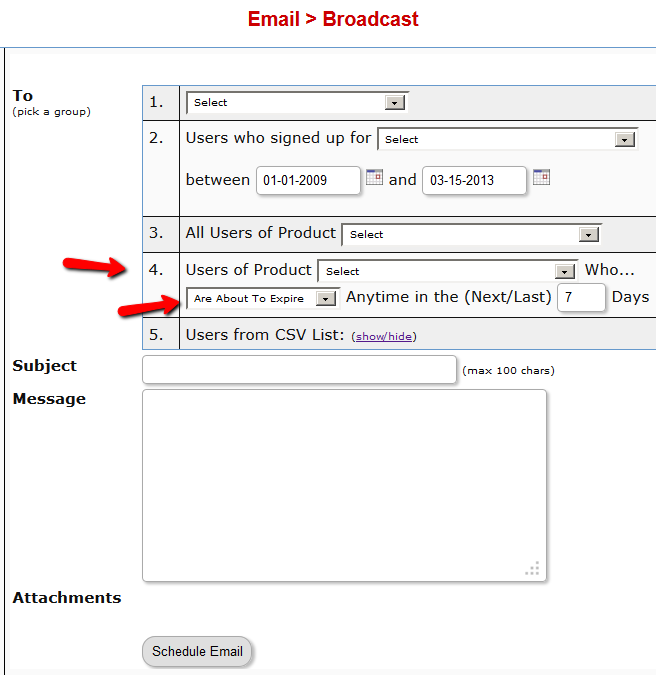
Once you’ve scheduled the broadcast, the emails will be sent out at the top of the hour when the DAP hourly cron runs.
2
Troubleshooting OptimizePress Templates
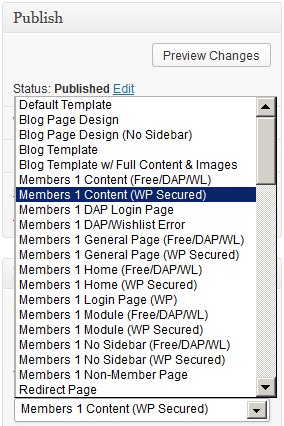
If you’re using OptimizePress as your theme, make sure you’re only using membership templates that have the word “DAP..” in them.
DO NOT USE any template that has the words “WP” or “WP Secured“. That will cause members logging in via DAP, to not be able to access those pages.
Those templates are meant for OP’s own internal membership functionality, or built for other membership plugins. Those will not work with DAP.
Templates that are OK to use with DAP
- Members 1 Content (Free/DAP/WL)
- Members 1 DAP Login Page
- Members 1 DAP/Wishlist Error
- Members 1 General Page (Free/DAP/WL)
- Etc.. anything with the word “DAP” in it.
For the other squeeze page/sales page templates, it doesn’t matter which ones you pick.
This restriction applies only to the “Members…” templates.
Log In As Member
Starting DAP v4.4, all passwords are encrypted. Previously, one of the main reasons that we had made it open, was because of many DAP admins asking for it to be that way so that they could log in “as” one fo their members to see what they’re seeing, for troubleshooting, etc.
But since the passwords are now encrypted, we have provided an alternate way for DAP admin to log in as a regular user/member.
Log In As Member (LIAM)
- If your primary browser is say Firefox where you’re normally logged in as WP admin and DAP admin, then open a separate browser window (like in Chrome or Safari)
- Go to http://YourSite.com/dap/loginAs.php
On that page, you will see 3 form fields as shown in the image below:

1) Email address of user/member that you wish to log in as
2) DAP Admin Email
3) DAP Admin Password
So once DAP verifies that it is indeed the DAP Admin trying to log in as someone else, DAP will log you into the site as that member whose email id you entered in (1) above.
NOTE: The Log In As Member (LIAM) feature does NOT mean that you can use just one browser to log in as both DAP Admin and regular member. You still need to use two separate browsers – one for DAP admin (like Chrome) another for regular member (Firefox). All LIAM does is to give you a workaround for logging in as someone else, because starting 4.4, the DAP Admin can no longer see what the member’s password is in order to log in as them.
1
Approving Users Before Access Is Enabled
Problem
“Will DAP allow me to manually approve members before their new accounts are activated? The process should be…
a) new user signs up, DAP prompts that the account is pending approval
b) Admin approves the account manually and email is sent to new member with their password and login details”
Solution
Yes, this can be achieved by enabling the “Double Optin” for a product.
So, normally, when a DAP Product is made “Double Optin” by entering the double-optin subject and email text on the “Email Notifications” tab of the product, and a user signs up for this product (whether as a free sign up or as a paid purchase or Admin-add), DAP will send them the content of this double-optin email first.
And usually, the body of this email would contain the %%ACTIVATION_LINK%% merge tag, which would become the confirmation link that the user has to click on first, before their product access status becomes “Active” (from “Inactive”). And as soon as the user clicks on the confirmation link, their product status becomes active, and then the “Welcome Email” is sent out right away, and now the user can log in and start accessing the content that is protected as part of that product.
Using Double-Optin To Force Approval
If you make the DAP product as double-optin, and remove the merge-tag %%ACTIVATION_LINK%% from the email body, what happens is that the user/member will get the email, but there’s really no activation link (confirmation link) in the email for them to self-activate their account. So the email would just say something like…
“Thank you for your purchase/signup. Your account needs to be activated by us. So appreciate your patience while we do so”.
Now, their account remains at “Inactive” status. And only you, the DAP Admin, can activate it.
By now, you would’ve gotten the admin notification email for this person’s signup. So you know their email id. If not, you can just go to DAP > Users > Manage and you’ll see all inactive users.
You would then click on “Modify” to activate product access. And if the user status is also “Inactive”, then you would edit the user info, and change their status to “Active” (from “Unconfirmed”).
And then make sure you’ve added an autoresponder email (that contains the user’s email and password – insert mergecodes %%EMAIL_ID%% and %%PASSWORD%% into the email) to go out on Day #2 for that product.
And assuming you will be approving this new user at some point within the first 2 days, the autoresponder email for day #2 will get triggered within the hour as soon as you activate their account, and the user will get their welcome email.
Or you can send them the password in the double-optin email itself, but tell them that they won’t be able to log in just yet until their account is activated. It’s all up to you – DAP is as flexible as you need it to be.
So that’s how you would use the Double-Optin feature to indirectly force an “Approval” process.
4
How To Test Member Access
We do NOT recommend testing what your regular member’s user-experience, while you are logged in as DAP/WP Admin.
Being logged in as DAP Admin and WP admin gives you certain privileges that your regular user/member won’t have. So you may see things that your members won’t be seeing. Or you may not see things that a regular user would normally see.
Either way, you may not be seeing what you’re supposed to see when you mix user testing with admin privileges.
So we recommend that you use two completely different browsers for testing: say, Chrome (or your primary browser) for WP & DAP Admin, and Firefox (or other) for logging in as regular user.
That way, you won’t have to keep logging in and out of DAP and or WP to test as both admin and user.
Keep them both separate.
If you are wondering how can the DAP Admin actually login as a member to see what they’re seeing – a critical feature during initial testing as well as troubleshooting a live site when a member says they’re having trouble accessing certain content, then continue reading.
You can use our “Login As Member” feature, where the DAP Admin would go to http://YourSite.com/dap/loginAs.php.
This page will present 3 form fields:
1) Email id of member you wish to log in as.
2) DAP Admin Email
3) DAP Admin Password
If you do not know what your DAP admin email / password is, you can click on your admin name in DAP Admin -> Users-> Manage page and update your admin password. The DAP Admin password is NOT the same as your WP admin password.
Once DAP verifies that it is indeed the DAP Admin trying to log in as someone else, DAP will log you into the site as that member whose email id you entered in (1) above.
NOTE: The Login As Member (LAM) feature does NOT mean that you can use just one browser to log in as both DAP Admin and regular member. You still need to use two separate browsers – one for DAP admin (like Chrome) another for regular member (Firefox). All LAM does is give you a workaround for logging in as someone else, because starting 4.4.x, the DAP Admin can no longer see what the member’s password is in order to log in as them.