12
Aweber To DAP Integration
Follow the documentation below on this page for Aweber-to-DAP integration, only if you’re using DAP 4.4 or later. (For DAP v4.3.1 or older, click here)
Subscriber Flow
The flow of subscriber in this model, is “FROM Aweber TO DAP“. User gets added to Aweber first, then arrives at DAP via Aweber “thank you page”, at which point she gets added to DAP.
Now, if the flow is from DAP-to-Aweber, and are using email parsing to integrate DAP and Aweber, then your Aweber list will always be double-opt-in (as per Aweber policy, nothing to do with DAP).
But if you want your Aweber list to be single-opt-in, or you want your sign ups to be added to Aweber first and then to DAP, then use this flow. HEre, you can use an Aweber signup form on your squeeze page (instead of the DAP sign-up form) and then have Aweber add users to DAP.
NOTE: You cannot use this flow for Paid members – because paid members will need to have paid first, which means DAP needs to process their payment first, and if successful, it can add them to Aweber. So for paid members and paid content, always use the other DAP-to-Aweber flow.
But for free signups (say, like when you’re trying to build a list), you can add them to Aweber first using the flow explained below, just so you can take advantage of making your Aweber list single-optin, and then have Aweber add the subscriber to DAP on the other end. So this way, DAP can then create a free account for them, email them their login/password, and give them access to the “Free” content (that is, content available only to “Registered” users, so to speak), etc.
So here are the steps…
Aweber To DAP Integration
1. Go to DAP Dashboard > Products > Manage page.
2. Note down the Product Id of the product to which you want to sign-up the users (after adding them Aweber first, of course). Let’s call this PRODUCTID

Aweber List Is Single-Optin
If your Aweber list is single-optin, then follow the steps below. If not, skip ahead to “Aweber List Is Double-Optin” flow further below.
(The old steps 3 & 4 no longer exist. To keep the image below in sync, follow the rest of the steps starting Step 5.)
5. Now login to your AWeber account.
5A) From the “Current List” drop-down, select the list that you wish to sign up users to.
5B) Click on “Web Forms” in the menu at the top.
5C) Edit existing form by clicking on the name of the list.

6. On the next page – the list form generator page – click on ‘Go to Step 2’ towards the bottom of the page.

7. On the next, page…
7A) Click on the thankyou page dropdown and select ‘Custom’.
7B) Set the thank you Page URL to http://YourSite.com/dap/signup_submit.php?productId=PRODUCTID
Replace YourSite.com with the name of your site.
Replace PRODUCTID with the Product Id of the product you noted in step 2.
So, if the Product Id of the product in DAP is 2, then the thankyou page URL will be…
http://YourSite.com/dap/signup_submit.php?productId=2
7C) Where it says “Pass Form Data”, check the check box so that Aweber can “Forward subscriber information to your thank you page” – which essentially is DAP, so that DAP can add the subscriber to your membership site.

That’s it!
Aweber List Is Double-Optin
In this flow, set up your Web Form as usual, with no DAP-specific settings required.
Only change required is in the Aweber list’s main “List Settings” page.
5. Now login to your AWeber account.
6. From the “Current List” drop-down, select the list that you wish to sign up users to.
7. Go to My Lists > List Settings

8. Go to “Confirmed Opt-In” tab

9. Scroll down to “3: Success Page“.
9A) Set the “Confirmation Success Page URL” to http://YourSite.com/dap/signup_submit.php?productId=PRODUCTID
Replace YourSite.com with the name of your site.
Replace PRODUCTID with the Product Id of the product you noted in step 2.
So, if the Product Id of the product in DAP is 2, then the thankyou page URL will be…
http://YourSite.com/dap/signup_submit.php?productId=2
9B) Check the check-box that says “Pass subscriber info for personalizing this page”. Ignore the comment that says “Not recommended for WordPress users”, because this is going to point to a DAP script, and not a WordPress page.
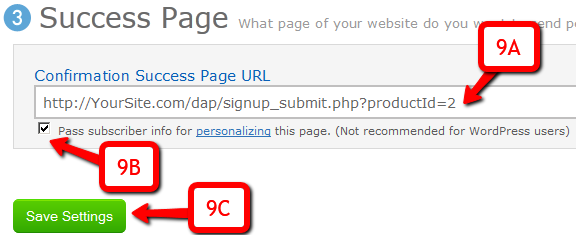
9C) Click on “Save Settings”.
That’s it!
Using Custom Redirect URL
If you want the user to be logged in automatically (either after single-optin or double-optin) and instead of being logged into the member’s area, you want the user to be redirect to your own custom URL, then your thank-you URL should be:
http://YourSite.com/dap/signup_submit.php?productId=PRODUCTID&redirect=http://yoursite.com/your-custom-thankyou-page
OR
http://YourSite.com/dap/signup_submit.php?productId=PRODUCTID&redirect=/your-custom-thankyou-page
Additional Notes
Now that you’ve set up DAP to integrate with your Aweber list (single- or double-optin), you may use the Aweber web form directly on your squeeze page for signing up subscribers
(instead of DAP’s “Direct Signup Form”).
Now, every time a subscriber signs up via the Aweber form, they will automatically be added to DAP.
If your list is single-optin, then the subscriber will be added to DAP instantly after sign-up.
If your list is double-optin, then the subscriber will be added to DAP only AFTER they’ve clicked on the Aweber double-optin confirmation link.
In both cases, if they’re a new user to DAP, they will be auto-logged in to the member’s area.
You may also configure the DAP Product’s “Welcome Email” to send out the DAP email and password via DAP itself.
-OR-
You can leave the Welcome Email in DAP Product page as blank. And then configure DAP to generate a default password (DAP Admin > Setup > Config > Default Password) as shown below, and then enter that same pre-chosen password in to your very first Aweber follow up email that goes out to your subscribers, so that they can receive their dap id/password details directly from your Aweber list.

For more details about this default password, please see this post.
PRODUCTID
26
How To Use DAP’s Default Password
DAP has a feature where you can ask DAP to always generate a pre-determined, default password of your choice for all new members.
So all new users will be assigned the same default password, which of course, they can change as soon as (or any time after) they login.
This is especially useful if you want a third-party service like Aweber – instead of DAP – to send out the new member’s “Welcome Email” which contains their email and password.
Since DAP is unable to pass the randomly generated password to Aweber, instead, you can setup a default password by going to
Setup > Config > Default Password
This can be found under the Miscellaneous section on that page.
So if you set this password to say, changethis, then DAP will give out the same password to all new users.
Then, in the welcome email you configure at, say, Aweber, you would put the Aweber merge code for email id, and then enter this pre-selected password (because you already know what it is) into your Aweber email, like this:
Hello {!firstname},
Welcome to Example.com. You may log in to your member’s area at:
Email: {!email}
Password: changethisThank you,
– Admin from Example.com
And if you ever change the default password in DAP, don’t forget to also change it in your welcome email at Aweber (or 3rd party email service).
Also, don’t use the default password in any subsequent emails, other than the Welcome email (very first email sent to member through Aweber), because the member may have already changed their password by then.
WARNING: You must have also set up DAP/Aweber integration first before you attempt to do this.
47
Aweber To DAP (<=4.3.1)
Follow this documentation page for Aweber-to-DAP integration only if you’re using DAP 4.3.1 or older.
(For DAP version 4.4 and newer, click here)
Subscriber Flow
The flow of subscriber in this model, is “FROM Aweber TO DAP“. User gets added to Aweber first, then arrives at DAP via Aweber “thank you page”, at which point she gets added to DAP.
Now, if the flow is from DAP-to-Aweber, and are using email parsing to integrate DAP and Aweber, then your Aweber list will always be double-opt-in (as per Aweber policy, nothing to do with DAP).
But if you want your Aweber list to be single-opt-in, then you can use an Aweber signup form on your squeeze page (instead of the DAP sign-up form) and then have Aweber add users to DAP.
Please note that you cannot use this flow for Paid members – because paid members will need to have paid first, which means DAP needs to process their payment first, and if successful, it can add them to Aweber. So for paid members and paid content, always use the other DAP-to-Aweber flow.
But for free signups (say, like when you’re trying to build a list), you can add them to Aweber first using the flow explained below, just so you can take advantage of making your Aweber list single-optin, and then have Aweber add the subscriber to DAP on the other end. So this way, DAP can then create a free account for them, email them their login/password, and give them access to the “Free” content (that is, content available only to “Registered” users, so to speak), etc.
So here are the steps…
Aweber To DAP Integration
1. Go to DAP Dashboard > Products > Manage page.
2. Note down the Product Id of the product to which you want to sign-up the users (after adding them Aweber first, of course)
3. There is a file called dap-aweber.php in the dap folder. Make a copy of that file and call it dap-aweber-PRODUCTID.php.
Replace with the text PRODUCTID with the actual Product Id you noted in the previous step.
So in the example above, Product Id is 2. So the name of the file copy should be dap-aweber-2.php.
4. Open this file (dap-aweber-2.php).
The first line of code in this file looks like this:
$default_product_id = 1; //Change this to any product id from DAP
Change the part shown in bold below:
$default_product_id = 2; //Change this to any product id from DAP
Upload this file back to /dap folder on your site.
Aweber List Is Single Optin
If your Aweber list is single-optin, then follow the steps below. If not, skip to “Aweber List Is Double-Optin” flow further below.
5. Now login to your AWeber account.
5A) From the “Current List” drop-down, select the list that you wish to sign up users to.
5B) Click on “Web Forms” in the menu at the top.
5C) Edit existing form by clicking on the name of the list.
6. On the next page – the list form generator page – click on ‘Go to Step 2’ towards the bottom of the page.
7. On the next, page….
7A) Click on the thankyou page dropdown and select ‘Custom’.
7B) Set the thank you Page URL to http://YourSite.com/dap/dap-aweber-PRODUCTID.php
Replace YourSite.com with the name of your site.
Replace PRODUCTID with the ProductId of the product you noted in step 2.
So, if the productId of the product in DAP is 2, then the thankyou page URL will be – http://yoursite.com/dap/dap-aweber-2.php
7C) Where it says “Pass Form Data”, check the check box so that Aweber can “Forward subscriber information to your thank you page” – which essentially is DAP, so that DAP can add the subscriber to your membership site.

That’s it!
Aweber List Is Double-Optin
In this flow, set up your Web Form as usual, with no DAP-specific settings required.
Only change required is in the Aweber list’s main “List Settings” page.
5. Now login to your AWeber account.
6. From the “Current List” drop-down, select the list that you wish to sign up users to.
7. Go to My Lists > List Settings
8. Go to “Confirmed Opt-In” tab
9. Scroll down to “3: Success Page“, and enter the URL of the special dap-aweber-2.php script (or whatever the file name is) you created back in Step #4 above.
Check the check-box that says “Pass subscriber info for personalizing this page”.
Ignore the comment that says “Not recommended for WordPress users”, because this is going to point to a DAP script, and not a WordPress page.

Click on “Save Settings”.
That’s it!
ADDITIONAL NOTES
Now that you’ve set up DAP to integrate with your Aweber list (single- or double-optin), you may use the Aweber web form directly on your squeeze page for signing up subscribers (instead of DAP’s “Direct Signup Form”).
Now, every time a subscriber signs up via the Aweber form, they will automatically be added to DAP.
If your list is single-optin, then the subscriber will be added to DAP instantly after sign-up.
If your list is double-optin, then the subscriber will be added to DAP only AFTER they’ve clicked on the Aweber double-optin confirmation link.
In both cases, they will be redirected to the DAP Login Form.
You may also configure the DAP Product’s “Welcome Email” to send out the DAP email and password via DAP itself.
-OR-
You can leave the Welcome Email in DAP Product page as blank. And then configure DAP to generate a default password (DAP Admin > Setup > Config > Default Password) as shown below, and then enter that same pre-chosen password in to your very first Aweber follow up email that goes out to your subscribers, so that they can receive their dap id/password details directly from your Aweber list.
For more details about this default password, please see this post.
NOTE: If you want to send the subscriber to a different page (instead of the DAP login page) upon sign-up, then do this:
- Open dap-aweber-2.php (or whatever the script name is)
- Look for this line :
$redirect = Dap_Config::get(“LOGIN_URL”); - Update it to point to any URL of your choice. For eg.,
$redirect = “http://yoursite.com/thankyou”;
This way you can redirect users after they complete the Aweber signup, to a landing page of your choice.
PRODUCTID
10
Troubleshooting Email Delivery
Sending Email Through Your Web Site: The Basics
DAP is not an email service (like, say, Aweber).
DAP is just a script – a tool – like Microsoft Outlook or Thunderbird – that simply sends out email using your web host’s email server.
It is your web host’s mail server that actually sends out the email to the recipient. So once DAP notifies your mail server about a email that is to be sent, it has absolutely no control over what happens next.
It’s like when you put an envelope with a letter (regular mail) into the mailbox (post box). It is up to the Postal Service to actually pick up your letter, and deliver to the destination address. Your web host is like the Postal Service. If it doesn’t pick up and deliver the (e)mail, then DAP doesn’t have any say in it.
So if the emails that DAP sends out are not getting delivered to your recipients (or landing in the spam/junk folder of the recipient), there could be more than one reason for that.
Improving Email Delivery
DAP uses your web host’s email servers to send out emails.
Here are some ways to improve email deliverability and also avoid your email landing in the recipient’s junk/spam folder.
- Check with your web host to make sure they have “Reverse DNS” setup and configured correctly for your domain. If not, then this is most likely the cause of emails not getting delivered.
- Do not use a Gmail or Yahoo or some other web based email as the “From” email id (under DAP Admin > Setup > Config).
- Instead, use a domain-based email id – like You@Yoursite.com or Support@Yoursite.com – as the “From” email id
If you are on a shared host, you may even consider totally by-passing sending emails through your web host, and instead use DAP’s “SMTP” feature to send emails out through an external email system – like Amazon’s SES (Simple Email Service) , Gmail or AuthSMTP.com.
Welcome Emails Not Going Out
If Admin notifications are going out ok, but the welcome email to the buyer/member is not being delivered, then see Troubleshooting Welcome-Email Delivery
Autoresponder Emails Not Going Out
If yours is a new site setup, then this is usually because the hourly cron-job has not been setup.
However, if the emails were going out fine previously, and suddenly stopped going out, then it usually is because…
- Something changed on your host that caused the cron to stop working.
- There is an error in the job queue, because of which DAP is unable to proceed with the remaining non-error emails. This could have happened if you tried to send out a broadcast to a CSV list, and there was an error in one of the emails from the CSV list.
- You’re trying to use a third party “SMTP” server to send out the emails, and your server is unable to connect to that server because the authentication settings you’ve configured on “Email > SMTP” are incorrect.
Steps to troubleshoot
- Make sure that the hourly cron (dap-cron.php) is still running – you need to look at your web hosting control panel for that.
- Go to “System > Job Queue” and scroll through any items there, and see if there are any scheduled messages there with the status “Error”. If yes, then click on the “Delete Jobs In Error” link. That will delete any jobs that can’t be processed because of an error in the email id or in the import process. Also be sure to click on “Delete Successful Jobs (till yesterday)” just to clear up old, sent emails.
- Also go to “System > Logs” and empty the logs.
- Go to “System > Config” and set “DAP Log Level” to “5”. That will start logging all the details you/we may need for troubleshooting.
- Wait for the top of the next hour and then re-visit the queue and see if emails are going out.
- If they still aren’t going out, go back to “System > Logs”, copy paste all text there, and open a new ticket with that info, of course, also giving us more details about the problem, what you have tried, etc, along with your login info for: FTP, WP Admin, DAP Admin, and Web Host Control Panel.
Server Blacklisting
If your inexpensive (read as cheap 🙂 shared web host is hosting a large number of sites on one server, and one of them knowingly sends out spam (or mistakenly gets flagged for spam), that will put the email deliverability of every web site on that server in jeopardy, because your site now shares the same IP address as that of an “alleged” spammer.
So your emails get sent to junk/spam folder by Gmail and Yahoo. Or worse, they just totally disappear into the ether.
Hourly Email-Sending Limits
Almost all shared hosts have hourly email sending limits. For example, DreamHost has an outgoing limit of 300 emails per hour. Which means, a total of only 300 emails can be sent out per hour through any web site hosted on DreamHost. All of the following count towards the 300 limit:
- Emails sent by any scripts on your site – like DAP
- Your WordPress blog notification emails
- Your WordPress admin emails,
- WP forgot password emails,
- WP comment notification emails,
- Forum notification emails,
- Forum emails sent to each other by your users,
- Forum-software Admin notification emails,
- Support software user and admin notification emails
- Tell-a-friend emails
- Viral-inviter type emails
- Emails sent through Outlook or Thunderbird where you have set the outgoing SMTP server to be your web site’s SMTP server
- Emails sent by others using the same SMTP server to send out emails- like your business partners, employees, etc
- DAP User welcome emails, Payment notification emails, Forgot password emails, Autoresponder emails, Broadcast emails, etc
So do you see how quickly you can go over that hourly limit of 300 emails per hour?
But here comes the worst part…
Once you go over that limit, any emails that are actually sent by you or the scripts running on your site, will not actually result in any kind of error. The mail server will respond by saying that the email(s) has been sent successfully, but in reality, on the backend, it quietly “snuffs out” the email. Which means, it doesn’t go anywhere – just gets sent to a “blackhole”. So you keep thinking that you sent out the email. DAP keeps thinking it has sent out the email. But in reality, the emails never actually get sent.
This is the same as you actually putting your letter into the mailbox at the Post Office. But then, imagine this: The postal worker who comes to pick up your mail, quietly goes to the back of the post office and dumps it all into one giant trash can, and destroys all of the mail. So you’re thinking you actually mailed out that important check to pay your utility bill. But the utility company never gets your check, and they slam you with a late fee.
Possible Solutions
1) BEST OPTION: DAP + 3rd party SMTP service provider like Amazon SES, AuthSMTP.com or SMTP.com. (much less expensive than Aweber, and very reliable too)
2) DAP + Aweber (more expensive, very reliable)
3) DAP + Good web host (cheapest option, but can lead to mixed results – depends on your host).
You could always use DAP and external SMTP service provider like Amazon SES, AuthSMTP.com or SMTP.com to send out bulk mail through DAP while totally bypassing your web host’s email system. This is probably the first best option where DAP controls the composition and sending of the email, the 3rd party service controls the deliverability.
Next best option is using a service like Aweber or GetResponse.
And if you can’t afford even that, then simply use DAP on a good web host. We ourselves use just DAP and LiquidWeb’s email servers to send out emails to all of our users.
And DAP also has built-in job queues to schedule outgoing emails while also making sure that you don’t exceed your web host’s hourly email sending limits (dreamhost’s limit is 300 emails/hour, I think). We use multiple SMTP servers from our own other web sites, all combined to be able to send a few thousand emails per hour.
But even with a lot of planning, it is easy to go over the hourly limit.
So the next time you see in your Job Queue that emails were sent out successfully, but the recipient never received it, here are some things to check:
1) It landed in your recipient’s junk/spam folder. Ask them to whitelist or add your email address to their contacts list.
2) You have overshot the limit, so you would have to actually send out the email again.
3) Try to send out broadcasts during a low-traffic time – say like later in the night – when you’re not actively sending out emails, and using up precious email counts from that hourly quota.
http://DigitalAccessPass.com/documentation/?page=/doc/troubleshooting-email-delivery/
22
DAP vs Aweber
(Or… “DAP vs MailChimp”, “DAP vs. GetResponse”, “Amazon vs Web Host”, …. “DAP vs 3rd-Party-List-Service”)
Quick Summary: Here’s what we recommend, in the order listed below:
1) DAP + Amazon SES: Best option – this is what we use ourselves here at DigitalAccessPass.com and WickedCoolPlugins.com.
2) DAP + ActiveCampaign: If you must sign up for a third-party service for their advance analytics, we highly recommend ActiveCampaign, which is a very robust and popular email service, which we recommend over even, say, Aweber. This #2 option is great if you want advanced email analytics – like click-thru rates or open-rates – that DAP itself doesn’t offer yet. You will still be able to add the subscriber/buyer to both DAP and ActiveCampaign, for eg., and you will have the choice of sending out the emails from either system. This offers more flexibility, but comes at a cost of the services like ActiveCampaign or Aweber.
3) DAP + Your Web Host: Very usable and workable option as long as you are hosting with a decent web host.
Now, for some background information…
We often get asked why use Aweber (or other third-party list service) when DAP itself has a built-in Autoresponder system as well as an Email Broadcast system. So here’s a brief overview of when and why it makes sense to use DAP – or ActiveCampaign/Aweber/MailChimp/GetResponse, etc.
Why DAP Rocks
DAP integrates with Amazon SES (Simple Email Service), which allows you to send out tens of thousands of emails a day using DAP. Which means that it will only cost you pennies to send out a large volume of email via DAP (just $0.10 per 1,000 emails). So imagine the power of DAP and the deliverability of Amazon in one sweet, integrated system!
Until quite recently, it used to be that the biggest advantage of using a third-party service like Aweber was their email delivery rate. But with the onslaught of high-powered, high-deliverability but-still-inexpensive services like Amazon SES, the advantage now shifts more towards DAP.
Also, when you use a third-party service, like Aweber, and you send out an email and a number of people mark it as spam (incorrectly or not), your account could get shutdown without notice, and you would lose your entire list (unless of course, you have been maniacally exporting the data every few days and storing it on your computer in the form of a CSV file, the chances of which are highly unlikely).
But when you use DAP with say, Amazon SES, your “list” is still stored within the DAP database on your web site. So you always own the list, and the data is always going to be there on your web site, even if you stopped using DAP. And if the same spam issue happens with SES, then Amazon will probably shut down your SES account too – but in this case, that’s not a bank-breaker, because you can sign up with a different email provider, like AuthSMTP.com, or SMTP.com, or Mandrill, integrate DAP with this new email service, and resume your emails like nothing ever happened. Obviously, we’re not telling you this as a way to spam people. The point is that nowadays, people who don’t want your messages any more, instead of unsubscribing, will sometimes mark your email as spam. And when stuff hits the fan, that’s when it’s nice to have some options (like DAP + SES), instead of losing your entire list.
But first, some basics…
DAP is not an email service like Aweber or ActiveCampaign.
DAP is just a tool – like Outlook or Thunderbird – that simply sends out email using your web host’s email server, but in an automated fashion, of course.
If your inexpensive shared web host is hosting a large number of sites on one server, and one of them sends out spam (or mistakenly gets flagged for spam), that will put the email deliverability of every web site on that server, in jeopardy, because your site now shares the same IP address as that of an “alleged” spammer. So your emails could get sent to junk/spam folder by Gmail and Yahoo. Or worse, they just totally disappear into the ether. Some customers won’t get your emails. This won’t happen with Aweber (for the most part).
Aweber (and other premier email service providers) have staff on hand just for this purpose. Their core business is about email deliverability. They spend a lot of time, money and resources dealing with regular ISP’s (like AOL and SBC) to make sure their lists – and their reputation – remain clean. Which is also probably why they shut down large lists without much of a warning to you, and do other similar crazy stuff.
I guess it works for them – and the other Aweber users, because when you send out an email through your Aweber list, it almost always gets there in your recipient’s inbox. Which is very cool. And which is why they also charge so much for their service.
And that’s where DAP comes in.
You can use DAP’s built-in email autoresponder and broadcast system, and send out emails through your web host. But that normally means that the deliverability of those emails is only as good as your web host’s deliverability. And if you’re not on a Virtual Private Server (VPS) or a Dedicated server, then relying on your cheap, shared web host to safely deliver your email to your members is totally unrealistic and naive – just ain’t gonna happen.
And that’s where the 3rd-Party SMTP feature of DAP comes in real handy – this is one of the un-sung features of DAP that makes it so much more powerful than almost all other competing WordPress membership plugins, and just doesn’t get talked about enough.
You can use DAP as an “Email-Sending Tool” and hook it up to an external SMTP service provider – like Amazon Simple Email Service (Amazon SES), Fusemail.com or AuthSMTP.com – to send out bulk-mail through DAP – while completely bypassing your web host’s email system.
Which means you get high email delivery, thanks to a 3rd party SMTP provider like Amazon SES that practically guarantees you sky-high deliverability rates and rock-bottom rates, and you can host hundreds of thousands of emails in DAP for no charge other than standard hosting fees (it’s after all just disk-space in your database), and send emails through Amazon SES (costs just 10 cents for every 1,000 emails you send).
Don’t wish to pay even those few pennies? Then simply use DAP on a decent web host like Liquid Web.
DAP also has a built-in job queue to schedule outgoing emails, with the ability to throttle the number to make sure that you don’t exceed your web host’s hourly email sending limits (most web hosts limit you to 300 outgoing emails/hour).
You can even use multiple SMTP servers from your own other lesser-used web sites, all combined together in a round-robin fashion, be able to send thousands of emails an hour right from your web host for absolutely free!
So, to summarize, here’s what DAP can and can-not do when compared to more expensive, dedicated email services like Aweber and GetResponse.
Advantage: DAP
- Aweber and similar services cost several hundred dollars a year (see Aweber.com – it could cost you about $794 a year – based on an annual fee of $194/year + another $600/year for maintaining a list size of just 5,000 subscribers). But all emails sent via DAP are essentially FREE! You don’t pay anything to send out thousands of emails and have a list with tens of thousands of members. The Autoresponder & Broadcast features are built right into the core DAP software.
- Don’t trust your web host to deliver the emails? Simply hook up DAP to an external email system like Amazon SES and send thousands of emails for mere pennies! Takes all of 5 minutes to set up!
- Unlimited Autoresponders
- Store Unlimited email id’s for free (no limit on how large your list can grow – so it’s practically free, since you’ve already paid for DAP and your web hosting)
- Full control over your list. You can make the sign-ups single opt-in. You can add your buyers to your list without forcing double opt-in on them. Services like Aweber will force double opt-in even when it’s a paid member who just purchased your product or service. And there’s no way around it. And you have to play by their rules, even if they don’t make sense sometimes. But since you control the DAP software, you get to decide who to send out broadcast or autoresponder emails to. Bring them all in as single-optin if you want. Or move them from one list to another. Or add them to multiple lists. Whatever you want.
- Import any CSV list (just need an email) and broadcast to them or add them to your autoresponder. You don’t even have to add them to your database at all – do on-the-fly mailings without storing any of the emails or subscriber data (imagine sending out a quick email blast to your mastermind group – or soccer team parents!). A very powerful tool – so don’t abuse it (i.e., don’t use it to spam!)
- Add same email to multiple Autoresponders (unique to DAP)
- Email throttling included, so as to not exceed your web host’s hourly email sending limits
- DAP has a stunning-looking “Lightbox” plugin with several built-in templates, to show your DAP signup form as a popup. See List Builder Popup for DAP
- Ability to merge member data – like password or affiliate link or user id – right into the emails (DAP only). Third-party email services won’t know as much about your members as DAP does, and won’t be able to (say) send members their personalized affiliate link (like DAP can).
- International-friendly: Using DAP, you can send out autoresponder and broadcast emails in multiple languages. Not restricted to just English. DAP now supports Chinese, Spanish, Russian, Danish, French, Italian, and Hindi – and that’s just what we know! DAP will surely work with any language that is UTF-8 based. We don’t think any of the big third-party email marketing services – like Aweber or GetResponse – support non-English emails. This in itself is a HUGE plus for DAP.
Advantage: Aweber and the others
- Ability to track open rates and click-through rates (coming in a future version in DAP)
- Ability to automatically send out your newly published blog posts as a broadcast (also coming in a future version in DAP)
So given a choice, here’s what we recommend, in the order listed below:
1) DAP + Amazon SES: Best option – this is what we use ourselves here at DigitalAccessPass.com and WickedCoolPlugins.com.
2) DAP + ActiveCampaign: If you must sign up for a third-party service for their advance analytics, we highly recommend ActiveCampaign, which is a very robust and popular email service, which we recommend over even, say, Aweber. This #2 option is great if you want advanced email analytics – like click-thru rates or open-rates – that DAP itself doesn’t offer yet. You will still be able to add the subscriber/buyer to both DAP and ActiveCampaign, for eg., and you will have the choice of sending out the emails from either system. This offers more flexibility, but comes at a cost of the services like ActiveCampaign or Aweber.
3) DAP + Your Web Host: Very usable and workable option as long as you are hosting with a decent web host.
Feel free to comment below if you have any questions.
65
DAP-to-Aweber Integration
UPDATE April 2, 2015: Starting DAP 4.8, DAP now integrates with Aweber via their API.
UPDATE July 23, 2014: The DAP-to-Aweber integration below has slightly changed – the documentation below has already been updated with the new information.
Subscriber Flow
The flow of subscriber in this model, is “FROM DAP TO Aweber“. User signs up at DAP first, then DAP adds her to Aweber.
If you are looking for the other way, i.e, “FROM Aweber TO DAP”, then click here.
Please Note
When DAP adds a subscriber to your Aweber list, it can currently “send” only the user’s Name and Email address to Aweber. DAP cannot (and does not) send the user’s unique password in DAP, or their affiliate id, etc. If you want Aweber to send out the password, then here’s how you can do it.
How it works
With the “DigitalAccessPass.com” Aweber Email Parser, integrating DAP with Aweber is a total breeze.
1. Login to your account at Aweber.com and from the “Current List” drop-down, pick the list to which you want DAP to add users to.
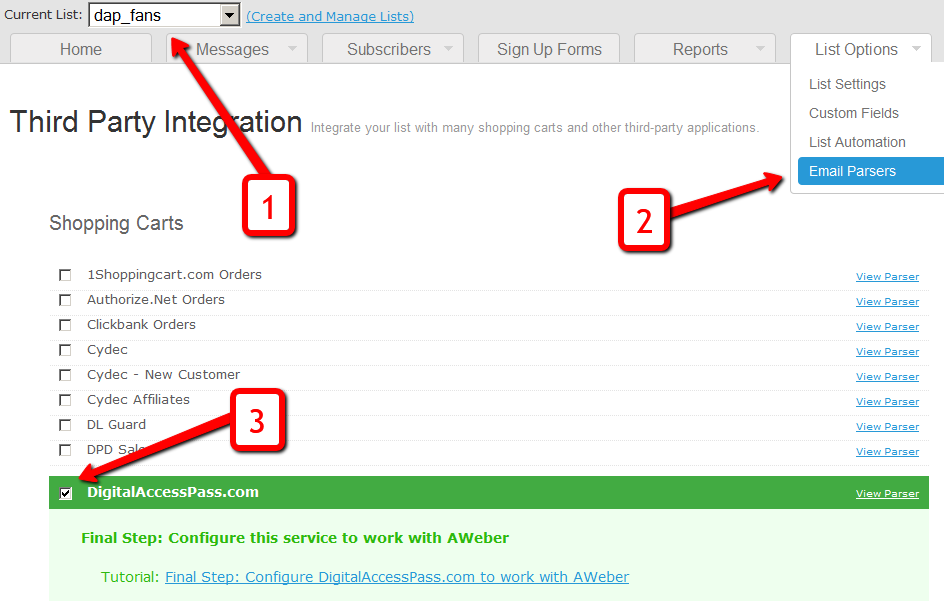
2. Click on “List Options”, and from the drop-down, select “Email Parser”
3. On the Email Parsers page, select the check-box next to the “DigitalAccessPass.com”
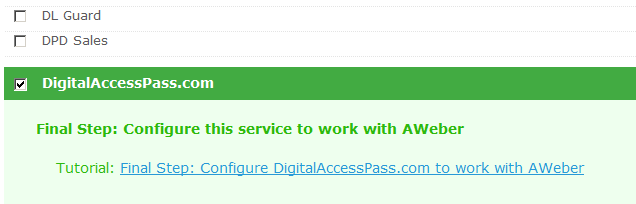
That’s it for the Email Parser activation at Aweber. You will be shown something like the image below – but note that there is no “Final Step”. So nothing further to do on this Aweber page.
4. Log in to your DAP Admin Dashboard and pick the product (whose members you wish to add automatically to your Aweber list from step 1 above)
This step is where things changed on Aweber’s end sometime in June/July 2014. So if you previously performed this step and your Aweber integration has stopped working, please double-check the steps here.
5. Go back to Aweber and select the right list. Then, under List Options > List Settings, under “Basic Information” section, you’ll see “List Name” and right below that, you’ll see “Unique List ID“.
In the image below, both appear to be the same. But on most Aweber accounts, especially new lists recently created, these may not be the same.
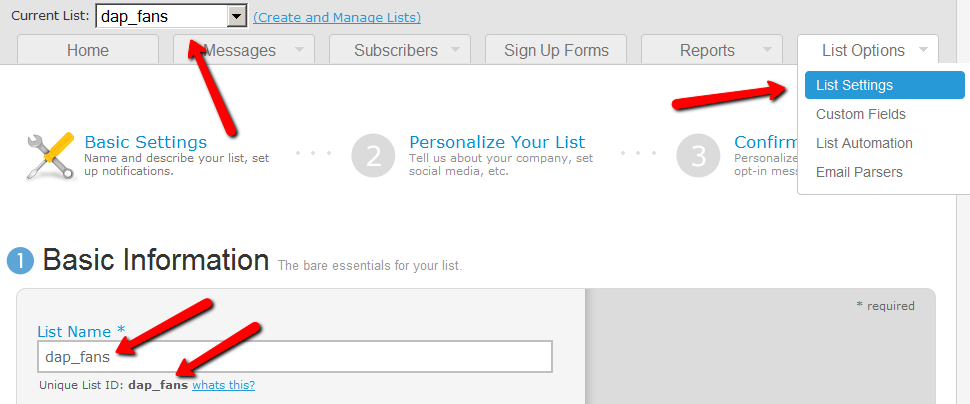
Take the “Unique List ID” (NOT THE “List Name”, like it used to be earlier)
Add the text “@aweber.com” to the end of that text – that now becomes your “Aweber List Email”. So if your list’s unique list id is “dap_fans”, then your Aweber List Email becomes “dap_fans@aweber.com”.
Copy this, go to the DAP Products > Manage page, and under the “Notifications” tab, add this Aweber List Email to the “3rd Party Notification” field, and save.
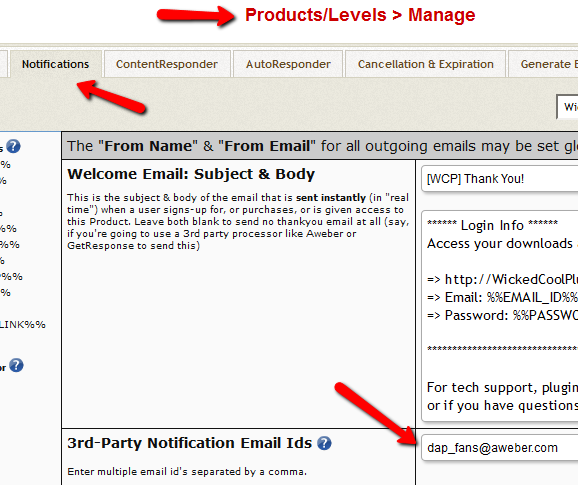
That’s it!
How This Works
So let’s say you picked the list “dap_fans” in your Aweber account, and the DAP Product “Example Subscription Product” (as shown in the screenshots above).
So once you add “dap_fans@aweber.com” to the product’s “3rd Party Notification Email Ids” field and save it, every time someone gets access to the “Example Subscription Product” product (regardless of whether they buy it, or you give them access on the backend), an email is sent out to the email id dap_fans@aweber.com , which looks like this:
From: Joe Subscriber <joe@subscriber.com>
Subject: New User Signup (3rd Party Notification)
Body:
Name: Joe Subscriber
Email: Joe@Subscriber.com
Product: Example Subscription Product
And because you have already activated the DigitalAccessPass.com parser in your “dap_fans” list, Aweber automatically adds “Joe Subscriber” with the email id (Joe@Subscriber.com) to your dap_fans list. And the parser has been written in such a way, that the product name will be used as your “Ad Tracking” field for the subscriber. So you will be able to group them and run reports on them in your Aweber account.
Frequently Asked Questions
Q: If I integrate DAP with Aweber and someone signs up to my membership site and then later on cancels or stops paying, can DAP automatically remove people from Aweber?
A: Short answer: No. Aweber doesn’t have a “Remove” parser, only an “Add” parser. So if someone who DAP automatically added to your Aweber list when they purchased a product, cancels or asks for a refund, you will have to manually remove them from the Aweber list. But wait, this may not be such a bad thing after all.
ExtraTip: As soon as someone cancels their subscription (or just doesn’t pay, or their credit card is declined), then their membership account in DAP automatically expires. Which means they can no longer access any content (unless you have specifically set DAP Config to deliberately give ex-members access to content that they paid for previously when they were a member).
So that means, their access in DAP has expired, but they are still on your Aweber list.
This may not be bad, because if you keep sending them emails (through Aweber) about new content and new videos and new stuff you are adding to your membership site even after they’ve cancelled, when they come back to your site through the link in your email, they won’t be able to access the actual content.
So it’s a great way of continuing to keep even ex-members curious and coming back to the site, only to be presented with a “Sorry, you don’t have access to this”, which may be a great incentive for them to come back and join your web site.
Of course, for this to work, you must put all the key content on your web site, and use the emails just to get them curious about the content, and eventually bring them back to the site to deliver the content. However, if you are going to send out all the good stuff in your emails (which doesn’t make sense anyway) then this may be an issue for you.
Q) Will DAP add only paid customers to Aweber? Or both Paid and Free members?
The link is really between the DAP Product and your Aweber List. So regardless of who gets access to that product – for free, by paying, or admin added – they will automatically be added to your Aweber list. So if you don’t want your free members to be added to your Aweber list, then keep your “Free” products and your “Paid’ products separate, and don’t set up this integration for the Free products.
Q) I have a question about how Aweber integrates with DAP. In this instance i am selling a monthly and yearly membership. The reader clicks on the subscribe button on my sales page and gets taken to Paypal. Assuming i have integrated Aweber properly, does the person get added to my Aweber List as well as the DAP list? Or is the only way they get added to Aweber is through a webform? I would like to be able to email the subscribers from time to time through Aweber but i am not using a Web form on my sales page, only a subscribe paypal button.
For paid products, here’s the flow:
Payment Processor (For ex – Paypal) == > DAP ==> Aweber
1) User pays via Paypal.
2) Paypal notifies DAP (ofcourse you need to integrate Paypal with DAP first either using Paypal hosted buttons (http://www.digitalaccesspass.com/doc/setting-up-your-paypal-button-and-paypal-ipn/) or using DAP generated button for paypal (http://www.digitalaccesspass.com/blog/2010/12/dap-v4-0/).
3) If the Paypal payment was successful, DAP creates the membership account and sends out the thankyou email to user with their membership login info (you can configure thankyou/welcome in the DAP products page).
4) In the DAP products page, you can select the product and set the Aweber list name in the 3rd party notification Ids field. In this field, you can specify a comma-separated list of email Ids.. one of the email ids can be your Aweber list email i.e. mylist@aweber.com
5) After DAP adds the user to purchased product, it sends out notifications to all email Ids listed in the 3rd party notification id field for that product.
Here’s more info on how to integrate DAP -> Aweber for paid products. Make sure to login to your Aweber account, Click on “My Lists†and within that, select “Email Parserâ€Â. On the Email Parsers page, check the check-box next to the parser named “DigitalAccessPass.com†as described above in this post.
First Name: Veena
Last Name: Prashanth
Email: veena@digitalaccesspass.com
Product: Digital Access Pass with WP LiveLinks