Pay-Per-Post with DAP
One way of setting up Pay-Per-Post in DAP, is to create one product per post, and then sell access to each one separately.
However, if you have a lot of posts, this can be a lot of work.
An easier and more efficient way is to use our credits plugin, “Credit Store“.
Using the Credit Store plugin, you can setup individual pieces of content – like a post, page, category, or even a file – to be Redeemed via Credits, instead of cash. You sell credits, your members buy those credits, then use their credits towards redeeming individual content.
Just like when you buy an iTunes gift card and purchase individual songs or movies with it. Or like buying credits on a stock photo site and then redeeming it for individual images.
Whether that content is a bunch of content all bundled together, or individual posts/pages/files, is up to how you configure and set up your own Store.
The Credit Store plugin is a true game-changer, and allows you to be a lot more creative, and for your content to be delivered in a much more flexible yet powerful manner to your buyers and members.
We already have a few DAP users using the Credit Store (beta) this way, and they’re all loving the power and flexibility of this plugin.
See this for more details on the Credit Store:
http://wickedcoolplugins.com/the-plugins/dap-credit-store/
As the Credit Store is currently in Beta, if you wish to purchase it now, we will make it available for download in a few weeks and give you access to the plugin for a big discount compared to the price it will be launching at. So feel free to email us or open at ticket if you want more details.
5
Cache Plugin Setup
DAP works great with the WP Super Cache plugin. Probably works with others too – but we have officially tested it with just Super Cache at this time.
And this page below walks you through the full set up of the WP Super Cache plugin.
___________________________________________________________
Go to Settings > WP Super Cache
You are now on the “Easy” tab. Don’t do anything here just yet.
Go to Advanced tab.
Be sure to put a “Check” (or “Select” the radio button) next to each of the following items
Caching
Cache hits to this website for quick access. (Recommended)
Use mod_rewrite to serve cache files. (Recommended)
Miscellaneous
Compress pages so they’re served more quickly to visitors. (Recommended)
Don’t cache pages for known users. (Recommended)
Don’t cache pages with GET parameters. (?x=y at the end of a url)
Cache rebuild. Serve a supercache file to anonymous users while a new file is being generated. (Recommended)
Advanced
Clear all cache files when a post or page is published or updated.
Extra homepage checks. (Very occasionally stops homepage caching) (Recommended)
Only refresh current page when comments made.
List the newest cached pages on this page.
Click on Update Status button.
Keep scrolling down until you see the Accepted Filenames & Rejected URIs section.
You’ll see a big text area under the text “Add here strings (not a filename) that forces a page not to be cached”. +
There, add the following, one per line.
/dap/
/dap/.*\.php
/dap/admin/
/dap/admin/.*\.php
/login/
/members/
/my-profile/
/my-content/
Obviously, your member content page URL’s may be slightly different. So make sure you customize it to suit your own URL’s.
Next to back to Easy tab at the top.
Now you select the “Caching On” option and save.
That’s it for the setup.
Now, on to testing.
Content Organization Tips
If you organize all of your member content under a main parent page, say “members”, then all you need to exclude from caching, is /members/
For example, if your URLs include year and you don’t wish to cache last year posts, it’s enough to specify the year, i.e. /2004/. WP-Cache will search if that string is part of the URI and if so, it will not cache that page.
So basically, excluding just one single URL – /members/ – from caching, will make sure all of the following as well remain UN-CACHED.
/members/login/
/members/home/
/members/my-content/
/members/my-profile/
/members/my-affiliate-info/
/members/course-1/
/members/course-1/module-1/
/members/course-1/module2/
/members/course-2/module-1/
/members/course-2/module2/
You get the idea. When you exclude “/members/”, any URL that starts with that same text, will be excluded.
So here’s how you set up the “hierarchy” of the pages.
First, create the page “members“.
Then, when you create the “login” page, make sure you select the “parent” of the page, to be the “members” page.
So, instead of the login page URL looking like… http://YourSite.com/login/
… because the parent page is “members”, that also gets added to the URL, and the login page URL becomes like this:
http://YourSite.com/members/login/
If you created a page called “example” and made the “login” page as its parent, then the URL for this new page becomes:
http://YourSite.com/members/login/example/
So you see how that hierarchy works. Use that to arrange all of your member content under the main “ancestor”, which is “members”, here in our example.
But if you have already completed creation of all of your content, then you’re just going to have to do a little extra work to identify all of your pages and posts and exclude the member content from the list. DAP makes this a little bit easier as well.
Getting A Full List Of Pages & Posts
If you log in via FTP and go to the “dap” folder, inside, you will see a file called “dap_permalink_dump.php”. If you download that file to your desktop, and open it with any text editor (Notepad, Dreamweaver, etc), inside you will see a full list of URL’s of all posts and pages from your WordPress site. You can just take that list, remove separator text like “Posts” and “Pages”, and trim the list of URL’s down to just your member content, you can take that and paste it right into the WP Super Cache > Advanced tab > Accepted Filenames & Rejected URIs section.
Testing Caching Impact
Now open multiple browsers – like Firefox, Chrome and Internet Explorer (or Safari). Use at least 3 separate browsers.
Next, go to your login page in one of them, and then log in. Then go to same login page in another browser – make sure it doesn’t say “You are already logged in”. It should show you the DAP login form. Same on third browser.
Next go to the profile page while logged in as member. Do the same in other two browsers, while logging in as three different people. Each profile page should you show you different information.
If you crated 3 separate products, with 3 different users, then logging in as those 3 different users on the 3 different browsers, should show you 3 different sets of pages.
All this is just to make sure there’s no caching going on of your membership content, that’s all.
If all of this works, then you’re all set with caching for your non-membership content, and no caching for your dynamic member content.
Downline Builder
Or also called as network builder. And we introduced this feature in DAP v4.4.
We call it DAP “Upline” – basically a shortcode called [DAPUpline] that allows you (site admin) to display the person’s upline’s affiliate code to the person. So in effect, it is a downline builder.
1) John joins your site
2) John fills out profile with (say) his ClickBank nickname
3) John refers Adam
4) When Adam logs in, he sees affiliate link to some xyz third party product, but CB nick in the affiliate link is replaced with John’s CB nickname.
5) Adam fills out his profile with his own CB nickname
6) Adam refers Jill
7) When Jill logs in, she sees affiliate link to same third party product, but cbnickname is replaced with Adam’s CB nickname.
This can be done with any number of third-party programs, as long as the nickname can be easily replaced with the info provided by the upline affiliate.
DAP even takes this one step further.
When Jill joins through Adam’s DAP affiliate link, if Adam has not filled out his CB nickname in his profile, then the third-party CB link shows CB Nickname of Site Admin in its place.
So if an affiliate fails to claim his affiliate link, then site admin gets credit for it (and all such links).
Here’s the documentation for [DAPUpline]
DAP to 1ShoppingCart List Integration
Q: How to automatically add a new user in DAP to a 1SiteAutomation.com (1SA) list (or other 1Shoppingcart – 1SC – private label)?
A: Every list in 1SA/1SC gets a unique email id – like 1sc-12345@autocontactor.com ).
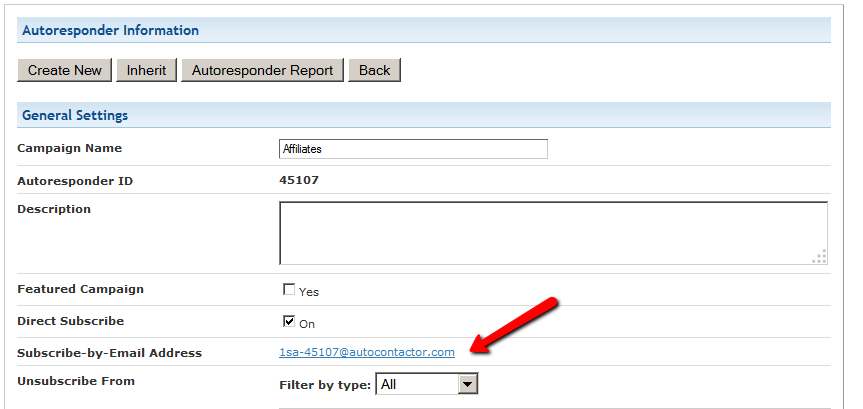
Add that to the “3rd-Party Notification Email Ids” field of the DAP product (under Products > Manage > “Notifications” tab)
And make sure you set the “Direct Subscribe” field in your 1SA/1SC list to be “On”.
2
Redirect After Double-Optin Confirmation
If you are using double-optin for your DAP product, then you would normally have entered the text %%ACTIVATION_LINK%% in your email body, which is replaced by a unique confirmation link specific to that user.
Normally, when that activation link is clicked, the user is redirected to your login page configured under Setup > Config > Login URL.
But if you wanted them to be redirected elsewhere to a page of your choice, then in your double-optin email body, where you normally enter %%ACTIVATION_LINK%% , enter this instead:
%%ACTIVATION_LINK%%&redirect=http://link/to/landing/page/
Where “http://link/to/landing/page/” is the URL where you want them to be redirected to after they click on the double-optin activation link.
11
[DAPUpline]
[DAPUpline]
[DAPUpline] is basically a WordPress shortcode that you can insert into WordPress pages and posts. It allows you (DAP admin) to display the member’s upline affiliate’s data to the member.In simple terms, it shows a user their referring Affiliate’s (a.k.a Sponsor’s) information. It could also be called a downline builder.
And you can display any data from the member’s affiliate profile, on a page.
So when a user visits the page that has this shortcode, it will determine who the visitor/member’s affiliate is, from…
1) Affiliate Cookie (if it exists), or
2) If they’re already a member, and have logged in to DAP, then it will show their current Affiliate’s information. Or,
3) If neither the cookie is set, nor the user has an Affiliate attached to their account already in DAP, then it will show the info of the DAP Admin.
So you can use it to show the user information of the person (affiliate) who referred them to the page.
Think of it as a “Your Sponsor” tag.
Consider this example:
1) John joins your site
2) John fills out his profile with (say) his ClickBank nickname
3) John later refers Adam
4) When Adam logs in, he sees affiliate link to some third-party product, but CB nickname in the affiliate link is replaced with John’s CB nickname. So if Adam goes on to purchase that third-party CB product, then John will get the affiliate commissions for that purchase.
5) Now Adam fills out his profile with his own CB nickname
6) Adam refers Jill
7) When Jill logs in, she sees affiliate link to same third party product, except this time, the CB nickname is replaced with Adam’s CB affiliate nickname.
This can be done with any number of third-party programs, as long as the nickname can be easily replaced with the info provided by the upline affiliate. And it’s not just one field – you can create multiple profile fields for the affiliate to fill out – like ClickBankNick, CommissionJunctionNick, JVZooId, GoogleAnalyticsId, etc.
DAP actually even takes this one step further.
When Jill joins through Adam’s DAP affiliate link, if Adam has not filled out his CB nickname in his profile, then the third-party CB link shows CB Nickname of Site Admin in its place.
So if an affiliate fails to claim his affiliate link, then site admin gets credit for it (and all such links).
Hope this helps.
For eg., to show affiliate’s first name on a page, insert this into page:
[DAPUpline showField="first_name"]
Full list of available fields from sponsor’s or affiliate’s profile:
[DAPUpline showField="first_name"]
[DAPUpline showField="last_name"]
[DAPUpline showField="user_name"]
[DAPUpline showField="email"]
[DAPUpline showField="address1"]
[DAPUpline showField="address2"]
[DAPUpline showField="city"]
[DAPUpline showField="state"]
[DAPUpline showField="zip"]
[DAPUpline showField="country"]
[DAPUpline showField="phone"]
[DAPUpline showField="fax"]
[DAPUpline showField="company"]
[DAPUpline showField="title"]
[DAPUpline showField="paypal_email"]
Showing Custom fields:
[DAPUpline showField="custom_"]
Eg: To show affiliate’s/sponsor’s custom SSN field (say “ssn”):
[DAPUpline showField="custom_ssn"]
NOTE: You should’ve already created the custom field “ssn” before you can do this, of course.
1
Automated Reminder Emails For Admin
In DAP, you can not only send automated pre-scheduled emails to your members (Autoresponders), but you can also set up similar pre-scheduled “Reminder” emails to be sent to you (the admin) every time a member reaches a day milestone.
Eg: Let’s say you (the admin) want DAP to send you or someone on your team a reminder email to follow up with each member by email once they reach day #7 – meaning, it’s been 7 days since they signed up for a specific product.
This is how you do it in DAP:
- Go to DAP Admin > Emails > Autoresponders
- Click on “Compose New Email“
- For subject, enter (say) “Follow Up with %%FIRST_NAME%%”
- In the body of that email, you may use merge-tags for the member – like “Be sure to email %%FIRST_NAME %%LAST_NAME%% , ask them about their progress, see how they’re doing and upsell Platinum Coaching program. Their email id is: %%EMAIL_ID%%”
- Further below on that page, in the “Send to 3rd Party (instead of member)” field, select “Yes (like admin or staff)” and you will see an additional text box show up below, where you can enter your (or your staff’s) email id where you want the reminder to be sent.
- Save the email.
- Go to the DAP Product where you want this email to be added to the sequence.
- Go to “ContentResponder” tab.
- Add this new email to the product, click on the “Edit” icon, and set it to be dripped on Day #7.
That’s it!
Now for each member that signs up for that product, regardless of when they join, every time they reach day #7, the reminder email will be sent to the 3rd party email id specified for that message (instead of being sent to member).
Reverse Dripping
If you want to be sent this same email say 3 days before member’s access expires to that Product, then set the email to be dripped on day “-3”. (See Expiration Notifications / Renewal Reminders)
1
[DAPUserProfile]
This post is dedicated just to the [DAPUserProfile] shortcode. To see the rest of the DAP Shortcodes, click here.
[DAPUserProfile]
This is the shortcode that displays all of the user profile fields on a page. Simply enter it on a WordPress page, save it, and when you view it when logged in as a user, it will display the DAP user profile form, with the logged-in user’s information displayed in the form fields.
As DAP Admin, you can customize which profile fields to show to your members, and which ones to hide. Just set the profile field that you don’t want displayed, to “N” in the tag below.
Default version
[DAPUserProfile showFirstName="Y" showLastName="Y" showUserName="Y" showEmail="Y" showPassword="Y" showAddress1="Y" showAddress2="Y" showCity="Y" showState="Y" showZip="Y" showCountry="Y" showPhone="Y" showFax="Y" showCompany="Y" showTitle="Y" showPaypalEmail="Y" showOptedOut="Y" showCustomFields="Y"]
Default is "Y". So Leaving out the text (for eg.) showLastName="Y" entirely from the shortcode, is the same as setting it "Y", which means it will be displayed.
Entering just [DAPUserProfile] into a page, will show ALL fields.
Show All Fields Except Phone & Fax
To hide just Phone and Fax, you would do something like this:
[DAPUserProfile showPhone="N" showFax="N"]
So all other fields will be displayed, except those two.
Show Just A Few
To show (say) just First, Last, Username, Password and Email, this is the shortcode:
[DAPUserProfile showFirstName="Y" showLastName="Y" showUserName="Y" showEmail="Y" showPassword="Y" showAddress1="N" showAddress2="N" showCity="N" showState="N" showZip="N" showCountry="N" showPhone="N" showFax="N" showCompany="N" showTitle="N" showPaypalEmail="N" showOptedOut="Y" showCustomFields="N"]
Related: [DAPUserLinks] shortcode
10
[DAPUserLinks]
This post is dedicated just to the [DAPUserLinks] shortcode. To see the rest of the DAP Shortcodes, click here.
[DAPUserLinks]
This is the shortcode that shows the user a list of all of the products that they have access to, and details about each product – like name, description, links that have already been dripped, etc.
This is similar to %%USERLINKS%%, but more advanced and more customizable.
You can customize most of the elements of this shortcode, as shown below.
You can even customize this to show details of a specific product (instead of all products).
Full Version
[DAPUserLinks showProductName="Y" showAccessStartDate="Y" showAccessEndDate="Y" showDescription="Y" showLinks="Y" orderOfLinks="NEWESTFIRST" howManyLinks="10000" errMsgTemplate="SHORT" productId="ALL" dateFormat="YYYY-MM-DD" showProductCount="Y" hideProductId="3,4"]
Most of the elements are self-explanatory. Here are a couple explained in detail.
orderOfLinks
orderOfLinks can have one of two values…
NEWESTFIRST will drip newly dripped links at the top. So day 7 link will be above day 1 link.
OLDESTFIRST will drip newly dripped links towards the bottom. So day 1 link will be above day 7 link.
showProductCount
showproductcount=”N” will disable the heading “You have access to (X) products” at the top of the “My Content” section.
So, here’s another version of the DAPUserLinks shortcode that shows oldest links at th top, and does not show the product-count heading.
[DAPUserLinks showProductName="Y" showAccessStartDate="Y" showAccessEndDate="Y" showDescription="Y" showLinks="Y" orderOfLinks="OLDESTFIRST" howManyLinks="10000" errMsgTemplate="SHORT" productId="ALL" dateFormat="YYYY-MM-DD" showproductcount="N"]
productId
productId is by default set to “ALL” which means details for all products that a user has access to, will be displayed on that page. You can also configure it to show for just one product (productId="8") or a few select products (productId="8,11").
hideproductid
This was introduced in DAP v4.5. It allows you to suppress all listed product id’s (either just one, or multiple product id’s separated by commas) from being displayed in the list.
[DAPUserLinks ... hideproductid="3" ...]
Related: [DAPUserProfile] shortcode
12
Aweber To DAP Integration
Follow the documentation below on this page for Aweber-to-DAP integration, only if you’re using DAP 4.4 or later. (For DAP v4.3.1 or older, click here)
Subscriber Flow
The flow of subscriber in this model, is “FROM Aweber TO DAP“. User gets added to Aweber first, then arrives at DAP via Aweber “thank you page”, at which point she gets added to DAP.
Now, if the flow is from DAP-to-Aweber, and are using email parsing to integrate DAP and Aweber, then your Aweber list will always be double-opt-in (as per Aweber policy, nothing to do with DAP).
But if you want your Aweber list to be single-opt-in, or you want your sign ups to be added to Aweber first and then to DAP, then use this flow. HEre, you can use an Aweber signup form on your squeeze page (instead of the DAP sign-up form) and then have Aweber add users to DAP.
NOTE: You cannot use this flow for Paid members – because paid members will need to have paid first, which means DAP needs to process their payment first, and if successful, it can add them to Aweber. So for paid members and paid content, always use the other DAP-to-Aweber flow.
But for free signups (say, like when you’re trying to build a list), you can add them to Aweber first using the flow explained below, just so you can take advantage of making your Aweber list single-optin, and then have Aweber add the subscriber to DAP on the other end. So this way, DAP can then create a free account for them, email them their login/password, and give them access to the “Free” content (that is, content available only to “Registered” users, so to speak), etc.
So here are the steps…
Aweber To DAP Integration
1. Go to DAP Dashboard > Products > Manage page.
2. Note down the Product Id of the product to which you want to sign-up the users (after adding them Aweber first, of course). Let’s call this PRODUCTID

Aweber List Is Single-Optin
If your Aweber list is single-optin, then follow the steps below. If not, skip ahead to “Aweber List Is Double-Optin” flow further below.
(The old steps 3 & 4 no longer exist. To keep the image below in sync, follow the rest of the steps starting Step 5.)
5. Now login to your AWeber account.
5A) From the “Current List” drop-down, select the list that you wish to sign up users to.
5B) Click on “Web Forms” in the menu at the top.
5C) Edit existing form by clicking on the name of the list.

6. On the next page – the list form generator page – click on ‘Go to Step 2’ towards the bottom of the page.

7. On the next, page…
7A) Click on the thankyou page dropdown and select ‘Custom’.
7B) Set the thank you Page URL to http://YourSite.com/dap/signup_submit.php?productId=PRODUCTID
Replace YourSite.com with the name of your site.
Replace PRODUCTID with the Product Id of the product you noted in step 2.
So, if the Product Id of the product in DAP is 2, then the thankyou page URL will be…
http://YourSite.com/dap/signup_submit.php?productId=2
7C) Where it says “Pass Form Data”, check the check box so that Aweber can “Forward subscriber information to your thank you page” – which essentially is DAP, so that DAP can add the subscriber to your membership site.

That’s it!
Aweber List Is Double-Optin
In this flow, set up your Web Form as usual, with no DAP-specific settings required.
Only change required is in the Aweber list’s main “List Settings” page.
5. Now login to your AWeber account.
6. From the “Current List” drop-down, select the list that you wish to sign up users to.
7. Go to My Lists > List Settings

8. Go to “Confirmed Opt-In” tab

9. Scroll down to “3: Success Page“.
9A) Set the “Confirmation Success Page URL” to http://YourSite.com/dap/signup_submit.php?productId=PRODUCTID
Replace YourSite.com with the name of your site.
Replace PRODUCTID with the Product Id of the product you noted in step 2.
So, if the Product Id of the product in DAP is 2, then the thankyou page URL will be…
http://YourSite.com/dap/signup_submit.php?productId=2
9B) Check the check-box that says “Pass subscriber info for personalizing this page”. Ignore the comment that says “Not recommended for WordPress users”, because this is going to point to a DAP script, and not a WordPress page.
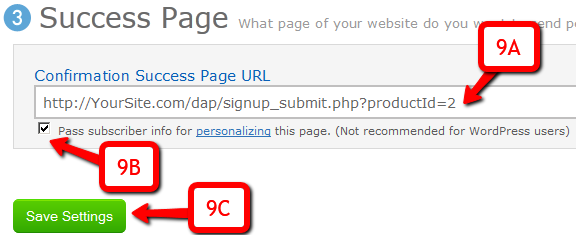
9C) Click on “Save Settings”.
That’s it!
Using Custom Redirect URL
If you want the user to be logged in automatically (either after single-optin or double-optin) and instead of being logged into the member’s area, you want the user to be redirect to your own custom URL, then your thank-you URL should be:
http://YourSite.com/dap/signup_submit.php?productId=PRODUCTID&redirect=http://yoursite.com/your-custom-thankyou-page
OR
http://YourSite.com/dap/signup_submit.php?productId=PRODUCTID&redirect=/your-custom-thankyou-page
Additional Notes
Now that you’ve set up DAP to integrate with your Aweber list (single- or double-optin), you may use the Aweber web form directly on your squeeze page for signing up subscribers
(instead of DAP’s “Direct Signup Form”).
Now, every time a subscriber signs up via the Aweber form, they will automatically be added to DAP.
If your list is single-optin, then the subscriber will be added to DAP instantly after sign-up.
If your list is double-optin, then the subscriber will be added to DAP only AFTER they’ve clicked on the Aweber double-optin confirmation link.
In both cases, if they’re a new user to DAP, they will be auto-logged in to the member’s area.
You may also configure the DAP Product’s “Welcome Email” to send out the DAP email and password via DAP itself.
-OR-
You can leave the Welcome Email in DAP Product page as blank. And then configure DAP to generate a default password (DAP Admin > Setup > Config > Default Password) as shown below, and then enter that same pre-chosen password in to your very first Aweber follow up email that goes out to your subscribers, so that they can receive their dap id/password details directly from your Aweber list.

For more details about this default password, please see this post.
PRODUCTID