Pay-Per-Post with DAP
One way of setting up Pay-Per-Post in DAP, is to create one product per post, and then sell access to each one separately.
However, if you have a lot of posts, this can be a lot of work.
An easier and more efficient way is to use our credits plugin, “Credit Store“.
Using the Credit Store plugin, you can setup individual pieces of content – like a post, page, category, or even a file – to be Redeemed via Credits, instead of cash. You sell credits, your members buy those credits, then use their credits towards redeeming individual content.
Just like when you buy an iTunes gift card and purchase individual songs or movies with it. Or like buying credits on a stock photo site and then redeeming it for individual images.
Whether that content is a bunch of content all bundled together, or individual posts/pages/files, is up to how you configure and set up your own Store.
The Credit Store plugin is a true game-changer, and allows you to be a lot more creative, and for your content to be delivered in a much more flexible yet powerful manner to your buyers and members.
We already have a few DAP users using the Credit Store (beta) this way, and they’re all loving the power and flexibility of this plugin.
See this for more details on the Credit Store:
http://wickedcoolplugins.com/the-plugins/dap-credit-store/
As the Credit Store is currently in Beta, if you wish to purchase it now, we will make it available for download in a few weeks and give you access to the plugin for a big discount compared to the price it will be launching at. So feel free to email us or open at ticket if you want more details.
Downline Builder
Or also called as network builder. And we introduced this feature in DAP v4.4.
We call it DAP “Upline” – basically a shortcode called [DAPUpline] that allows you (site admin) to display the person’s upline’s affiliate code to the person. So in effect, it is a downline builder.
1) John joins your site
2) John fills out profile with (say) his ClickBank nickname
3) John refers Adam
4) When Adam logs in, he sees affiliate link to some xyz third party product, but CB nick in the affiliate link is replaced with John’s CB nickname.
5) Adam fills out his profile with his own CB nickname
6) Adam refers Jill
7) When Jill logs in, she sees affiliate link to same third party product, but cbnickname is replaced with Adam’s CB nickname.
This can be done with any number of third-party programs, as long as the nickname can be easily replaced with the info provided by the upline affiliate.
DAP even takes this one step further.
When Jill joins through Adam’s DAP affiliate link, if Adam has not filled out his CB nickname in his profile, then the third-party CB link shows CB Nickname of Site Admin in its place.
So if an affiliate fails to claim his affiliate link, then site admin gets credit for it (and all such links).
Here’s the documentation for [DAPUpline]
2
Gift Subscriptions
There are two ways members can buy gift subscriptions for others.
1) Use the recipient’s email id (but their own name and billing info) during checkout. So when DAP creates the member account, it will send the welcome email to the recipient’s email id.
NOTE: Using the recipient’s email id may not be an option if the gift giver is paying for it using their own Paypal standard account, in which case their Paypal email id will be used by DAP to create the membership account. So, the best option is the one explained below.
2) BEST OPTION: Have the buyer make the purchase in their own name, and then forward the welcome email (which has the password to the member’s area) to the recipient. And the recipient can then log in using that information, and can change any and all profile information on the User Profile page.
NOTE: If this is a subscription product, then the recipient should not change the “Paypal Email” field in the profile, which will be having the buyer’s Paypal email id, because recurring subscriptions will continue to come in using the buyer’s Paypal email id. And since the recipient is not the one being charged, and it’s still going to be charged to the gift giver’s account, they need to leave that field in there. So you can use the [DAPUserProfile] shortcode and maybe not even show the “Paypal Email” field.
37
Amazon Simple Email Service (SES) Integration With DAP
DAP/Amazon SES Integration
You can hook up DAP to Amazon’s Simple Email Service (Amazon SES) and have all of your emails go through Amazon’s beefed up, high-performance, high-deliverability email servers.
The document below explains how to connect DAP to Amazon SES. (troubleshooting info for DAP/SES integration)
- Go to http://aws.amazon.com/ses/ and sign up for Amazon SES. You must already have an Amazon account and you can add SES to that same account.
- Then go to https://console.aws.amazon.com/console/home , log in if required, and click on the SES link there.
- That will bring you to the SES “Dashboard”.

- When you first sign up for SES, you will be assigned a “Sandbox” account. Which means that you will only be able to send emails TO and FROM verified email addresses (a verified email address is something you add yourself to your SES account and then click on a confirmation link that Amazon sends you, to prove that you are the owner of that email id). Also, Sandbox access allows you to send out a maximum of just 25 emails per day, both FROM and TO verified email id’s only.
- So the first step is to add a Verified Sender. So click on the “Verified Senders” link in the menu on the left.

- That will bring you to this page. Click on the Verify a New Email Address link with the green check-mark next to it.

- In the popup, enter the email id that you wish to use as your FROM email id to send out emails. Please note that you can ONLY use verified email id’s to send out emails from your Amazon SES account. So whatever email id you wish to use in DAP Admin as the sender for outgoing emails (see DAP Admin > Setup > Config > From-Email Id : For all outgoing DAP emails), that’s the email id you should verify.IMPORTANT: The email address is case sensitive. So if you white-listed You@YourSite.com at Amazon SES, then you must enter the email address with the exact same cAsE within DAP Config too (You@YourSite.com is NOT the same as you@yoursite.com for the purposes of Amazon SES. Crazy, we know! But that’s how it is.)

- You will then receive an email from Amazon at that email id which has a confirmation link. Once you click on that link, your email id in your Amazon SES account is now “Verified” (also known as whitelisted). Please note that at this time, you still have Sandbox access. Which means you can send email both FROM and TO the same verified email id. Not very useful, but that’s ok. Now time to go back to the SES Dashboard and Request Production Access.
- Click on Request Production Access and you will be taken to a form that you need to fill out and submit. Amazon then reviews it, and it can take up to 48 hours for your account to be granted Production Access – which basically means, you can now use SES and start sending out real emails, and your per-day limit is now 10,000 emails per day.
- Now, you need to get a SMTP Username and SMTP password for sending out emails. This username & password is NOT the same as your Amazon account email and password. Neither does it have anything to do with your Amazon Public or Secret keys. This is a completely different (and new) username and password used JUST for sending emails, and it needs to be generated newly.
- To generate a new set of SMTP Username and Password, click on the SMTP Settings link in the menu. And then on the next page, click on Create My SMTP Credentials.

- In the resulting popup, click on Create.

- That will create your SMTP credentials. But to see it, you have to click on Show User SMTP Security Credentials

- Once you click on Show User SMTP Security Credentials, you will be shown your SMTP Username and Password.

- Be sure to note down the username and password in a safe place where you can get to it again, because Amazon will not show this same set of username and password ever again. If you lose them, of course, you can always generate a new set of username/password again for free, but you’ll never get the same pair again – it will be a fresh pair.
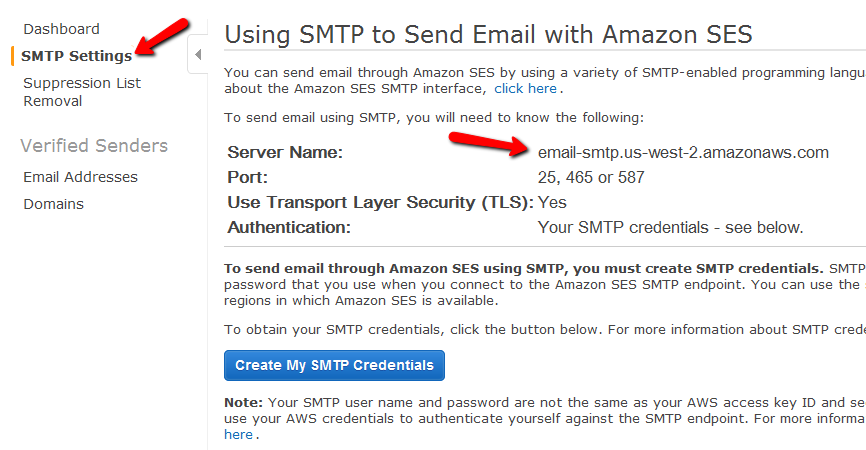
- Go to the SMTP Settings link in the menu and note down the Server Name.
It will be one of the following:
email-smtp.us-east-1.amazonaws.com (as in the image below)
email-smtp.us-west-1.amazonaws.com
email-smtp.eu-west-1.amazonaws.com (European Union users)
 You need to determine what your host name is, and then add the text “ssl://” to it at the front.
So if the server name displayed in your Amazon SES account is this…
email-smtp.us-east-1.amazonaws.com…then the text you would enter into the DAP Email > SMTP page is this…
ssl://email-smtp.us-east-1.amazonaws.com - Now log in to your DAP Admin Panel, and go to DAP Admin > Email > SMTP.
- On this screen, use the section Add a New SMTP Server to create a new SMTP row as follows:

(Click on image above to see full-size screenshot)
Description: Amazon SES
Server: <what you noted down above>
Port: 465 (must be exactly that – ignore port numbers recommended by Amazon SES)
SSL: N (must be exactly that)
User Id: Amazon SMTP Username (that you generated and noted down in Step 15 above)
Password: Amazon SMTP Password (that you generated and noted down in Step 15 above)
Email Sending Limit Per Hour: 500 (ideal number – don’t go more – less is ok)Click on the “Add” button to create and save the new Amazon SES SMTP server setting in DAP. - Once it is saved, now you will see 2 rows on the “Email > SMTP” screen. One is for the server “Localhost”, and the other is the new “Amazon SES”.
- Towards the end of each row, you’ll see a setting called “Activated?”. Set it to “N” for Localhost and “Y” for Amazon SES.
- That will now make all of your outgoing emails (listed below) go out only through Amazon SES, totally bypassing your web host’s email server. Which means, your email deliverability will go up substantially.
- List of outgoing emails include:
– Real-time Welcome Emails
– All transactional emails to DAP Admin – like payment receipt, new user signup, error notifications, user unsubscription notifications, etc
– All autoresponder and broadcast emails
– etc…

Watch this video for details:
4
The “Smart Login” Process
DAP has a very powerful, flexible and easy-to-use log in flow for your users and members.
- Log in from a dedicated log in page, or
- Log in from the login form on the side-bar (login/logout widget), or
- Log in through the log in form shown on “Sorry, you don’t have access to this content. Please log in first…” kind of error messages.
And we call it the Smart Login, because the login process will work differently under different conditions, all designed to make the user-experience for your member more smooth and consistent with general login standards around the web.
So let’s see the various possible login locations in DAP.
But first, it is important to note that DAP has two main types of logins.
Primary Login
This is where it is considered a “generic” login by your member. For eg., a member came to your web site, and then just generally wants to log in to the member’s area – so they have no “context” – it’s NOT as if they were trying to view a specific page or post, got challenged with a login form, and then logged-in from there. That makes this a “Primary Login“.
Examples of this are…
a) Dedicated Login Page: You have a dedicated login page, like http://YourSite.com/login/ – which is what you’ve entered in to “Setup > Config > Login URL“. The body of this page has the DAP merge tag for the login form, which is %%LOGIN_FORM%%
b) Login/Logout Widget on any page of your web site. This is also considered a primary login. The reasoning here is that if they’re logging in through a sidebar widget, it means that they just want to log in to the member’s area, so it is considered primary login.
Secondary Login
This is a login action that HAS “context”. Say, a member landed deep into your site (not the home page, not the dedicated login page) and were challenged by the “In Page Error Message” that says something like “Sorry, you must log in before you can view this content” and are presented with a login form right on that very same page. They were trying to read something before they were asked to log in first – which means, they must be returned to the same page they were trying to view BEFORE they were asked to login. So that makes this a “Secondary Login“.
Examples of this are…
a) Any custom “Error Page”, where you have inserted the DAP merge tag for the login form, %%LOGIN_FORM%%.
b) DAP’s “In-Page Error Message” which says “Sorry, this is private content – you must log in first before you can view this”.
c) Log in form showing up on a page when “Sneak-Peek” is enabled.
Redirection Rules
Based on whether it’s a Primary Login or a Secondary Login, your member will be redirected to a different location.
1) If it is a Primary Login action, then…
a) They’re taken to the “Post-Login URL” if set at a Product-level AND they have access to just one Product.
b) They’re taken to the GLOBAL “Post Login URL” (under Setup > Config) if you have NOT set anything at a Product-level, OR if they have access to more than one Product.
This scenario is the only one where the Post-Login URL is ever used (whether it’s the Product-level or Global-level).
1) If it is a Secondary Login action, then…
They’re always redirected back to the same page they were on (or were trying to access) before they were challenged to log in first to view the content.
Bottom-line:
Primary Login is predictable, and you (the DAP Admin) control where they go right after they login.
Secondary Login depends on “context”, and they’re taken back to whatever page they were on, before they logged in.
4
DAP’s “Pause Membership” Feature
How It Works
Joe Member joins your site on 01/01/2011.
He stays a member for about 3 months. Let’s say it’s now mid March. He wants to take a couple of months break. So he goes on a 2 month break. Comes back end of May and wants to resume his membership.
DAP allows him to pick up right where he left off – which is continuing to receive content as of April (04/01/2011), even though today’s date is May 25th, 2011.
So while he took a break, other members who did not take a break in membership, continued to pay for those 2 months, and continued to receive content dripped through those months. So it is only fair that when he does come back end of May and resumes his subscription, he does not resume from June’s content, but from April’s content (when he last put his membership on “Pause”).
It’s ok if you’re not dripping content on a monthly-basis, but rather on a “day” basis. So to put it in terms of “days”, when Joe resumes his subscription, since he was already 90 days old in the system when he put his subscription “On Hold”, and comes back another 60 days later (roughly about 2 months), then DAP will start dripping Day #91 content onwards for him, and NOT Day #151 onwards (he didn’t pay for 2 months in between).
This is how DAP works right out of the box. Nothing special to configure. And DAP automatically takes care of pausing the dripping when he is not paying.
WARNING: Just remember that in order for you to put his actual payments on hold, you will need to have a payment gateway like Authorize.net or Paypal Website Payments Pro. Or you must be using a shopping cart like http://1SiteAutomation.com . Using something like Paypal Standard or ClickBank will not allow you to put the actual charging of his credit card on hold.
NOTE: If you actually did want him to start receiving current content even though he left for 2 months, then all you have to do is, once he comes back and starts paying again, just extend his access end date on his account (which will initially be showing 03/31/2011 – end of March, when he left) and modify it and make it 05/31/2011. So when his next payment comes in after he resumes, DAP will extend his access end date to 06/30/2011 – which means, he can now access all of the current content.
Content Protection, Security and DRM
We frequently get asked questions like…
“Can DAP protect my Videos/PDF’s/Audio files from being copied? Is there some kind of tracking that I can build into my videos that will let me track the video on torrent sites?”
“Can DAP prevent people from downloading my videos/audio/pdf and uploading it to a torrent or third-party site?”
“Can DAP force people to only watch my videos online? I don’t want my members to download any of my content to their hard disk – I want to force them to see/read/hear/watch everything online.”
Short Answer: No.
Long Answer: Keep reading…
The Nitty-Gritty
There are so many ways to steal your content from your web site – no matter what technology you use.
Let us explain what that means…
1) Let’s say you implement a technology where only paying members can even get to your videos. Like you can already do with DAP. So then a paying member can download your video because they are already a paying member, and they actually have access to the videos. And once your video has been downloaded to their hard disk, you have lost all control over it – no matter what anyone tells you, that’s the truth. Because they can upload it to any illegal warez sharing site, and there’s nothing you can do about it.
Of course, you could spend all your time, money and efforts monitoring the thousands of illegal sharing sites whether your video or ebook is found anywhere – assuming you can even find it in the first place, which would be like finding a needle in a hay stack – no, make that “hay factory” – wait, make that “finding a needle in New York City” – and then write to those site owners and ask them to take it down.
Or you could focus on the 99% of legitimate members of your site, and create great content for them, and keep them paying month after month, and sell more products to them, and keep them happy.
2) Let’s say you use a plugin that only allows true-streaming – like one based on Amazon CloudFront technology, that will not allow the users to directly download your videos, but force them to watch online only. Then there’s any number of “screen-capture” tools – even free ones – that your members can use to capture another video of your video, and then share it with their friends, or upload to illegal sharing sites.
The list goes on and on. No matter how hard you make it, there’s always going to be a way around.
So, unless you’re a NASA, NetFlix, or Amazon or Apple who has a real reason to protect their content that is worth real millions of dollars, there is *no technology* available today that will let you track a video or pdf *after* it has been downloaded. If someone is saying they can do this, then they’re outright lying to you, and playing on your fears.
DAP already has a built-in password-sharing prevention security built in. If someone tries to share their account info with others, DAP will lock their account the moment their account gets log-ins from multiple IP’s (you can configure this setting) and deny further access to any of their content, until you investigate the user and “un-lock” their account.
DAP already protects all of your media from illegal access.
DAP also prevents your Amazon S3 videos and audio and other content from being accessed by anyone directly. Using a script like http://S3MediaVault.com , you can make it such that your videos and audio and other media can only be downloaded from approved sites (where the plugin is installed), and then on top of that, there’s DAP already sitting like a monster watch-dog, making sure only authorized users can even get into the site in the first place.
So hope that helps if you’ve gotten too worried about protecting your content – so worried that you’re missing the big picture.
Don’t Forget What Is Important (Hint: It starts with “Mem” and ends with “bers”)
The best membership sites allow people to consume the content they’ve paid for in multiple ways – view the video, download the video, download mp3 audio version of the video, download the presentation as a powerpoint, download the transcripts as a PDF, and so on.
Instead of making it easy for your members to download the content, if you’re going to spend your limited resources trying to figure out how to prevent people from downloading content that they’ve actually paid for, and force people to only view your content online and not be able to view it offline (like in their spare time or when going for a jog in the park), you run the risk of upsetting 99% of your legitimate paying members, in order to secure your content from the 1% of pirates, who will steal and share your content no matter what.
So forget about the 1%, and focus on the 99%. DAP already has enough security in place to stop the 1%. So don’t worry about that. Your content is very secure with DAP.
Anything else is just a total waste of your time. So don’t get distracted by the noise, and just get on with the real important tasks on hand: Building a long-term recurring income stream by building a large community of highly satisfied, loyal fans who are thrilled about what you have to offer, and will continue to pay month after month because whatever it is that you’re selling, is making their life better in some way.
The hardest thing to do online, with a membership site is still this: Creating great content, Attracting buyers, and then getting your members to keep paying month after month.
And that, is the big picture.
4
Creating A Ready-Made Affiliate Toolbox
You already know that DAP has a built-in affiliate program, and everyone who joins your site (or gets a free or paid account) is automatically made into an “Instant Affiliate”.
DAP also lets you create an Affiliate Tool Box for your affiliates, with ready-to-use banners, emails, subjects, signatures and text links – all with their own personalized affiliate link embedded into it already.
So all they have to do is copy, paste, and hit send.
See the sample screen-shots below that show what our own affiliate tool box looks for DAP affiliates who wish to promote DigitalAccessPass.com to others.
Banners

Email Copy

Text Links

How To Create The Affiliate Tool Box
Create as many different pages you want on your blog – like “Banners”, “Email Swipe Copy” or “Text Links”.
Or create just one big page for all of this – like “Affiliate Tool Box”.
Download this text file which has all of the ready-made HTML code that you need to insert into the WordPress pages.
Feel free to modify the text as required, and be careful not to delete any of the special characters that are in there just for the formatting.
=> Download Sample Affiliate ToolBox Code
29
Coming Soon: DAP v3.9
[Updated: 09/27/2010]
Video 1: DAP/vBulletin Integration
[s3mv]vbintro.mp4,800,600,false,false[/s3mv]Video 2: Demo of vBulletin Integration
[s3mv]vbintro2.mp4,800,600,false,false[/s3mv]We’re about to launch DAP v3.9 which has some really cool new features packed into it! Here’s what is coming in 3.9…
vBulletin integration
This is by far the most exciting feature in 3.9. I don’t think even we, the developers of DAP, have been this excited about a new feature in the longest time! 🙂
This is going to completely ROCK your membership world.
Now, with just a few clicks of the mouse, you can completely automate your Forum management, and do some really slick stuff like…
* “Silver” Members get posting access only to the following vB forums…
– Introductions
– General Discussions
* “Gold” members get access to all above, plus the forum “Puppy Potty Training Tips”. So they get access to the following vB forums…
– Introductions
– General Discussions
– Puppy Potty Training Tips
* “Platinum” members get access to ALL of the forums above, PLUS some premium forums, like “Joint Ventures”, “Starting Your Own Dog Business”, “Premium Support”, and more. So they get access to…
– Introductions
– General Discussions
– Puppy Potty Training Tips
– Joint Ventures
– Platinum Mastermind
– Starting Your Own Dog Business
– Premium Support
And then you can add some more rules like…
Both Gold & Silver can just VIEW the “Premium Support” forums, but cannot POST anything.
And Gold & Silver CANNOT even VIEW the “Joint Ventures”, “Platinum Mastermind”, “Starting Your Own Dog Business”.
See how insanely powerful this can get?
Sure, you could have a forum with WP-based forum plugins like bbPress and Simple:Press too.
But comparing those WP forums to vBulletin? That’s like putting a kid who’s just completed one month of boxing lessons, in a ring with Mike Tyson right after someone said something mean about his mother!
And can you imagine what it would do to your “retention rate”, when you tell your members that if they cancel their subscription, they will lose access to the entire community of like minded people?
And to think that we’re just scratching the surface of monetizing forums here.
The vBulletin forum software is so rich in rules and user roles, and the DAP integration with vB is so tight that you could start just a “Forums Only” membership site and charge just for access to your forums!
Imagine creating a one-time product where for $10, they get to post in a “Special Offers” forum where they can advertise their product or service?
Or how about charging $10 to post in a forum called “Outsourcing”, where they can advertise their need to hire someone either for both long-term and short-term projects? It would be free to view for everyone, but you have to pay-to-post]
HTML Email
Now you can send out HTML email in your welcome emails, double-optin emails, autoresponder emails and broadcast emails. Of course, you still get to send out a “text” version of that same email, so that those email clients which cannot handle HTML (we really can’t think of any, though) can still show your member the “text” version. Pretty cool stuff.
Manual Transactions
Now if someone sends you a check in the mail, there is a way to directly enter the “payment amount” into the sytem. This is awesome on many levels:
1) Your DAP Dashboard reports now show you your earnings more accurately (previously, it didn’t know about the “offline” payments)
2) Because now there is a “manual” order in the system, DAP knows how much to pay the affiliate who referred the member. So Joe Customer clicks on Jill Affiliate‘s affiliate link, arrives at your web site, calls you up and says he doesn’t have a credit card or Paypal account, and would like to send you a check. Then you get a check in the mail. You add Joe manually through the DAP Dashboard (this is already possible). Then you now add a new transaction into the system manually, that Joe Customer paid you $100. Then when Joe Customer logs into your system, Jill’s affiliate link kicks in, DAP knows now that Joe paid $100, and Jill’s commission is 20% (what you have set as the admin).
So Jill now gets paid $20, which wouldn’t have been possible before!
And what’s EVEN more cool, is that if you really want to be super awesome to your affiliates (which we highly recommend you do :-), then you can even enter transactions retroactively – even from 2 years ago – and all of your affiliates will now suddenly start seeing commissions for customers they referred a long time ago, but never really got paid because you had no way of entering the offline transactions into the system.
Is that awesome? Or is that AWESOME? 🙂
Manual Affiliate Credits
Joe Customer purchased a product. He doesn’t seem to have been referred by any affiliate. Then you get an email from Jill – “Hey guys, I just referred my cousin Joe to your product using my affiliate link. He says he purchased it, but I never got any commissions. Can you please look into this?”
Previously, the only way to make sure Jill got the credit for Joe, was a slightly long-winded (and boring) manual process (which we won’t go into here), which really wasn’t hard to do, but still took you about 5 minutes.
Starting 3.9, it’s going to take you 5 seconds!
And Lots More To Come…
We have features that are even more exciting (something that’s not going to be easy to do, after the vBulletin launch!) planned for DAP 4.0!
* “N” tier affiliate program (psst… you read that right, not “2-tier”, not “3-tier” – but “N” tier- which means as many levels as you want, and each new tier with a different commission percentage!)
* Coupon Codes
And lots more…. (we can’t tell you just yet, because otherwise our competitors may steal our ideas 😉
Ok, now you know why we’re so excited about DAP 3.9.
So do let us know what you think in the comments section below.
And be sure to also subscribe to this post – because we’re going to shortly publish a video right here showing you some of the new features, as well as announce a pre-launch call that you’re not going to want to miss.
Cheers!
– Veena Prashanth & Ravi Jayagopal
26
How To Use DAP’s Default Password
DAP has a feature where you can ask DAP to always generate a pre-determined, default password of your choice for all new members.
So all new users will be assigned the same default password, which of course, they can change as soon as (or any time after) they login.
This is especially useful if you want a third-party service like Aweber – instead of DAP – to send out the new member’s “Welcome Email” which contains their email and password.
Since DAP is unable to pass the randomly generated password to Aweber, instead, you can setup a default password by going to
Setup > Config > Default Password
This can be found under the Miscellaneous section on that page.
So if you set this password to say, changethis, then DAP will give out the same password to all new users.
Then, in the welcome email you configure at, say, Aweber, you would put the Aweber merge code for email id, and then enter this pre-selected password (because you already know what it is) into your Aweber email, like this:
Hello {!firstname},
Welcome to Example.com. You may log in to your member’s area at:
Email: {!email}
Password: changethisThank you,
– Admin from Example.com
And if you ever change the default password in DAP, don’t forget to also change it in your welcome email at Aweber (or 3rd party email service).
Also, don’t use the default password in any subsequent emails, other than the Welcome email (very first email sent to member through Aweber), because the member may have already changed their password by then.
WARNING: You must have also set up DAP/Aweber integration first before you attempt to do this.