Pay-Per-Post with DAP
One way of setting up Pay-Per-Post in DAP, is to create one product per post, and then sell access to each one separately.
However, if you have a lot of posts, this can be a lot of work.
An easier and more efficient way is to use our credits plugin, “Credit Store“.
Using the Credit Store plugin, you can setup individual pieces of content – like a post, page, category, or even a file – to be Redeemed via Credits, instead of cash. You sell credits, your members buy those credits, then use their credits towards redeeming individual content.
Just like when you buy an iTunes gift card and purchase individual songs or movies with it. Or like buying credits on a stock photo site and then redeeming it for individual images.
Whether that content is a bunch of content all bundled together, or individual posts/pages/files, is up to how you configure and set up your own Store.
The Credit Store plugin is a true game-changer, and allows you to be a lot more creative, and for your content to be delivered in a much more flexible yet powerful manner to your buyers and members.
We already have a few DAP users using the Credit Store (beta) this way, and they’re all loving the power and flexibility of this plugin.
See this for more details on the Credit Store:
http://wickedcoolplugins.com/the-plugins/dap-credit-store/
As the Credit Store is currently in Beta, if you wish to purchase it now, we will make it available for download in a few weeks and give you access to the plugin for a big discount compared to the price it will be launching at. So feel free to email us or open at ticket if you want more details.
Giving DAP Admin Access To All Products
By default, the DAP Admin User does not have access to all of the products you create.
This is a deliberate feature, because every time you protect content in DAP and try to visit it yourself while logged in as DAP admin and WP admin, we want you to see that the content is actually protected.
So, in order to be able to “see” the locked content yourself, you need to give yourself – the DAP Admin user – access to all of the DAP Products you create.
Identifying DAP Admin User
1) When you log in to DAP admin dashboard, click on the “Welcome <admin name>” link towards the top left corner of the DAP dashboard screen.
2) That will take you to the User > Edit page, where you can see the email id of the DAP Admin user. Copy the email id.
3) Go to Users > Manage page, and search for the email id.
4) Give yourself access to all of the products, one by one.
DAP to 1ShoppingCart List Integration
Q: How to automatically add a new user in DAP to a 1SiteAutomation.com (1SA) list (or other 1Shoppingcart – 1SC – private label)?
A: Every list in 1SA/1SC gets a unique email id – like 1sc-12345@autocontactor.com ).
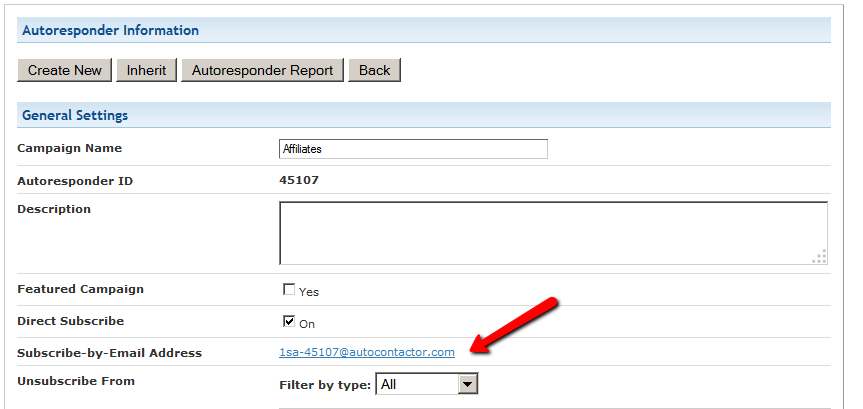
Add that to the “3rd-Party Notification Email Ids” field of the DAP product (under Products > Manage > “Notifications” tab)
And make sure you set the “Direct Subscribe” field in your 1SA/1SC list to be “On”.
1
[DAPUserProfile]
This post is dedicated just to the [DAPUserProfile] shortcode. To see the rest of the DAP Shortcodes, click here.
[DAPUserProfile]
This is the shortcode that displays all of the user profile fields on a page. Simply enter it on a WordPress page, save it, and when you view it when logged in as a user, it will display the DAP user profile form, with the logged-in user’s information displayed in the form fields.
As DAP Admin, you can customize which profile fields to show to your members, and which ones to hide. Just set the profile field that you don’t want displayed, to “N” in the tag below.
Default version
[DAPUserProfile showFirstName="Y" showLastName="Y" showUserName="Y" showEmail="Y" showPassword="Y" showAddress1="Y" showAddress2="Y" showCity="Y" showState="Y" showZip="Y" showCountry="Y" showPhone="Y" showFax="Y" showCompany="Y" showTitle="Y" showPaypalEmail="Y" showOptedOut="Y" showCustomFields="Y"]
Default is "Y". So Leaving out the text (for eg.) showLastName="Y" entirely from the shortcode, is the same as setting it "Y", which means it will be displayed.
Entering just [DAPUserProfile] into a page, will show ALL fields.
Show All Fields Except Phone & Fax
To hide just Phone and Fax, you would do something like this:
[DAPUserProfile showPhone="N" showFax="N"]
So all other fields will be displayed, except those two.
Show Just A Few
To show (say) just First, Last, Username, Password and Email, this is the shortcode:
[DAPUserProfile showFirstName="Y" showLastName="Y" showUserName="Y" showEmail="Y" showPassword="Y" showAddress1="N" showAddress2="N" showCity="N" showState="N" showZip="N" showCountry="N" showPhone="N" showFax="N" showCompany="N" showTitle="N" showPaypalEmail="N" showOptedOut="Y" showCustomFields="N"]
Related: [DAPUserLinks] shortcode
10
[DAPUserLinks]
This post is dedicated just to the [DAPUserLinks] shortcode. To see the rest of the DAP Shortcodes, click here.
[DAPUserLinks]
This is the shortcode that shows the user a list of all of the products that they have access to, and details about each product – like name, description, links that have already been dripped, etc.
This is similar to %%USERLINKS%%, but more advanced and more customizable.
You can customize most of the elements of this shortcode, as shown below.
You can even customize this to show details of a specific product (instead of all products).
Full Version
[DAPUserLinks showProductName="Y" showAccessStartDate="Y" showAccessEndDate="Y" showDescription="Y" showLinks="Y" orderOfLinks="NEWESTFIRST" howManyLinks="10000" errMsgTemplate="SHORT" productId="ALL" dateFormat="YYYY-MM-DD" showProductCount="Y" hideProductId="3,4"]
Most of the elements are self-explanatory. Here are a couple explained in detail.
orderOfLinks
orderOfLinks can have one of two values…
NEWESTFIRST will drip newly dripped links at the top. So day 7 link will be above day 1 link.
OLDESTFIRST will drip newly dripped links towards the bottom. So day 1 link will be above day 7 link.
showProductCount
showproductcount=”N” will disable the heading “You have access to (X) products” at the top of the “My Content” section.
So, here’s another version of the DAPUserLinks shortcode that shows oldest links at th top, and does not show the product-count heading.
[DAPUserLinks showProductName="Y" showAccessStartDate="Y" showAccessEndDate="Y" showDescription="Y" showLinks="Y" orderOfLinks="OLDESTFIRST" howManyLinks="10000" errMsgTemplate="SHORT" productId="ALL" dateFormat="YYYY-MM-DD" showproductcount="N"]
productId
productId is by default set to “ALL” which means details for all products that a user has access to, will be displayed on that page. You can also configure it to show for just one product (productId="8") or a few select products (productId="8,11").
hideproductid
This was introduced in DAP v4.5. It allows you to suppress all listed product id’s (either just one, or multiple product id’s separated by commas) from being displayed in the list.
[DAPUserLinks ... hideproductid="3" ...]
Related: [DAPUserProfile] shortcode
5
Access Expiration Options
In DAP 4.7, we have added a new feature to the hourly dap cron where once every day (it’s hardcoded to run ONCE between 10:00 PM – 11:00 PM PDT) the cron will look for users whose access expired that day.
You can configure the Cancellation Options in DAP Products page -> Cancellation & Expiration tab.

Then based on these settings, the DAP Hourly Cron will check if the current time is between 10:00 – 11:00 pm PDT (Server time), and if yes, it will take a look at each product, pick up the ‘Expiration Action’ setting for that product, then get a list of ALL users whose access to that product has expired and apply the ‘Expiration Action’ to that user->product record in DAP users -> manage page.
The reason the DAP Cron checks the current time and runs the ‘expiration job’ only once a day is because running it too often will burden your server/resources as this job needs to pick up all products and then apply the cancellation rule to all users whose access has expired.
The main thing is to make sure it only runs once.. does not matter if that’s between 10 – 11 or 11 – 12 etc. We just picked the time to be between 10 – 11 PM (server time).
1) No Action
User’s access will auto-expire at the end of current recurring cycle. If the user re-signs, they will start from where they left off instead of starting over at day 1.
Infact this is how all older versions of dap already work.
If a user cancelled access to a subscription product before and say that the same user now wants to start back after a couple of months break.
If you have selected NO ACTION as this product’s expiration setting (in dap products page -> cancellation & expiration tab),
then when the user re-signs, they will start their dripping from where they left off and will not start fresh again from day 1.
Say a user’s access start date is 07/01/2014 and access end date is 07/30/2014, when the cron runs on 07/31/2012
and finds the user’s access has expired, it wont do anything.
If the same user re-signs for the same product on 08/30/2014 using the same email id, their access start date will be what it was before (07/01/2014) and their new access end date will simply be extended from what it was before. It will be set to previous access end date (07/30) + 30 days instead of new signup date (08/30) + 30 days. User’s access to product will remain expired. You will have to set post-expiry access to “Y” in dap setup->config page for access to ‘paid-for content’.
See this for more details: Cancellation
2) Remove From Product
If selected, dap will automatically find users whose access to this product has expired and remove user’s access to product completely for those users.
You will need this setting to prevent access for expired users. Users will completely lose access to product.
If these users signs up again, they will start over like a new member.
3) Set end date to previous day
To enable this option, you will have to first enter the following in /dap/dap-config.php file.
Please ftp to your site, find dap-config.php file, edit it and add this to your /dap/dap-config.php file:
Add it towards the top after php start tag (<?php) :
if(!defined(‘EXPIREACCESS’)) define(‘EXPIREACCESS’,’Y’);
IMPORTANT: Replace all occurrences of backticks in the line above with single or double quote character.
Then upload back to your site (under dap folder).
We are forcing the dap-config.php setup in DAP 4.7 so users do not pick this option by mistake. We also want this feature to be BETA tested fully (in DAP 4.7) and then we will remove the extra steps (to add lines to the dap-config.php).(
After you set this in dap-config.php, this dropdown option will be available in the ‘expiration action’ dropdown.
If you pick this option for a product, then DAP CRON will automatically find a list of expired users (whose access has expired to this product) nightly and move the expired user’s access start and end day (set the access end date to the previous date).
When the cron wakes up and runs this job once once every night at 10:00 PM, it will move the user’s access start / end date forward in such a way that user’s access will remain expired but the access end date will not be stuck somewhere in past. It will be always set to the previous date (from current date).
Say a user’s access start date is 07/15/2014 and access end date is 08/15/2014.
When the cron runs on 08/16/2014 and finds the user’s access has expired, it will set the access end date to previous date.
So first time when the cron runs after the user’s access expires, nothing will happen. The access end date will remain 08/15 as it’s already set to previous date.
When cron runs on 8/17, it will move forward the the access start and access end window, so the new access start date will be 07/16 (moved forward by 1 day) and end date will be 8/16 (moved forward by 1 day).
This way the user’s access is still expired (as it’s always set to previous date) but the access dates are not stuck in the past.
If they re-sign, when DAP extends access, the access end date will be in the future instead of being expired.
If the cancelled user re-signs, the user’s access will not remain expired as their access will be extended from the current access end date to a date in future and the dripping will continue from where they left off.
IMPORTANT: ADDITIONAL INFORMATION
1) EXPIRATION: SET ACCESS TO PREVIOUS DATE
We recommend that you enable this option ON a test product first. DO NOT use this option on an actual live product. Add a few test users to the test product. Move their access start/end date manually to a date in the past .Make a note of it. Enable the admin option to ‘move date to previous date’ for this product. Then run the cron manually. Go back to dap manage users page and check the new access start / end dates for these users. If all looks good, then use it for live products.
2) CRON JOB:
The dap cron (dap-cron.php) runs once every hour at the top of the hour… but it will only do the expiration job between 10- 11 PM (server time). The expiration part of the cron only executes once a day.
To force run the cron, run this command in a browser (dont run cron too close to the top of the hour as it will collide with the normal running of cron ).
http://yoursite.com/dap/dap-cron.php?forcerun=Y (replace yoursite.com with the name of your site)
Protecting Draft Content
Now, normally, links to pages or posts show up in the left-hand side of the ContentResponder tab of the DAP Product only after they’ve been published.
But sometimes, for whatever reason, you may wish to protect pages or posts even before they are published – like in a “Draft” or “Pending Review” status. So here’s what you do.
As soon as you first create a new post or page, and tab out of the title field, and even before you save the post as a draft, or publish it, WordPress will create and display the permalink for that post/page, based on the text in your title.
So, if your page title is “Protecting Draft Pages”, then the default permalink will take on the structure http://YourSite.com/protecting-draft-pages – basically a lower-case version of the title, with hyphens separating the words. Like this…

You can then copy that entire permalink from where it is displayed, go to the DAP Product’s ContentResponder section, scroll down to the section that says “Protect a URL”, and then paste the entire permalink there (http://YourSite.com/protecting-draft-pages), and click “Add URL”.

That will protect this page or post in advance of it being published.
4
DAP’s “Pause Membership” Feature
How It Works
Joe Member joins your site on 01/01/2011.
He stays a member for about 3 months. Let’s say it’s now mid March. He wants to take a couple of months break. So he goes on a 2 month break. Comes back end of May and wants to resume his membership.
DAP allows him to pick up right where he left off – which is continuing to receive content as of April (04/01/2011), even though today’s date is May 25th, 2011.
So while he took a break, other members who did not take a break in membership, continued to pay for those 2 months, and continued to receive content dripped through those months. So it is only fair that when he does come back end of May and resumes his subscription, he does not resume from June’s content, but from April’s content (when he last put his membership on “Pause”).
It’s ok if you’re not dripping content on a monthly-basis, but rather on a “day” basis. So to put it in terms of “days”, when Joe resumes his subscription, since he was already 90 days old in the system when he put his subscription “On Hold”, and comes back another 60 days later (roughly about 2 months), then DAP will start dripping Day #91 content onwards for him, and NOT Day #151 onwards (he didn’t pay for 2 months in between).
This is how DAP works right out of the box. Nothing special to configure. And DAP automatically takes care of pausing the dripping when he is not paying.
WARNING: Just remember that in order for you to put his actual payments on hold, you will need to have a payment gateway like Authorize.net or Paypal Website Payments Pro. Or you must be using a shopping cart like http://1SiteAutomation.com . Using something like Paypal Standard or ClickBank will not allow you to put the actual charging of his credit card on hold.
NOTE: If you actually did want him to start receiving current content even though he left for 2 months, then all you have to do is, once he comes back and starts paying again, just extend his access end date on his account (which will initially be showing 03/31/2011 – end of March, when he left) and modify it and make it 05/31/2011. So when his next payment comes in after he resumes, DAP will extend his access end date to 06/30/2011 – which means, he can now access all of the current content.
1
Exporting Users
You can export DAP user/member data in CSV format, from the Users > Manage screen, as shown below.
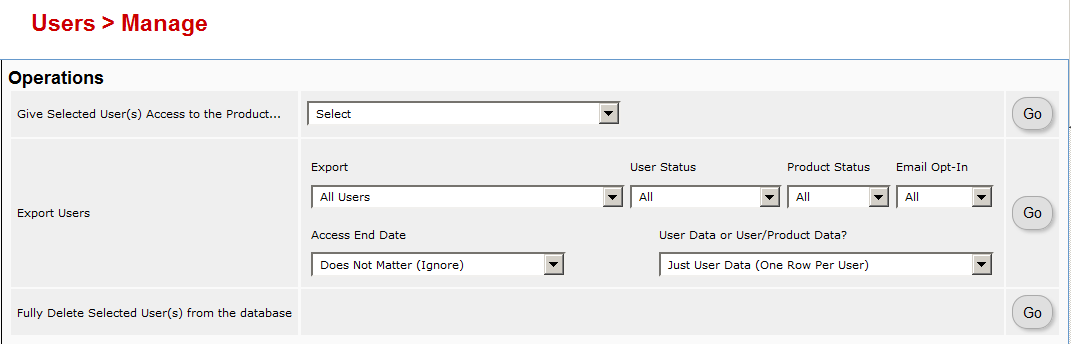
When you click on the “Go” button, you will see a pop-up appear that contains the exported data.
You may then copy it and save it to your desktop.
If you wish to bring that data into, say, an MS Excel spreadsheet, then save the file as a .csv file on your desktop, and then you will be able to import it into Excel.
31
Mailchimp Integration
Subscriber Flow
The flow of subscriber is “FROM DAP TO Mailchimp“. User signs up at DAP first, then DAP automatically adds the user to Mailchimp list.. Admin removes the user’s access to a product, and DAP automatically removes the user from Mailchimp list. This feature is available starting DAP v4.1.
How it works
[s3mv]mailchimp.mp4,640,378,false,false[/s3mv]1. Login to your account at http://admin.mailchimp.com/account/api/ and note down the API Key.
Image 1:

2. Go to http://admin.mailchimp.com/lists/ and grab your List’s Unique Id. Click the “settings” link for the list – the Unique Id is at the bottom of that page.
Image 2:

3. Log in to your DAP Admin Dashboard -> Products Page and select the product (whose members you wish to add automatically to your Mailchimp list.
4. If the list Id of the mailchimp list that you want to integrate with a DAP product/membership is say “ffffffffff”, and say your Mailchimp API Key is ‘ffffffffffffffffffffffffffffff-us2’ then add the following to the “Notify Plugin upon User -> Product Activation (Add)” in DAP products page and HIT Save/Update Product.
mailchimp:ffffffffffffffffffffffffffffff-us2:ffffffffff
Image 3:

That’s it!
Save the product and this completes the DAP->Mailchimp integration.
How This Works
So let’s say you picked the list “ffffffffff” in your Mailchimp account, and the DAP Product “Example Subscription Product” (as shown in the screenshots above).
So once you add “mailchimp:ffffffffffffffffffffffffffffff-us2:ffffffffff” to the product’s “Notify plugin upon user->product activation” and “Notify plugin upon user->product de-activation” field and save it, every time someone gets access to the “Example Subscription Product” product (regardless of whether they buy it, or you give them access on the backend), DAP will automatically add them to the list – ffffffffff. And everytime you remove the user’s access to product (click on ‘Remove’ in DAP manage users page), DAP will automatically remove the user from the list.
df11c84ab4