Bounces and Invalid Emails
There are many reasons why an email is not delivered to the recipient.
- Auto-responses and Vacation Replies
- Email delivered to “Junk” or “Spam” folder of recipient
- General undeliverable emails with no error specified by recipient’s server
- Recipient email server is down or unreachable
- “Connection timed out”
- Recipient mail box full
- Recipient email address not found
- Temporary non-delivery (server will keep trying for a few more days)
- Your server IP is blocked by recipient’s ISP (“Relaying Denied”)
- Your server IP is blacklisted for suspected spam
And the list goes on!
That should give you an idea why email delivery is so tricky and complicated, which is what created a niche for the email delivery industry, and which is why companies like Aweber, MailChimp and GetResponse even came into existence and have thrived while charging a hefty fee for what you would think is the simple act of delivering email over the interwebs.
When you use DAP for sending out emails (whether autoresponder or broadcast emails), the “From Name” and “From Email” you set up in the DAP Config are used to send out the emails.
If you use your own web host as the “carrier”, then your web host’s email server is the one that carries the email and tries to deliver to the inbox of the recipient. And web hosts are generally not very good at the intricate science of email delivery, which is why if you’re going to use DAP, we recommend that you bypass your web host and have a third-party email system like Amazon SES deliver your emails.
Regardless of the carrier (web host, Amazon SES, AuthSMTP.com, etc), all bounced and undeliverable emails come back to the “From Email” that you have used under DAP Config.
DAP by itself does not do anything with those emails, as those emails don’t come back to DAP, but they go straight to the inbox of whatever “From Email” you have specified.
We will surely address this in the future. But for now, you will have to manually review those email bounces, see which one of them sound more serious (like, say, recipient email id not found, or domain no longer in use, etc), and then de-activate those email id’s from your DAP database.
When you use Amazon SES, Amazon by itself also monitors email id’s that have a consistent history of bouncing back, and will automatically suppress those email id’s and won’t even deliver email to those email id’s even if DAP did send the actual email to those id’s.
Pay-Per-Post with DAP
One way of setting up Pay-Per-Post in DAP, is to create one product per post, and then sell access to each one separately.
However, if you have a lot of posts, this can be a lot of work.
An easier and more efficient way is to use our credits plugin, “Credit Store“.
Using the Credit Store plugin, you can setup individual pieces of content – like a post, page, category, or even a file – to be Redeemed via Credits, instead of cash. You sell credits, your members buy those credits, then use their credits towards redeeming individual content.
Just like when you buy an iTunes gift card and purchase individual songs or movies with it. Or like buying credits on a stock photo site and then redeeming it for individual images.
Whether that content is a bunch of content all bundled together, or individual posts/pages/files, is up to how you configure and set up your own Store.
The Credit Store plugin is a true game-changer, and allows you to be a lot more creative, and for your content to be delivered in a much more flexible yet powerful manner to your buyers and members.
We already have a few DAP users using the Credit Store (beta) this way, and they’re all loving the power and flexibility of this plugin.
See this for more details on the Credit Store:
http://wickedcoolplugins.com/the-plugins/dap-credit-store/
As the Credit Store is currently in Beta, if you wish to purchase it now, we will make it available for download in a few weeks and give you access to the plugin for a big discount compared to the price it will be launching at. So feel free to email us or open at ticket if you want more details.
5
Cache Plugin Setup
DAP works great with the WP Super Cache plugin. Probably works with others too – but we have officially tested it with just Super Cache at this time.
And this page below walks you through the full set up of the WP Super Cache plugin.
___________________________________________________________
Go to Settings > WP Super Cache
You are now on the “Easy” tab. Don’t do anything here just yet.
Go to Advanced tab.
Be sure to put a “Check” (or “Select” the radio button) next to each of the following items
Caching
Cache hits to this website for quick access. (Recommended)
Use mod_rewrite to serve cache files. (Recommended)
Miscellaneous
Compress pages so they’re served more quickly to visitors. (Recommended)
Don’t cache pages for known users. (Recommended)
Don’t cache pages with GET parameters. (?x=y at the end of a url)
Cache rebuild. Serve a supercache file to anonymous users while a new file is being generated. (Recommended)
Advanced
Clear all cache files when a post or page is published or updated.
Extra homepage checks. (Very occasionally stops homepage caching) (Recommended)
Only refresh current page when comments made.
List the newest cached pages on this page.
Click on Update Status button.
Keep scrolling down until you see the Accepted Filenames & Rejected URIs section.
You’ll see a big text area under the text “Add here strings (not a filename) that forces a page not to be cached”. +
There, add the following, one per line.
/dap/
/dap/.*\.php
/dap/admin/
/dap/admin/.*\.php
/login/
/members/
/my-profile/
/my-content/
Obviously, your member content page URL’s may be slightly different. So make sure you customize it to suit your own URL’s.
Next to back to Easy tab at the top.
Now you select the “Caching On” option and save.
That’s it for the setup.
Now, on to testing.
Content Organization Tips
If you organize all of your member content under a main parent page, say “members”, then all you need to exclude from caching, is /members/
For example, if your URLs include year and you don’t wish to cache last year posts, it’s enough to specify the year, i.e. /2004/. WP-Cache will search if that string is part of the URI and if so, it will not cache that page.
So basically, excluding just one single URL – /members/ – from caching, will make sure all of the following as well remain UN-CACHED.
/members/login/
/members/home/
/members/my-content/
/members/my-profile/
/members/my-affiliate-info/
/members/course-1/
/members/course-1/module-1/
/members/course-1/module2/
/members/course-2/module-1/
/members/course-2/module2/
You get the idea. When you exclude “/members/”, any URL that starts with that same text, will be excluded.
So here’s how you set up the “hierarchy” of the pages.
First, create the page “members“.
Then, when you create the “login” page, make sure you select the “parent” of the page, to be the “members” page.
So, instead of the login page URL looking like… http://YourSite.com/login/
… because the parent page is “members”, that also gets added to the URL, and the login page URL becomes like this:
http://YourSite.com/members/login/
If you created a page called “example” and made the “login” page as its parent, then the URL for this new page becomes:
http://YourSite.com/members/login/example/
So you see how that hierarchy works. Use that to arrange all of your member content under the main “ancestor”, which is “members”, here in our example.
But if you have already completed creation of all of your content, then you’re just going to have to do a little extra work to identify all of your pages and posts and exclude the member content from the list. DAP makes this a little bit easier as well.
Getting A Full List Of Pages & Posts
If you log in via FTP and go to the “dap” folder, inside, you will see a file called “dap_permalink_dump.php”. If you download that file to your desktop, and open it with any text editor (Notepad, Dreamweaver, etc), inside you will see a full list of URL’s of all posts and pages from your WordPress site. You can just take that list, remove separator text like “Posts” and “Pages”, and trim the list of URL’s down to just your member content, you can take that and paste it right into the WP Super Cache > Advanced tab > Accepted Filenames & Rejected URIs section.
Testing Caching Impact
Now open multiple browsers – like Firefox, Chrome and Internet Explorer (or Safari). Use at least 3 separate browsers.
Next, go to your login page in one of them, and then log in. Then go to same login page in another browser – make sure it doesn’t say “You are already logged in”. It should show you the DAP login form. Same on third browser.
Next go to the profile page while logged in as member. Do the same in other two browsers, while logging in as three different people. Each profile page should you show you different information.
If you crated 3 separate products, with 3 different users, then logging in as those 3 different users on the 3 different browsers, should show you 3 different sets of pages.
All this is just to make sure there’s no caching going on of your membership content, that’s all.
If all of this works, then you’re all set with caching for your non-membership content, and no caching for your dynamic member content.
Giving DAP Admin Access To All Products
By default, the DAP Admin User does not have access to all of the products you create.
This is a deliberate feature, because every time you protect content in DAP and try to visit it yourself while logged in as DAP admin and WP admin, we want you to see that the content is actually protected.
So, in order to be able to “see” the locked content yourself, you need to give yourself – the DAP Admin user – access to all of the DAP Products you create.
Identifying DAP Admin User
1) When you log in to DAP admin dashboard, click on the “Welcome <admin name>” link towards the top left corner of the DAP dashboard screen.
2) That will take you to the User > Edit page, where you can see the email id of the DAP Admin user. Copy the email id.
3) Go to Users > Manage page, and search for the email id.
4) Give yourself access to all of the products, one by one.
Downline Builder
Or also called as network builder. And we introduced this feature in DAP v4.4.
We call it DAP “Upline” – basically a shortcode called [DAPUpline] that allows you (site admin) to display the person’s upline’s affiliate code to the person. So in effect, it is a downline builder.
1) John joins your site
2) John fills out profile with (say) his ClickBank nickname
3) John refers Adam
4) When Adam logs in, he sees affiliate link to some xyz third party product, but CB nick in the affiliate link is replaced with John’s CB nickname.
5) Adam fills out his profile with his own CB nickname
6) Adam refers Jill
7) When Jill logs in, she sees affiliate link to same third party product, but cbnickname is replaced with Adam’s CB nickname.
This can be done with any number of third-party programs, as long as the nickname can be easily replaced with the info provided by the upline affiliate.
DAP even takes this one step further.
When Jill joins through Adam’s DAP affiliate link, if Adam has not filled out his CB nickname in his profile, then the third-party CB link shows CB Nickname of Site Admin in its place.
So if an affiliate fails to claim his affiliate link, then site admin gets credit for it (and all such links).
Here’s the documentation for [DAPUpline]
DAP to 1ShoppingCart List Integration
Q: How to automatically add a new user in DAP to a 1SiteAutomation.com (1SA) list (or other 1Shoppingcart – 1SC – private label)?
A: Every list in 1SA/1SC gets a unique email id – like 1sc-12345@autocontactor.com ).
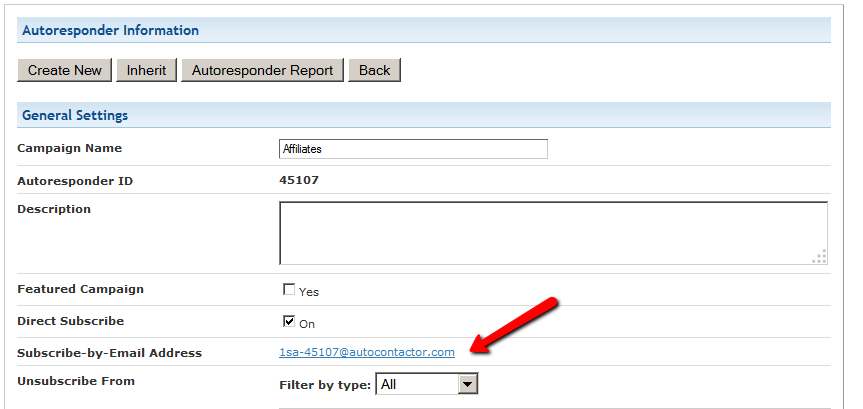
Add that to the “3rd-Party Notification Email Ids” field of the DAP product (under Products > Manage > “Notifications” tab)
And make sure you set the “Direct Subscribe” field in your 1SA/1SC list to be “On”.
2
Redirect After Double-Optin Confirmation
If you are using double-optin for your DAP product, then you would normally have entered the text %%ACTIVATION_LINK%% in your email body, which is replaced by a unique confirmation link specific to that user.
Normally, when that activation link is clicked, the user is redirected to your login page configured under Setup > Config > Login URL.
But if you wanted them to be redirected elsewhere to a page of your choice, then in your double-optin email body, where you normally enter %%ACTIVATION_LINK%% , enter this instead:
%%ACTIVATION_LINK%%&redirect=http://link/to/landing/page/
Where “http://link/to/landing/page/” is the URL where you want them to be redirected to after they click on the double-optin activation link.
11
[DAPUpline]
[DAPUpline]
[DAPUpline] is basically a WordPress shortcode that you can insert into WordPress pages and posts. It allows you (DAP admin) to display the member’s upline affiliate’s data to the member.In simple terms, it shows a user their referring Affiliate’s (a.k.a Sponsor’s) information. It could also be called a downline builder.
And you can display any data from the member’s affiliate profile, on a page.
So when a user visits the page that has this shortcode, it will determine who the visitor/member’s affiliate is, from…
1) Affiliate Cookie (if it exists), or
2) If they’re already a member, and have logged in to DAP, then it will show their current Affiliate’s information. Or,
3) If neither the cookie is set, nor the user has an Affiliate attached to their account already in DAP, then it will show the info of the DAP Admin.
So you can use it to show the user information of the person (affiliate) who referred them to the page.
Think of it as a “Your Sponsor” tag.
Consider this example:
1) John joins your site
2) John fills out his profile with (say) his ClickBank nickname
3) John later refers Adam
4) When Adam logs in, he sees affiliate link to some third-party product, but CB nickname in the affiliate link is replaced with John’s CB nickname. So if Adam goes on to purchase that third-party CB product, then John will get the affiliate commissions for that purchase.
5) Now Adam fills out his profile with his own CB nickname
6) Adam refers Jill
7) When Jill logs in, she sees affiliate link to same third party product, except this time, the CB nickname is replaced with Adam’s CB affiliate nickname.
This can be done with any number of third-party programs, as long as the nickname can be easily replaced with the info provided by the upline affiliate. And it’s not just one field – you can create multiple profile fields for the affiliate to fill out – like ClickBankNick, CommissionJunctionNick, JVZooId, GoogleAnalyticsId, etc.
DAP actually even takes this one step further.
When Jill joins through Adam’s DAP affiliate link, if Adam has not filled out his CB nickname in his profile, then the third-party CB link shows CB Nickname of Site Admin in its place.
So if an affiliate fails to claim his affiliate link, then site admin gets credit for it (and all such links).
Hope this helps.
For eg., to show affiliate’s first name on a page, insert this into page:
[DAPUpline showField="first_name"]
Full list of available fields from sponsor’s or affiliate’s profile:
[DAPUpline showField="first_name"]
[DAPUpline showField="last_name"]
[DAPUpline showField="user_name"]
[DAPUpline showField="email"]
[DAPUpline showField="address1"]
[DAPUpline showField="address2"]
[DAPUpline showField="city"]
[DAPUpline showField="state"]
[DAPUpline showField="zip"]
[DAPUpline showField="country"]
[DAPUpline showField="phone"]
[DAPUpline showField="fax"]
[DAPUpline showField="company"]
[DAPUpline showField="title"]
[DAPUpline showField="paypal_email"]
Showing Custom fields:
[DAPUpline showField="custom_"]
Eg: To show affiliate’s/sponsor’s custom SSN field (say “ssn”):
[DAPUpline showField="custom_ssn"]
NOTE: You should’ve already created the custom field “ssn” before you can do this, of course.
Disabling Login IP Security Check
DAP has a security check to prevent password sharing.
And starting DAP v4.4, you can turn this off at both a per-user level and also at a global site-wide leve.
Disabling IP Check For Individual Users
- Search for the user on the Users > Manage page
- Click on their email or user id, and you will now be taken to the “User Edit” page
- There, on their user profile, towards the bottom, set the field “Exclude from Login IP Check” to “Yes” and save.

This user will now be excluded from login IP check.
NOTE: If the user’s account is currently already locked, then you also need to unlock it this one time, but going forward, the account is now whitelisted, and will not get locked again.
Disabling IP Check For All Users (Site-wide)
If you wish to permanently disable this for all users in your membership site, then here’s how to do it:
- Go to DAP Admin > Setup > Config
- Set “IP Login Limit: Max. # of User Logins From Different IP’s” to a high number – like “100″.
- Set “Flush Login IP Records How Often? Every….. ?” to “Day” so that any accumulated IP records gets flushed every day.
That’s it!
Emailing Expired Users
You can send an email broadcast to expired users of a product/level, on the DAP Admin > Email > Broadcasts page, by selecting Group #4.
The same feature works for sending emails to those who have “Cancelled” their subscription or trial.
Go to DAP Admin > Email > Broadcasts
Select Group #4.
1st drop-down: Select Product Name
2nd drop-down: Select “Have Already Expired”
3rd text field: Enter within how many days the users should’ve expired – as in, expired in the “Last X Days”
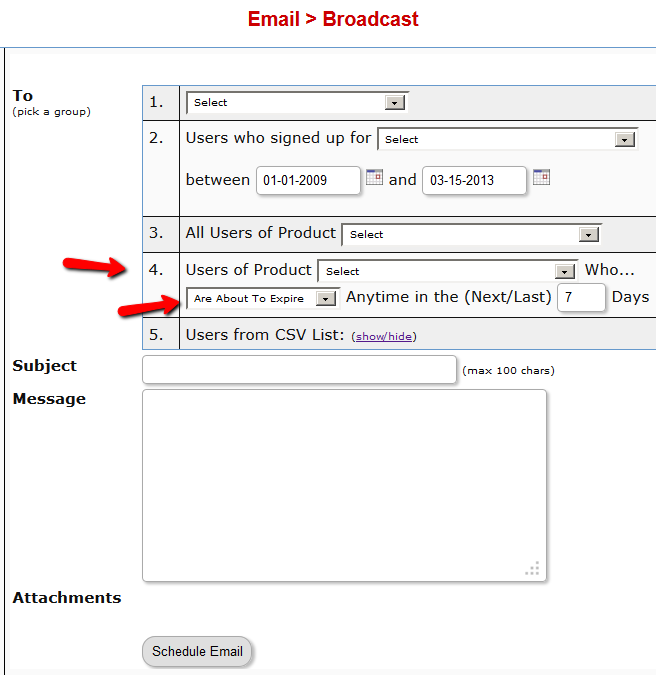
Once you’ve scheduled the broadcast, the emails will be sent out at the top of the hour when the DAP hourly cron runs.