1
[DAPUserProfile]
This post is dedicated just to the [DAPUserProfile] shortcode. To see the rest of the DAP Shortcodes, click here.
[DAPUserProfile]
This is the shortcode that displays all of the user profile fields on a page. Simply enter it on a WordPress page, save it, and when you view it when logged in as a user, it will display the DAP user profile form, with the logged-in user’s information displayed in the form fields.
As DAP Admin, you can customize which profile fields to show to your members, and which ones to hide. Just set the profile field that you don’t want displayed, to “N” in the tag below.
Default version
[DAPUserProfile showFirstName="Y" showLastName="Y" showUserName="Y" showEmail="Y" showPassword="Y" showAddress1="Y" showAddress2="Y" showCity="Y" showState="Y" showZip="Y" showCountry="Y" showPhone="Y" showFax="Y" showCompany="Y" showTitle="Y" showPaypalEmail="Y" showOptedOut="Y" showCustomFields="Y"]
Default is "Y". So Leaving out the text (for eg.) showLastName="Y" entirely from the shortcode, is the same as setting it "Y", which means it will be displayed.
Entering just [DAPUserProfile] into a page, will show ALL fields.
Show All Fields Except Phone & Fax
To hide just Phone and Fax, you would do something like this:
[DAPUserProfile showPhone="N" showFax="N"]
So all other fields will be displayed, except those two.
Show Just A Few
To show (say) just First, Last, Username, Password and Email, this is the shortcode:
[DAPUserProfile showFirstName="Y" showLastName="Y" showUserName="Y" showEmail="Y" showPassword="Y" showAddress1="N" showAddress2="N" showCity="N" showState="N" showZip="N" showCountry="N" showPhone="N" showFax="N" showCompany="N" showTitle="N" showPaypalEmail="N" showOptedOut="Y" showCustomFields="N"]
Related: [DAPUserLinks] shortcode
10
[DAPUserLinks]
This post is dedicated just to the [DAPUserLinks] shortcode. To see the rest of the DAP Shortcodes, click here.
[DAPUserLinks]
This is the shortcode that shows the user a list of all of the products that they have access to, and details about each product – like name, description, links that have already been dripped, etc.
This is similar to %%USERLINKS%%, but more advanced and more customizable.
You can customize most of the elements of this shortcode, as shown below.
You can even customize this to show details of a specific product (instead of all products).
Full Version
[DAPUserLinks showProductName="Y" showAccessStartDate="Y" showAccessEndDate="Y" showDescription="Y" showLinks="Y" orderOfLinks="NEWESTFIRST" howManyLinks="10000" errMsgTemplate="SHORT" productId="ALL" dateFormat="YYYY-MM-DD" showProductCount="Y" hideProductId="3,4"]
Most of the elements are self-explanatory. Here are a couple explained in detail.
orderOfLinks
orderOfLinks can have one of two values…
NEWESTFIRST will drip newly dripped links at the top. So day 7 link will be above day 1 link.
OLDESTFIRST will drip newly dripped links towards the bottom. So day 1 link will be above day 7 link.
showProductCount
showproductcount=”N” will disable the heading “You have access to (X) products” at the top of the “My Content” section.
So, here’s another version of the DAPUserLinks shortcode that shows oldest links at th top, and does not show the product-count heading.
[DAPUserLinks showProductName="Y" showAccessStartDate="Y" showAccessEndDate="Y" showDescription="Y" showLinks="Y" orderOfLinks="OLDESTFIRST" howManyLinks="10000" errMsgTemplate="SHORT" productId="ALL" dateFormat="YYYY-MM-DD" showproductcount="N"]
productId
productId is by default set to “ALL” which means details for all products that a user has access to, will be displayed on that page. You can also configure it to show for just one product (productId="8") or a few select products (productId="8,11").
hideproductid
This was introduced in DAP v4.5. It allows you to suppress all listed product id’s (either just one, or multiple product id’s separated by commas) from being displayed in the list.
[DAPUserLinks ... hideproductid="3" ...]
Related: [DAPUserProfile] shortcode
2
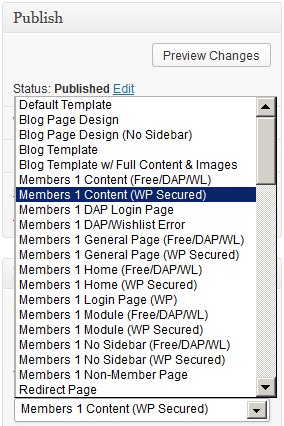
Troubleshooting OptimizePress Templates
If you’re using OptimizePress as your theme, make sure you’re only using membership templates that have the word “DAP..” in them.
DO NOT USE any template that has the words “WP” or “WP Secured“. That will cause members logging in via DAP, to not be able to access those pages.
Those templates are meant for OP’s own internal membership functionality, or built for other membership plugins. Those will not work with DAP.
Templates that are OK to use with DAP
- Members 1 Content (Free/DAP/WL)
- Members 1 DAP Login Page
- Members 1 DAP/Wishlist Error
- Members 1 General Page (Free/DAP/WL)
- Etc.. anything with the word “DAP” in it.
For the other squeeze page/sales page templates, it doesn’t matter which ones you pick.
This restriction applies only to the “Members…” templates.
12
Aweber To DAP Integration
Follow the documentation below on this page for Aweber-to-DAP integration, only if you’re using DAP 4.4 or later. (For DAP v4.3.1 or older, click here)
Subscriber Flow
The flow of subscriber in this model, is “FROM Aweber TO DAP“. User gets added to Aweber first, then arrives at DAP via Aweber “thank you page”, at which point she gets added to DAP.
Now, if the flow is from DAP-to-Aweber, and are using email parsing to integrate DAP and Aweber, then your Aweber list will always be double-opt-in (as per Aweber policy, nothing to do with DAP).
But if you want your Aweber list to be single-opt-in, or you want your sign ups to be added to Aweber first and then to DAP, then use this flow. HEre, you can use an Aweber signup form on your squeeze page (instead of the DAP sign-up form) and then have Aweber add users to DAP.
NOTE: You cannot use this flow for Paid members – because paid members will need to have paid first, which means DAP needs to process their payment first, and if successful, it can add them to Aweber. So for paid members and paid content, always use the other DAP-to-Aweber flow.
But for free signups (say, like when you’re trying to build a list), you can add them to Aweber first using the flow explained below, just so you can take advantage of making your Aweber list single-optin, and then have Aweber add the subscriber to DAP on the other end. So this way, DAP can then create a free account for them, email them their login/password, and give them access to the “Free” content (that is, content available only to “Registered” users, so to speak), etc.
So here are the steps…
Aweber To DAP Integration
1. Go to DAP Dashboard > Products > Manage page.
2. Note down the Product Id of the product to which you want to sign-up the users (after adding them Aweber first, of course). Let’s call this PRODUCTID

Aweber List Is Single-Optin
If your Aweber list is single-optin, then follow the steps below. If not, skip ahead to “Aweber List Is Double-Optin” flow further below.
(The old steps 3 & 4 no longer exist. To keep the image below in sync, follow the rest of the steps starting Step 5.)
5. Now login to your AWeber account.
5A) From the “Current List” drop-down, select the list that you wish to sign up users to.
5B) Click on “Web Forms” in the menu at the top.
5C) Edit existing form by clicking on the name of the list.

6. On the next page – the list form generator page – click on ‘Go to Step 2’ towards the bottom of the page.

7. On the next, page…
7A) Click on the thankyou page dropdown and select ‘Custom’.
7B) Set the thank you Page URL to http://YourSite.com/dap/signup_submit.php?productId=PRODUCTID
Replace YourSite.com with the name of your site.
Replace PRODUCTID with the Product Id of the product you noted in step 2.
So, if the Product Id of the product in DAP is 2, then the thankyou page URL will be…
http://YourSite.com/dap/signup_submit.php?productId=2
7C) Where it says “Pass Form Data”, check the check box so that Aweber can “Forward subscriber information to your thank you page” – which essentially is DAP, so that DAP can add the subscriber to your membership site.

That’s it!
Aweber List Is Double-Optin
In this flow, set up your Web Form as usual, with no DAP-specific settings required.
Only change required is in the Aweber list’s main “List Settings” page.
5. Now login to your AWeber account.
6. From the “Current List” drop-down, select the list that you wish to sign up users to.
7. Go to My Lists > List Settings

8. Go to “Confirmed Opt-In” tab

9. Scroll down to “3: Success Page“.
9A) Set the “Confirmation Success Page URL” to http://YourSite.com/dap/signup_submit.php?productId=PRODUCTID
Replace YourSite.com with the name of your site.
Replace PRODUCTID with the Product Id of the product you noted in step 2.
So, if the Product Id of the product in DAP is 2, then the thankyou page URL will be…
http://YourSite.com/dap/signup_submit.php?productId=2
9B) Check the check-box that says “Pass subscriber info for personalizing this page”. Ignore the comment that says “Not recommended for WordPress users”, because this is going to point to a DAP script, and not a WordPress page.
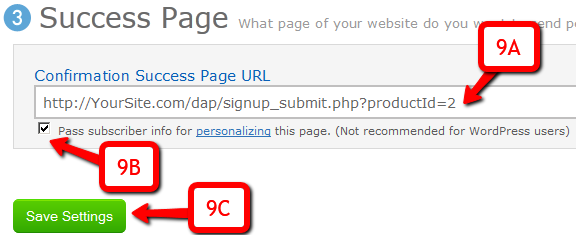
9C) Click on “Save Settings”.
That’s it!
Using Custom Redirect URL
If you want the user to be logged in automatically (either after single-optin or double-optin) and instead of being logged into the member’s area, you want the user to be redirect to your own custom URL, then your thank-you URL should be:
http://YourSite.com/dap/signup_submit.php?productId=PRODUCTID&redirect=http://yoursite.com/your-custom-thankyou-page
OR
http://YourSite.com/dap/signup_submit.php?productId=PRODUCTID&redirect=/your-custom-thankyou-page
Additional Notes
Now that you’ve set up DAP to integrate with your Aweber list (single- or double-optin), you may use the Aweber web form directly on your squeeze page for signing up subscribers
(instead of DAP’s “Direct Signup Form”).
Now, every time a subscriber signs up via the Aweber form, they will automatically be added to DAP.
If your list is single-optin, then the subscriber will be added to DAP instantly after sign-up.
If your list is double-optin, then the subscriber will be added to DAP only AFTER they’ve clicked on the Aweber double-optin confirmation link.
In both cases, if they’re a new user to DAP, they will be auto-logged in to the member’s area.
You may also configure the DAP Product’s “Welcome Email” to send out the DAP email and password via DAP itself.
-OR-
You can leave the Welcome Email in DAP Product page as blank. And then configure DAP to generate a default password (DAP Admin > Setup > Config > Default Password) as shown below, and then enter that same pre-chosen password in to your very first Aweber follow up email that goes out to your subscribers, so that they can receive their dap id/password details directly from your Aweber list.

For more details about this default password, please see this post.
PRODUCTID
Customizing User Profile Fields
The old shortcode for displaying the user profile on a page, was %%USERLINKS%% which just displayed the entire user profile with all fields, without the ability to customize which fields to show.
That one is still valid. But starting DAP v4.4.3, we have a new shortcode to display userprofile.
[DAPUserProfile]
Allows you to selectively display profile fields on a page. Entering just the shortcode [DAPUserProfile] within a WP page, will show the default user profile form with all default fields being displayed.
So entering just [DAPUserProfile] on a pagem is the same as entering the full version below:
[DAPUserProfile showFirstName=”Y” showLastName=”Y” showUserName=”Y” showEmail=”Y” showPassword=”Y” showAddress1=”Y” showAddress2=”Y” showCity=”Y” showState=”Y” showZip=”Y” showCountry=”Y” showPhone=”Y” showFax=”Y” showCompany=”Y” showTitle=”Y” showPaypalEmail=”Y” showOptedOut=”Y” showCustomFields=”Y”]Not Show Certain Fields
Just set the profile field that you don’t want shown to “N” in the shortcode.
Default is “Y”. So Leaving out the text showLastName=”Y” entirely from the shortcode, is the same as setting it “Y”, which means it will be displayed.
To NOT SHOW Phone and Fax
[DAPUserProfile showPhone=”N” showFax=”N”]So all other fields will be displayed, except those two.
To SHOW just First Name, Last Name and Email
[DAPUserProfile showFirstName=”Y” showLastName=”Y” showUserName=”N” showEmail=”Y” showPassword=”N” showAddress1=”N” showAddress2=”N” showCity=”N” showState=”N” showZip=”N” showCountry=”N” showPhone=”N” showFax=”N” showCompany=”N” showTitle=”N” showPaypalEmail=”N” showOptedOut=”N” showCustomFields=”N”]To SHOW just Password field
[DAPUserProfile showFirstName=”N” showLastName=”N” showUserName=”N” showEmail=”N” showPassword=”Y” showAddress1=”N” showAddress2=”N” showCity=”N” showState=”N” showZip=”N” showCountry=”N” showPhone=”N” showFax=”N” showCompany=”N” showTitle=”N” showPaypalEmail=”N” showOptedOut=”N” showCustomFields=”N”](both main password field and repeat password will always be displayed together)
Expiration Notifications / Renewal Reminders
We have a new feature starting DAP v4.4: “Reverse Dripping”
This is where you can drip emails “X” days (where “X” is a number of your choice) before the access to a product ends for a member. So this is what you would use to send expiration notification / renewal reminder emails to your members.
To setup a renewal reminder email, you would set up the email as usual, and drip it as a negative day. So if you set up the email to drip on Day “-1”, then it means the email will be sent out 1 day prior to product expiry (for that product).
If you set it up to drip on “-3”, it will be sent out 3 days prior to access end date.
If you set it up to drip on “-7”, it will be sent out 1 week prior to access end date.
Renewal Reminder Email Setup
Warning: This is something you should set up only for recurring products that require manual renewal. Do not set up these emails to go out for automated subscription products, because the members will be charged automatically on the designated day every month, and asking them to renew will only confuse them.
- Create a new Autoresponder email with the product expiration notice, at Email > Autoresponders. In this email, you would say something like “Hey, your subscription is expiring in 1 week, so click on this link to renew… (followed by link to renewal page)”.
- Create another email that says “Hey, your subscription is expiring tomorrow…”.
- Go to Products > Manage and choose product for which you wish to set up renewal reminder.
- Switch to “Autoresponder” tab.
- Select the 7-day renewal reminder email from step 1 and add it to the product.
- Then click on the “Edit” link and set the drip day as -7
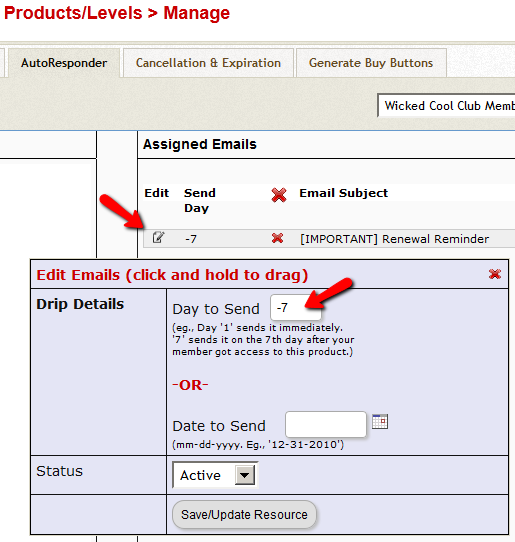
- Do the same for the 1-day reminder email as well, and this time set the dripping to be “-1”.
That’s it!
4
Affiliate Notification On Leads And Sales
Starting DAP v4.4, you can notify your affiliates with an automated instant email when they earn a commission for a lead and a sale.
In DAP > Setup > Config > (Affiliate Module) you can separately configure which emails to send (Lead, Sale):

And then on DAP > Setup > Templates page, you can configure the Subject and Body for both emails.

Troubleshooting Amazon SES Integration
DAP’s Amazon SES integration has been heavily tested, and we use it ourselves at DigitalAccessPass.com . So you can rest assured that there are no “bugs” of any kind.
Here are some troubleshooting steps if SES integration is not working even after you’ve followed the documentation exactly.
Troubleshooting SES
- MOST COMMON MISTAKE: Have you whitelisted the DAP “From” email in Amazon? And have you used exact same “case” for the email id in both places (DAP and Amazon)? Double-check spelling and case in both DAP and Amazon – they must be EXACTLY the same. For eg., you@yoursite.com is NOT the same as You@YourSite.com as far as Amazon is concerned. So if you’ve set the “From Email” in DAP to be you@yoursite.com, then you must whitelist exactly the same email id you@yoursite.com within your Amazon SES account as well. If you are not sure, delete the whitelisted email in your SES account, then COPY the from-email from DAP config (be sure to copy, and not re-type) and then PASTE the exact from-email into your Amazon SES account and whitelist it again.
- IMPORTANT: Have you requested Amazon for “Production Access” to your SES account? Being in “Sandbox” mode has its disadvantages (you can only send “from” and “to” whitelisted” emails ONLY). So your account MUST, MUST, MUST be in “Production” mode before Amazon SES lets you send emails to your customers.
- Are you using the exact ports as mentioned in our documentation? Ignore the port #s that Amazon recommends.
- IMPORTANT: Double-check with your web host to make sure that they actually allow a plugin like DAP to connect to a third-party server like Amazon SES to send out emails. Some hosts don’t even allow that to begin with (like BlueHost, for eg.)
- Turn on the logs by setting DAP > Setup > Config > Log Level to “Log All Activity”.
- Then go to System > Logs and clear the logs. Then go to one of your test accounts, and edit the user.
- On the “User Edit” page, click on “Resend Login/Password”.
- Check the email inbox to see if you got the email. If you didn’t, go to System > Logs and take the entire logs shown there, and paste it into a support ticket, and don’t forget to give us your WP login info and FTP info (and if possible, Amazon login info as well), and we’ll troubleshoot it.
Log In As Member
Starting DAP v4.4, all passwords are encrypted. Previously, one of the main reasons that we had made it open, was because of many DAP admins asking for it to be that way so that they could log in “as” one fo their members to see what they’re seeing, for troubleshooting, etc.
But since the passwords are now encrypted, we have provided an alternate way for DAP admin to log in as a regular user/member.
Log In As Member (LIAM)
- If your primary browser is say Firefox where you’re normally logged in as WP admin and DAP admin, then open a separate browser window (like in Chrome or Safari)
- Go to http://YourSite.com/dap/loginAs.php
On that page, you will see 3 form fields as shown in the image below:

1) Email address of user/member that you wish to log in as
2) DAP Admin Email
3) DAP Admin Password
So once DAP verifies that it is indeed the DAP Admin trying to log in as someone else, DAP will log you into the site as that member whose email id you entered in (1) above.
NOTE: The Log In As Member (LIAM) feature does NOT mean that you can use just one browser to log in as both DAP Admin and regular member. You still need to use two separate browsers – one for DAP admin (like Chrome) another for regular member (Firefox). All LIAM does is to give you a workaround for logging in as someone else, because starting 4.4, the DAP Admin can no longer see what the member’s password is in order to log in as them.
1
Approving Users Before Access Is Enabled
Problem
“Will DAP allow me to manually approve members before their new accounts are activated? The process should be…
a) new user signs up, DAP prompts that the account is pending approval
b) Admin approves the account manually and email is sent to new member with their password and login details”
Solution
Yes, this can be achieved by enabling the “Double Optin” for a product.
So, normally, when a DAP Product is made “Double Optin” by entering the double-optin subject and email text on the “Email Notifications” tab of the product, and a user signs up for this product (whether as a free sign up or as a paid purchase or Admin-add), DAP will send them the content of this double-optin email first.
And usually, the body of this email would contain the %%ACTIVATION_LINK%% merge tag, which would become the confirmation link that the user has to click on first, before their product access status becomes “Active” (from “Inactive”). And as soon as the user clicks on the confirmation link, their product status becomes active, and then the “Welcome Email” is sent out right away, and now the user can log in and start accessing the content that is protected as part of that product.
Using Double-Optin To Force Approval
If you make the DAP product as double-optin, and remove the merge-tag %%ACTIVATION_LINK%% from the email body, what happens is that the user/member will get the email, but there’s really no activation link (confirmation link) in the email for them to self-activate their account. So the email would just say something like…
“Thank you for your purchase/signup. Your account needs to be activated by us. So appreciate your patience while we do so”.
Now, their account remains at “Inactive” status. And only you, the DAP Admin, can activate it.
By now, you would’ve gotten the admin notification email for this person’s signup. So you know their email id. If not, you can just go to DAP > Users > Manage and you’ll see all inactive users.
You would then click on “Modify” to activate product access. And if the user status is also “Inactive”, then you would edit the user info, and change their status to “Active” (from “Unconfirmed”).
And then make sure you’ve added an autoresponder email (that contains the user’s email and password – insert mergecodes %%EMAIL_ID%% and %%PASSWORD%% into the email) to go out on Day #2 for that product.
And assuming you will be approving this new user at some point within the first 2 days, the autoresponder email for day #2 will get triggered within the hour as soon as you activate their account, and the user will get their welcome email.
Or you can send them the password in the double-optin email itself, but tell them that they won’t be able to log in just yet until their account is activated. It’s all up to you – DAP is as flexible as you need it to be.
So that’s how you would use the Double-Optin feature to indirectly force an “Approval” process.