Gift Subscriptions
There are two ways members can buy gift subscriptions for others.
1) Use the recipient’s email id (but their own name and billing info) during checkout. So when DAP creates the member account, it will send the welcome email to the recipient’s email id.
NOTE: Using the recipient’s email id may not be an option if the gift giver is paying for it using their own Paypal standard account, in which case their Paypal email id will be used by DAP to create the membership account. So, the best option is the one explained below.
2) BEST OPTION: Have the buyer make the purchase in their own name, and then forward the welcome email (which has the password to the member’s area) to the recipient. And the recipient can then log in using that information, and can change any and all profile information on the User Profile page.
NOTE: If this is a subscription product, then the recipient should not change the “Paypal Email” field in the profile, which will be having the buyer’s Paypal email id, because recurring subscriptions will continue to come in using the buyer’s Paypal email id. And since the recipient is not the one being charged, and it’s still going to be charged to the gift giver’s account, they need to leave that field in there. So you can use the [DAPUserProfile] shortcode and maybe not even show the “Paypal Email” field.
Group Memberships And Sub-Accounts
So you want to use DAP to sell group memberships or sub-accounts.
Eg. 1) A group membership – or multi-user account – that a School/College/Teacher can buy on behalf of their students. It’s either a one-time product, or could be a subscription product. In that case, buyer keeps paying monthly, and when they stop paying, all sub-users (child accounts) get disabled.
Eg. 2) Company A pays $X for up to 20 of its employees to have individual memberships. To begin with, the money is collected in one lump sum and DAP grants 20 memberships. Then each month Company A pays the Corporate/Umbrella/Bulk Membership and DAP gives credit to the individual memberships. If Company A fails to pay, all the “sub” members underneath lose access.
How To Implement Group/Bulk Memberships
DAP doesn’t directly support sub-memberships or sub-accounts yet. We already have this on our humongous to-do list :-). And we definitely plan on implementing it soon. But for now, here’s a work-around for making this happen. It’s fairly simple, yet it is manual, and cannot be automated yet.
- You would set up a One-Time product in DAP called, say, “20-Seat Membership“. If you wish to sell different quantities of “seats” or “licenses”, then you have to create as many products (like “5 Seats”, “10 seats”, “50 seats”, etc).
- In the welcome email, you would instruct buyer to email you a CSV file with 20 (or as many as your product allows) names and email id’s, one per line, in this format (EMAIL,FIRST,LAST):student@gmail.com,John,Student
another@yahoo,com,Jill,Freshman
…
…
member20@yahoo,com,Joe,Senior - And then, using DAP’s bulk-import feature, in one fell-swoop, you can add all 20/50/100 to your membership site and give them all their own accounts, usernames and passwords, that they can all use to independently log in to your web site.
- If you see Step 1 above, we advised to make this a One-Time product. The reason for that, is you give life-time access first, and if they stop paying, then you cancel manually. So if the main buyer stops paying the subscription, this is the only time you will have some manual work hunting searching for those 20/50/100 email id’s on the Users > Manage page, and then clicking on “Remove” on their user row, so that they completely lose access.
Until we include this feature in DAP and make it automated, there are two ways to look at this.
One: You could say, it’s too much work to remove 20/50 emails when the main buyer cancels. OR…
Two: Since this is a group membership, you are hopefully charging them a good fee for this (if not, then you certainly should!). So you can always hire someone for $5 or $10 per hour on Odesk and have them do the removal of those email id’s. Removing 50 email id’s would take about 20 minutes at most. And you would need to do this only when they cancel, which can happen only once per group membership.
So hope that helps give you some ideas.
Hope this makes sense.
Upgrading or Downgrading of Subscriptions
There are two main items that need to be addressed when it comes to a member wanting to Upgrade or Downgrade their Subscription from one membership “level” (a.k.a “Product” in DAP) to another.
1) Modifying the actual recurring payments to reflect the new amount
2) Giving them appropriate access as per the upgrade (or downgrade)
So let’s see how both of these are accomplished.
1) Modifying Recurring Payments
You do need to take some manual action for this. The way to do it is….
- Ask your members to sign up for the new product/level/subscription separately, like it were a new sign up
- Cancel their old subscription manually. When using Paypal standard, this can be done by both you (as the admin) and the member themselves. But with all of the other payment solutions, you (the admin) will have to log in to the payment gateway (Authorize.net or Paypal Website Payments Pro) and manually delete the member’s old subscription). DAP will not automatically remove users old subscription profile in your payment gateway.
2) Giving your member access to new level
Set up automation rules using DAP’s Product Chaining feature, so that if they sign up for one Product (or “level”), they’re automatically removed from another Product (or level).
So if they are currently signed up to your “Gold Membership”, then when they sign up afresh for the “Platinum Membership”, then set up a Product Chaining rule that says, “If member signs up for Platinum Membership, then remove them from Gold Membership”. This is just to make sure that they don’t have access to two products (or “levels”) at the same time.
Merging User Accounts
User ID 111 has been created with email id ABC123@somewhere.com
Same user buys a different product using a completely new (Paypal) email id. and DAP creates User ID 999 with PayPal email XYZ789@anothersite.com
User now has 2 accounts and wants only ABC123@somewhere.com (user ID 111) to be active.
So here’s what you should do:
- Place XYZ789@anothersite.com in the PayPal email field of User ID 111 and save.
- Give User ID 111 access to all products that User ID 999 currently has active, with matching start and end dates.
- Delete User ID 999 fully from the system.
If User ID 111 purchases additional products through Paypal, and her primary Paypal email id is still XYZ789@anothersite.com, then that Paypal email id will be recognized by DAP, and all purchased products will be activated under User ID 111 and no additional User IDs will be created.
However, if User ID 111 has changed their primary Paypal email id to be something else like XYZ123@yetanother.com, then the next time they make a purchase, DAP will not know it’s the same person, and will end up creating a completely new user id for the buyer. Which means, you will have to do the merge again, and replace the old Paypal email id in DAP with the new Paypal email id of the buyer.
WishList Migration Kit
We get many requests from folks wanting to switch their existing membership site from WishList to DAP, or from Amember to DAP, from Magic Member, YourMembers, eMember, Membergate, etc. We’ve honestly lost count of the number of migrations we’ve done over the years. And every single one of those users who switched to DAP, has been thrilled with DAP and has continued to stay with DAP ever since.
In almost all cases, they all wanted to switch their main “bread-and-butter” membership site over to DAP, because of many things that DAP does that the others don’t. Or maybe because their current membership plugin doesn’t let them do what they want to do, or because their developers stopped supporting it (or support is non-existent), or they’ve gone out of business, or simply because the plugins just don’t scale well for a large membership site, like DAP can.
Anyway, we decided to write a blog post about how to do that for those of you considering doing it yourself.
[NOTE] You don’t have to do this yourself – we can do the migration for you for a fee. See this link for details about purchasing our WishList-To-DAP Migration. [/NOTE]
1) Migrating “Free Members”
Moving free members over to DAP is very simple. Export your old members as a CSV (comma-separated) file containing just email, first name and last name(optional) in the following order:
Email,FirstName,LastName
Lastname is optional. No spaces before or after the comma’s.
And then import them on the “Users > Add” screen.
You can read more about importing users into DAP in this post.
2) Migrating “Paying Members” With Current Subscriptions
This is a bit trickier than migrating just free members. You not only have to import existing member information, but you also need to migrate over their existing subscriptions to point to DAP.
How this is done, primarily depends on what payment processor you were already using, and wish to continue to use while making sure all new incoming subscription payments get processed by DAP.
But before you migrate over their existing subscriptions, you have to import all of them first using DAP’s “Users > Add” screen, which allows you to import multiple users into a Product, while also marking them as “Paid”.
Before you do the import, be sure to empty both the “Double Optin” and “Thank-you” email subject and body on the Product page, because you don’t want DAP sending out any double-optin or thank-you emails to the members you are about to import. We can send them a broadcast email at a later point, when we’ve fully set them up correctly in the system.
Then once you’ve imported them all, you can modify each of their records quickly to modify their start and end dates, to sync with wherever they were in your previous WL site.
Then once you have all of their dates set up, all that remains is to integrate DAP with your payment processor, such that both payments from both new members as well existing members, all get processed by DAP, so that DAP continue to manage their subscriptions, and start giving them access to the member’s area, going forward.
Paypal Integration
Your current WishList subscriptions are probably already pointing to a WishList specific “virtual” URL. Unfortunately, Paypal will not allow you to modify the IPN url in existing “stored” subscriptions that are current.
So you will need to put in a new rule into your .htaccess file at the root of your web site, to simply redirect all incoming IPN notifications (that come to your WL virtual URL) to DAP’s Paypal-specific file on your site, which is http://YourSite.com/dap/dap-paypal.php
Here’s the exact line of text to place within your .htaccess file that’s in your root…
RewriteRule ^index.php/register/pgiotv$ /dap/dap-paypal.php [L]
Be sure to replace the text “index.php/register/pgiotv$” by the IPN URL given to you by wishlist.
Once this is done, DAP will start processing all future subscription payments from existing members.
3) IMPORTANT
Before you create any DAP Products and start protecting content within DAP, make sure you have disabled the Wishlist plugin. Also be sure to disable any other “content protection” plugins, like “Maintenance Mode”, and Cache plugins.
DAP-Supported Shopping Carts
Last updated: 09/02/2014
Direct Integration with Shopping Carts and Payment Processors
UPDATE: We are now authorized resellers for Authorize.net. If you’re in the US or Canada, click here to apply. If you’re in the UK, then click here.
DAP directly integrates with the following Payment Processors without the need for any additional third-party shopping carts:
- Stripe (new!) – via DAP Shopping Cart
- Authorize.net (US/Canada / UK) – via DAP Shopping Cart
- 2Checkout.com
- CCBill.com
- ClickBank
- ClickBank PitchPlus (1-Click Upsells)
- Digiresults
- DealGuardian
- Google Checkout
- e-Junkie (FYI: e-J does not allow recurring payments)
- JVZoo
- Paypal Standard – direct & via DAP Shopping Cart
- Paypal Express Checkout – direct & via DAP Shopping Cart
- Paypal Website Payments Pro (legacy) – via DAP Shopping Cart
- Plimus
- WorldPay
- WSO Pro (Warrior Plus)
- Zaxaa
DAP also integrates with the following Shopping Carts
- 1SiteAutomation.com (a 1shoppingcart private label)
- InfusionSoft
- Nanacast
- Ontraport (prev. Office Auto Pilot)
- Premium Web Cart
- WooCommerce
- WP eStore
Indirect Integration through 3rd Party Shopping Carts
Since DAP integrates with Shopping carts like WooCommerc, 1SiteAutomation.com (our white label of 1Shoppingcart), e-Junkie, Premium Web Cart and Infusionsoft, that means that it also integrates (albeit indirectly) with all of the Payment processors and gateways that these carts support. So, for example, since DAP works with 1SiteAutomation, it essentially integrates with all payment providers supported by 1SiteAutomation, like:
Bank of America
BluePay
Concord EFSNet
Cybercash
DPI Merchant Services
e-Commerce Exchange
Echo Inc.
ECX QuickCommerce 3.0
Epoch Systems
eProcessing Network
EPS SecureNet
EWAY (Australia)
FastTransact
Firepay
GoRealTime/EPP
GoRealTime
iBill
IntelliPay ExpertLink
IONGate (Costco)
iTransact RediCharge
LinkPoint Secure
MCPS WebLink
MerchantPartners
Moneris
NETbilling
Network Merchants
Paradata
PayCom Processing
Paymentech (direct integration via Authorize.net)
PayPal Payflow Pro (via e-Junkie)
PayReady
Planet Payment
PRIGate
PSiGate
RightConnect
RTWare WebLink
Shift4
SkipJack
StrataPay
Surepay
TrialPay (via e-Junkie)
TrustCommerce
USAEpay
uSight
VeriPayment
VeriSign PayFlow Pro
ViaKlix (Nova Systems)
YourPay
For the full list and more details, click here
1-Click Upsells
If you use the DAP Shopping Cart Plugin, you can do 1-Click Upsells/Downsells like the pros, without the need for any external shopping cart or upsell service provider.
The free DAP shopping cart that comes with your DAP purchase allows you to do unlimited 1-Click Upsells using Stripe, Authorize.net and Paypal Website Payments Pro (legacy).
However, for doing 2-Click Upsells/Downsells with Paypal Standard, you need our Paypal Upsell-Tree plugin that is sold separately. Or you can also get this plugin for free with our Platinum subscription.
Of course, if you need advanced shopping cart features – like ability to calculate shipping, tax, and coupons – then you should consider using 1SiteAutomation.com.
1ShoppingCart & GoDaddy
If you want automated recurring order processing using 1ShoppingCart (1SC) or 1SiteAutomation.com, then DAP needs to be able to process the recurring email notifications sent by 1ShoppingCart, which it does on the back-end when the DAP Cron Job runs every 10 minutes.
However, if you’re using Godaddy as your web host, then because GoDaddy disables a mandatory PHP library (“imap”) on all their servers for some reason, DAP is unable to process the recurring order email notifications from 1ShoppingCart.
This is not an issue if you are using GoDaddy as just your domain name registrar, and using some other service like Liquid Web or Hostgator as your web host.
But if you’re using 1SC & GoDaddy hosting, you will have to end up doing manual cancellations if any member cancels their subscription, or if their credit card fails and their recurring payments don’t get processed.
Please note that 1ShoppingCart order processing works great with all other (non-GoDaddy) hosts.
Cancellation or Refund Requests
The Question
How does a customer, once they have signed up and become a member, cancel their membership (or get for a refund)?
Cancellations
If it’s Paypal, they could go into their Paypal account, and cancel their subscription themselves.
If it’s ClickBank, they can log in to their CB account, and cancel their subscription themselves.
If it’s any other payment processor or cart – like 1SiteAutomation.com, Authorize.net, Paypal Payments Pro, etc – then they have to ask you (the membership site owner) to cancel.
Refunds
Except with CB, in all other cases, they have to ask you for a refund
Action Steps For DAP Admin
Whether it’s a cancellation or a refund, log in to your Payment Processor (1shoppingcart, Authorize.net, etc), and make sure you perform the cancellation or refund there. DAP does not store any of the payment information of your subscriber. So both cancellations and refunds have to be performed at your Payment Processor.
Now that you’ve cancelled the actual charging of the customer at the payment processor level, you have to also take care of the customer within DAP – only for refunds.
Cancellation Of Ongoing Subscription in DAP
If this is the cancellation of an ongoing subscription, then no action required within the DAP Dashboard as far as the User is concerned. DAP already does “Pay As You Go” processing – which means, their account will automatically expire at the end of the current recurring period (eg., end of current month). The “Access End Date” of the user’s access to the Product will automatically expire if no new payments come in. And then they’ll automatically lose all access to the content that is part of that Product.
However, if this is the cancellation of a “trial”, where if the user comes back and signs up again for another trial a few weeks or months later, then you want the user to start all the way AT THE BEGINNING. So if it’s the cancellation of a “trial” then you must manually remove the user’s access to the product. So for that, follow the process below.
Refunds (and Cancellation of Trial) in DAP
If it’s a refund of the entire purchase, then…
- Search for that user by email on the “Orders” page, which will bring up their Order (a.k.a “Transaction”)
- Click on the “Refund” button on that screen. That will create a new negative transaction in the Orders table. Then it also roll-backs any affiliate commissions earned on that sale and make a negative entry in the database for that affiliate. Then it rolls back user access by the number of days entered in one of the “Recurring Cycles” entered on that Product’s page (depending on how far along they were in as a member).
- Now search for that user by email on the “Users > Manage” screen. Make sure that they no longer have access to the Product.
If it’s a refund of just one recurring payment from among a series of subscription payments, or the cancellation of a trial, then you can go into the “Users > Manage” screen, search for the user, and do a “Rollback Access for Selected User(s) to the Product by 1 Recurring Cycle“.
For a big-picture view, also see Cancellations & Refunds
Buy Buttons, 1-Click Upsells, Downsells & OTO’s using Authorize.net
Selling through Authorize.net, 1-Click Upsells, Downsells and One-Time Offers (OTO’s) are all now extremely simple to implement using the new Shopping Cart Plugin for DAP.
This post explains how to create buy buttons for selling through Authorize.net.
Your site visitors never have to leave your site in order to make a purchase, if you are selling through Authorize.net. DAP itself will act as your shopping cart, and buyers can checkout and make purchases by staying right on your web site.
The DAP Shopping Cart itself is your actual shopping cart that connects to Authorize.net. You need to install this plugin whether you wish to accept one-time or subscription payments via Authorize.net, or whether you wish to do Upsells, and Downsells.
What you need before you can use this plugin
- You need an Authorize.net merchant account
- If you want to sell subscription-based products, then you also need Automated Recurring Billing (ARB) enabled in your Authorize.net account.
- You must have SSL (secure server) enabled on your web site. Ask your web host to enable SSL for your site.
- You must have a working version of DAP 3.5+.
Installation & Setup of UpsellTree
- You need be using at least DAP v3.5 for this.
- If you haven’t installed DAP already, then install DAP first.
- Log in to our member’s area and download the plugin file, DAPShoppingCart.zip .
- Unzip DAPShoppingCart.zip to your desktop. It will unzip the files to a new folder on your desktop, called DAPShoppingCart.
- Upload ALL of the files inside, DIRECTLY to your “dap” folder on your web site. DO NOT upload the folder itself – just the files inside.
- Log in to your Authorize.net account, and go to the “Settings” page.
- Click on Silent Post URL.
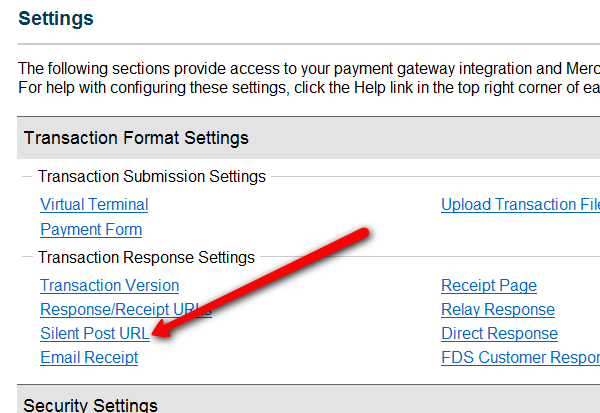
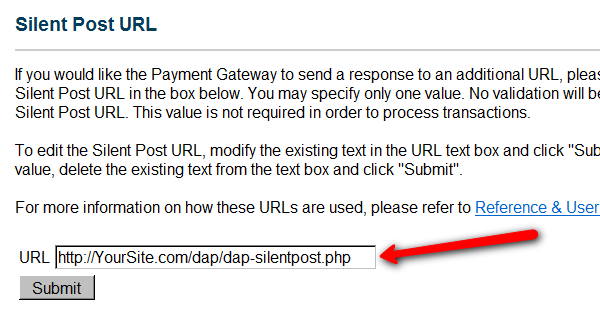
- On the next page, set the URL field, to http://YourSite.com/dap/dap-silentpost.php . Be sure to change the text “YourSite.com” to your actual domain name. Click “Submit”. It will take you back to the Settings page.
- On the Settings page, now click on the “API Login ID and Transaction Key” link towards the bottom.
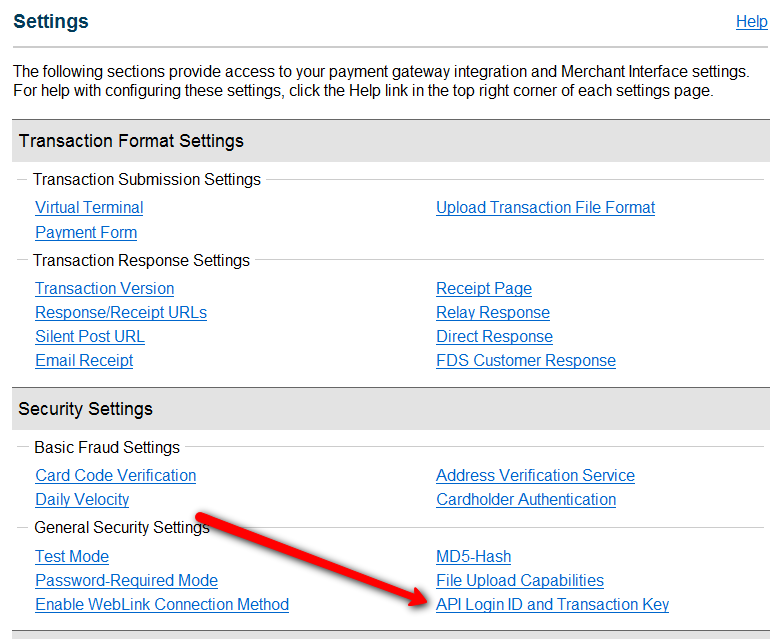
- On the next page, make a note of your “API Login ID” and “Transaction Key” on a piece of paper (or copy/paste it into a text file). That page also lets you create a new Transaction key or modify your existing one.
- That’s it for Authnet.
- Now, log in to your DAP Dashboard on your side, and go to “DAP Admin > Setup > Config > Payment Processing“.
- Enter the “API Login ID” and “Transaction Key” that you noted down earlier (Step #9 above) into the respective fields, and click “Update” next to the fields to save the changes.

- This step applies to you only if you are already using 1ShoppingCart with DAP (if not, skip to next step):
Be sure to remove the “Email Order” cron job from your web hosting control panel (“Cron Jobs” screen), because you don’t want your orders to be double-processed. - Go to the Products > Manage.
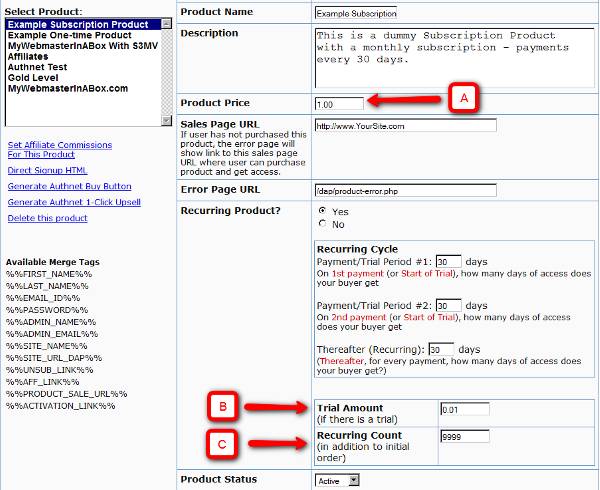
A) Product Price: For a 1-time purchase product, this is the product’s purchase price. For a recurring product, this is the “recurring” price (what the customer gets charged month after month).
B) Trial Amount: This is only if there’s a trial amount. If no trial, leave this empty.
C) Recurring Count: How long is your subscription? If you said “Forever”, then enter the number 9999 here. If it ends after 6 months, then enter 6 here. - Set these fields to valid values.
- NOTE: The DAP Authorize.net allows 1 trial. So in the recurring cycle fields, make sure “Payment/Trial Period #2” and “Payment/Trial Period #3” are both the same (set to same number of days: like 30). Example below shows the setting for a “7 day” trial period, followed by recurring payments every “30 days”.
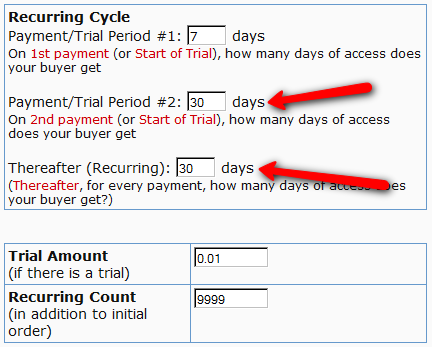
- If you are not offering a trial, then just set the Trial Amount to $0.00. But if you really wanted to offer a FREE TRIAL, then you must set the Trial Amount to at least $0.01 (1 penny).
- Once you’ve saved the product, you can now click on any of the two new “Generate… Button Code” links that are located right below the product list combo box.
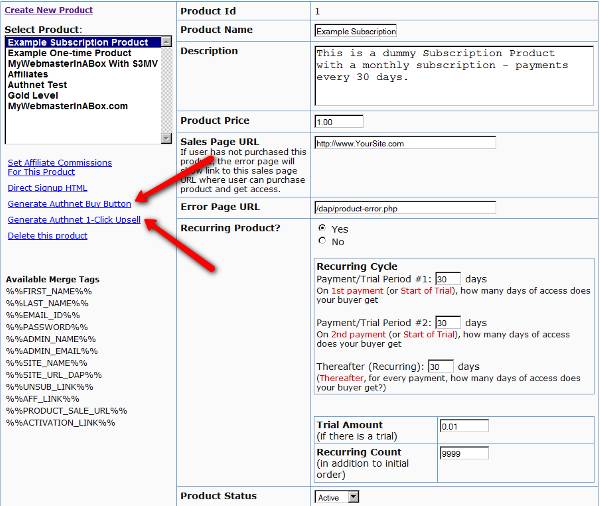
- “Generate Authnet Buy Button” link:
This generates the buy button HTML code for your product, which you can then directly paste into your sales page. When you click on this link, you will get a pop-up that shows the actual HTML code for your button. The price, trial price, and recurring options are all taken from your Product settings. So make sure you have saved your Product changes before you click on this link.
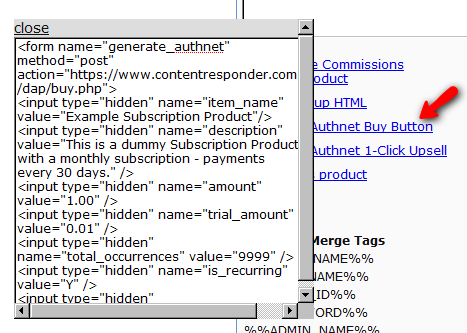
- Here’s what the HTML code looks like:
<form name="generate_authnet" method="post" action="https://www.contentresponder.com/dap/buy.php">

<input type="hidden" name="item_name" value="Example Subscription Product"/>

<input type="hidden" name="description" value="This is a dummy Subscription Product with a monthly subscription - payments every 30 days." />

<input type="hidden" name="amount" value="1.00" />

<input type="hidden" name="trial_amount" value="0.01" />

<input type="hidden" name="total_occurrences" value="9999" />

<input type="hidden" name="is_recurring" value="Y" />

<input type="hidden" name="recurring_cycle_1" value="30" />

<input type="hidden" name="recurring_cycle_2" value="30" />

<input type="hidden" name="recurring_cycle_3" value="30" />

<input type="hidden" name="payment_succ_page" value="https://www.contentresponder.com/dap/continue.php?url=/dap/upsell1.html" />

<input type="hidden" name="payment_gateway" value="authnet" />

<input type="hidden" name="is_submitted" value="Y" />

<input type="submit" value="Buy Now" />

</form> - If you’re doing upsells, the only thing you need to do is, look for the “payment_succ_page” field in the above form. By default it is pointing to:
https://www.contentresponder.com/dap/continue.php?url=/dap/upsell1.html - Modify the “upsell1.html” file within your dap folder, to make your 1-Click Upsell offer. Or if you don’t wish to use 1-Click upsells, you can make just about any kind of upsell offer on that page. The upsell1.html that comes with the plugin has a sample upsell page already created for you, just so you get an idea of what that will look like.
- On the upsell page, if you want to upsell say, Product B, then make sure you set up “Product B” ahead of time in DAP, and set up the price and recurring options. Then for upsell products only, click on the “Generate Authnet 1-Click Upsell” link to generate the 1-Click Upsell Buy button code, as the upsell buy button is slightly different than the ‘regular’ buy button code. Now take the upsell buy button code like you did before, and paste it in upsell1.html. That’s it.
- You can repeat this process for unlimited upsells, downsells and one-time offers. No limits.
That’s it.
While it looks like a LOT of steps, that is only because we have to explain the steps in detail so they are clear. In reality, it is very simple to set up, and starting from scratch, if you have DAP & SSL already installed, it shouldn’t take you more than 1/2 hour to set up your 1-Click Upsells/Downsells/OTO’s. And if you’re not using Upsells/Downsells, then it can be done even faster.
If you have any further questions, feel free to open a support ticket, and we will assist you in getting this going.
Cancellations and Refunds
Cancellation Of Ongoing Subscription
DAP employs a very unique “Pay As You Go” model.
It’s very similar to the “Pay As You Go” model used by cell phone companies.
You pay first, then new content (or “cell phone minutes” in the mobile world) gets released to you. You stop paying, you don’t get new content (minutes).
So let’s say a member (Joe Customer) joined your membership site this month, and this is January. So he’s on Month #1 in January.
When he first signs up (free or paid trial, or actual 1st month’s subscription), then his start and end dates in DAP on your site look like this:
Start date: Jan 1, 2009
End date: Jan 31, 2009
(Of course, DAP uses actual dates like “01/01/2009”, but “Jan 1, 2009” is easier to read for most people, especially an international audience – so using the above date format just for the purposes of this post).
Then, let’s say, his February subscription payment comes in. Now DAP “extends” his access to your content by a month. So now the dates look like this:
Start date: Jan 1, 2009
End date: Feb 28, 2009
Now your member Joe has access to all content from Jan 1 to Feb 28 (meaning, about 60 days worth of “dripped content”).
Then end of February, he decides to cancel his membership for whatever reason (or his credit card gets declined or rejected while processing payment for Feb). So no payment comes in for March.
Now because no payment came in, DAP doesn’t really do anything about his access dates. So they continue to stay at:
Start date: Jan 1, 2009
End date: Feb 28, 2009
So any content that you have configured to be dripped on, say, Day #61 (which is Month #3), won’t be available to Joe, even though he continues to remain an “Active” member within DAP, and continues to get your autoresponder and br0adcast emails, and even continues to have access to your affiliate program and continues to earn commissions.
Actually, it gets even better – just because Joe’s end date expired, he basically now has NO access to ANY content on your web site (even Month #1’s content).
[Note: Just so you know, DAP does have a feature to enable “Access to Previously Paid-for Content”. Keep reading for details.]Now all Joe has lost is just the “access to the content”.
So let’s say you exchange emails with him, ask him why he wanted to cancel, and try to convince him to come back (or get him to use a new, valid credit card).
Now remember that Joe is still at the end of February’s content (Month #2). So whenever the next payment comes in (be it in March, April, or 1 year later), Joe now gets access only to the 3rd month’s content, and not, say, the 10th month content.
So even though it is now say, May, because Joe’s next payment came in just now, his access dates now look like this:
Start date: Jan 1, 2009
End date: March 31, 2009
So that’s how DAP takes care of your content and makes sure that when members cancel or their payment doesn’t come in for whatever reason, your content cannot be accessed by unauthorized users.
But let’s say you want to be really fair and look like a “generous, honest” guy to your members. In that case, you want to make sure that if someone cancels their subscription 6 months after being with you, you don’t want to ‘screw’ them just because they stopped paying you. Who knows, they’ll probably come back if you keep showing to them what kind of content you’re building. Or they may buy your other products.
So now you want to make sure that they get access to the last 6 months worth of content, for which they have actually paid for.
There is a Configuration element in DAP where you can just turn this feature on, and members can instantly start access all “Previously Paid-for Content”.
So that’s how DAP puts a unique twist on cancellations.
Cancellation Of Trial
There is a small twist to the cancellation of a free or paid “Trial”. Consider the following example:
- User made the purchase on 2011-09-16.
- Because you have set it up as a 14-day trial, User gets 14 days of access.
So at this time the user’s access start date = 2011-09-16 and user’s access end date = 2011-09-29 (14 days access). - He then asks you to cancel his trial. So you go into your payment processor back-office, and cancel his future payments.
- In this case, because it’s a “trial”, if he ever decides to come back down the road and sign up for a trial again, you need him to start all the way AT THE BEGINNING.
- Which means, you must completely remove this person’s access to the product in DAP.
- If you don’t do it, then if he does come back later, then DAP will think he’s an existing user who wants to RESUME his subscription, and will move him past the trial into the next payment period meant only for people who actually stayed past the trial.
Refunds
“Refunds” are a slightly different animal than “Cancellations”. While a subscription “Cancellation” means you only have to stop access going forward, a “Refund” means you have to actually roll-back existing access.
So, doing a refund takes a few steps.
- Go into your payment processor (like Paypal.com, Authorize.net, etc) and refund the actual payment
- Now log into the DAP Dashboard on your site
- Go to the “Orders” page, search for all of the user’s transactions by her email id
- Click on the “Id” link for the transaction that you wish to refund
- On the transaction details page, you will see a “Refund” button. Click on that.
- That will mark that transaction as a refund, and also create a new transaction with a negative value (same as value of original transaction, except negative in value)
- DAP then rolls-back access for that user by one payment period (or “Recurring Cycle #3” from the Product page). So if member is still in month 1, then user will lose complete access to the product. But if member is on month 3, then since only one payment is being refunded, only the last month’s access (month #3’s access) will be rolled back – so now they only have access till month 2.
- Go back to “Manage > Users” screen, search for user by email, and make sure access is either rolled back, or access has been completely removed for that member.
- All Affiliate commissions credited to affiliates for this particular purchase will be automatically and completely rolled back. So the affiliate who referred this purchase, will see a negative commission credited to their account, that cancels out the positive commission credited earlier. So that in effect zeroes out their commissions.
