DAP to 1ShoppingCart List Integration
Q: How to automatically add a new user in DAP to a 1SiteAutomation.com (1SA) list (or other 1Shoppingcart – 1SC – private label)?
A: Every list in 1SA/1SC gets a unique email id – like 1sc-12345@autocontactor.com ).
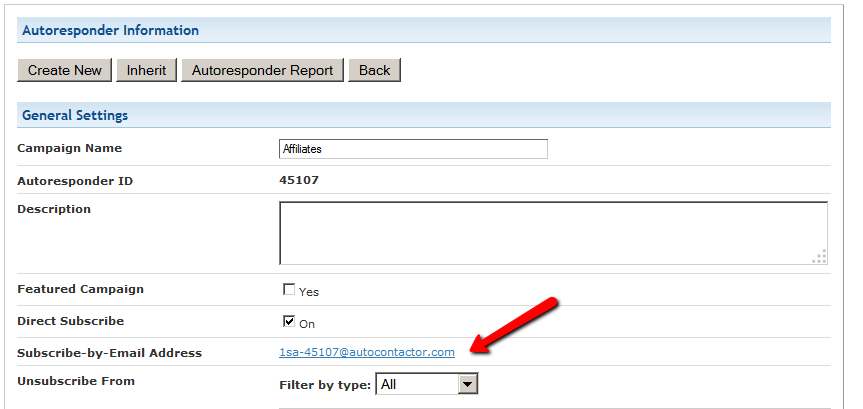
Add that to the “3rd-Party Notification Email Ids” field of the DAP product (under Products > Manage > “Notifications” tab)
And make sure you set the “Direct Subscribe” field in your 1SA/1SC list to be “On”.
12
Upgrading or Downgrading of Subscriptions
There are two main items that need to be addressed when it comes to a member wanting to Upgrade or Downgrade their Subscription from one membership “level” (a.k.a “Product” in DAP) to another.
1) Modifying the actual recurring payments to reflect the new amount
2) Giving them appropriate access as per the upgrade (or downgrade)
So let’s see how both of these are accomplished.
1) Modifying Recurring Payments
You do need to take some manual action for this. The way to do it is….
- Ask your members to sign up for the new product/level/subscription separately, like it were a new sign up
- Cancel their old subscription manually. When using Paypal standard, this can be done by both you (as the admin) and the member themselves. But with all of the other payment solutions, you (the admin) will have to log in to the payment gateway (Authorize.net or Paypal Website Payments Pro) and manually delete the member’s old subscription). DAP will not automatically remove users old subscription profile in your payment gateway.
2) Giving your member access to new level
Set up automation rules using DAP’s Product Chaining feature, so that if they sign up for one Product (or “level”), they’re automatically removed from another Product (or level).
So if they are currently signed up to your “Gold Membership”, then when they sign up afresh for the “Platinum Membership”, then set up a Product Chaining rule that says, “If member signs up for Platinum Membership, then remove them from Gold Membership”. This is just to make sure that they don’t have access to two products (or “levels”) at the same time.
4
DAP’s “Pause Membership” Feature
How It Works
Joe Member joins your site on 01/01/2011.
He stays a member for about 3 months. Let’s say it’s now mid March. He wants to take a couple of months break. So he goes on a 2 month break. Comes back end of May and wants to resume his membership.
DAP allows him to pick up right where he left off – which is continuing to receive content as of April (04/01/2011), even though today’s date is May 25th, 2011.
So while he took a break, other members who did not take a break in membership, continued to pay for those 2 months, and continued to receive content dripped through those months. So it is only fair that when he does come back end of May and resumes his subscription, he does not resume from June’s content, but from April’s content (when he last put his membership on “Pause”).
It’s ok if you’re not dripping content on a monthly-basis, but rather on a “day” basis. So to put it in terms of “days”, when Joe resumes his subscription, since he was already 90 days old in the system when he put his subscription “On Hold”, and comes back another 60 days later (roughly about 2 months), then DAP will start dripping Day #91 content onwards for him, and NOT Day #151 onwards (he didn’t pay for 2 months in between).
This is how DAP works right out of the box. Nothing special to configure. And DAP automatically takes care of pausing the dripping when he is not paying.
WARNING: Just remember that in order for you to put his actual payments on hold, you will need to have a payment gateway like Authorize.net or Paypal Website Payments Pro. Or you must be using a shopping cart like http://1SiteAutomation.com . Using something like Paypal Standard or ClickBank will not allow you to put the actual charging of his credit card on hold.
NOTE: If you actually did want him to start receiving current content even though he left for 2 months, then all you have to do is, once he comes back and starts paying again, just extend his access end date on his account (which will initially be showing 03/31/2011 – end of March, when he left) and modify it and make it 05/31/2011. So when his next payment comes in after he resumes, DAP will extend his access end date to 06/30/2011 – which means, he can now access all of the current content.
13
DAP Login Xpress
What Is “Login Xpress”?
“Login Xpress” is a DAP feature that enables your members to be logged right into your membership site immediately upon completion of their purchase.
This is roughly how it works:
- Visitor arrives at your web site
- On your sales page, they click on any “Buy” button to purchase a Product (or Membership Level)
- They’re taken to the checkout page (depending on Payment processor being used) and they enter their payment information and hit “Submit”
- When they hit “Submit” to complete their payment, their payment is processed right away, and the buyer is immediately transferred back to your web site, in real time, and automatically logged in to your membership site, and they are taken to the “Welcome” page or “Members” page (you may choose what this page is going to be at a per-Product level)
Payment Processors That Work With Login Xpress
DAP supports this feature with the following payment processors:
- Paypal Standard (DAP-generated buttons only – will not work with Paypal-hosted buy buttons that you generate from within your Paypal account)
- 1Shoppingcart / 1SiteAutomation.com
- Authorize.net
If you use any of the payment options above, then you can set up your sales funnel in such a way that buyers are logged in right away immediately after purchase.
Payment Processors That DO NOT Work With Login Xpress (Yet)
- Paypal Website Payments Pro
- ClickBank
- e-Junkie
- WorldPay
DAP integrates with the above processors via some kind of “back-end payment notification” – similar to Paypal’s “IPN” (Instant Payment Notification). Which means the notification between the payment processor and DAP on your site only happens on the “back-end”. Which is why DAP can only deliver the login details to the buyer via an email, and cannot log them in right away (like it can do with “Login Xpress”), because the buyer’s information is available to DAP only when the payment processor sends out the IPN notification behind-the-scenes, so to speak.
So if you’re using the above processors to accept online payments, then what you need to do, is to redirect your buyers to a static “Thank You” page that has a message similar to the one below…
“Thank you for your purchase. In a few minutes, please check your email address used during purchase for your log in details to log in to the members’ area and access the product you just purchased.”
And behind the scenes, DAP would’ve already received the payment notification from the payment processor, and it would’ve created an account for your buyer, given them access to the purchased product, and sent them the “Thank-you Email” for the product(s).
1SiteAutomation.com Upsell Express
DAP integrates with 1SiteAutomation.com‘s (our private label of 1shoppingcart) Upsell Express.
So if you are using 1Shoppingcart or our private label 1SiteAutomation.com to accept payments, then you cannot use DAP’s own free Upsell-Tree plugin. You will have to sign-up for 1SiteAutomation.com’s Upsell Express add on, which has a monthly fee associated with it.
Don’t have a 1shoppingcart account yet, and thinking of signing up for one? You certainly don’t want to do that till you check out our “Get DAP For Free” offer.
2
DAP-1SC Login Xpress
DAP Supports instant auto-login to the member’s area immediately after completing the 1ShoppingCart (or private label) purchase. We call this Login Xpress with 1ShoppingCart (Read more about Login Xpress)
The documentation below will show you how to setup 1ShoppingCart and DAP, so that your buyers can be automatically logged in to your “Member’s Area” upon completion of their purchase.
Note About Processing Recurring Orders via 1SC
If you only sell ONE-TIME products at this time, then the Login Xpress flow below is all you will need to setup as far DAP & 1SC integration is concerned.
If you are selling RECURRING products via 1SC , but DO NOT WANT your users to be automatically logged in to the “Members’ Area” right after their purchase, and you prefer sending them their membership login info (email & password) via email, then you DO NOT need to read this post any further – simply head over to this post: 1ShoppingCart Recurring Payment Processing via Email
But if you sell RECURRING products via 1SC and you DO WANT your users to be automatically logged in to the “Members’ Area” right after their purchase, then continue reading this post for Login Xpress setup.
Login Xpress Setup
1) Set up your sales page as you would normally do when accepting payment through 1ShoppingCart.
Make sure to use the exact same Product Name in 1SC as well as within DAP.
So, if you set up a product called “Platinum Members” within DAP, then use the exact same name “Platinum Members” as your 1SC product name. In fact, just to be sure, copy the product name from DAP and paste it into the product name field within 1SC (or vice-versa). That way, there will be no typos.
2) Log in to your 1ShoppingCart account.
Go to Products > Manage Products. Edit the Product you are setting up.
Go to the “Links” tab of that Product.
Set up the Thank You URL to point to this DAP script on your site, as shown below:
http://YourSite.com/dap/dap-1shopcart.php?cartId=SecretKey
YourSite.com should be replaced by the name of your site
SecretKey should be set to the same value that you set in DAP Dashboard > Setup > Config > Secret Key For Payment Processing
This secret key can be alphanumeric. No special characters or spaces.
For eg., if you set Secret Key For Payment Processing in DAP to be 12345
Then your 1ShoppingCart Thank You URL would look like this:
http://YourSite.com/dap/dap-1shopcart.php?cartId=12345

DAP Secret Key Setup (under DAP Admin > Setup > Config)

3) Now open a brand new browser session where you are not logged in as DAP admin or WP admin. Complete a test purchase using an email id that is not already in your DAP. If the integration worked correctly, then a new user account will automatically get created in DAP, and you (the buyer) will also be automatically logged in to DAP, and will be redirected to one of the following URL’s:
a) If this buyer has access to just 1 product, then user will be redirected to the Post-Login URL set up under that Product, at DAP Admin > Products > Manage
-OR-
b) If this buyer has previously purchased other products, then for security reasons, buyer will be redirected to the login URL that you have set up under DAP Admin > Setup > Config > Login URL. And at the same time, the buyer will be sent the Welcome Email from the Product’s settings.
Redirecting To A Custom URL After Checkout
The above setup will log new members right into the member’s area immediately after completing their purchase through your 1SiteAutomation.com or 1Shoppingcart check out page.
But if you wanted them to be redirected to a different page of your choice after the purchase, then set up the thank-you URL like this:
http://YourSite.com/dap/dap-1shopcart.php?cartId=SecretKey&redirect=yoursite.com/another-page/
So basically you are just adding the text in red to the end of the standard DAP/1SC thank-you page URL.
Now note that even though user is being redirected to “another-page” in the above example, they have been logged in to your membership site already. So if you publish a link to your member’s area somewhere on “another-page”, then they can go right to that page without having to log in, because they’re already auto-logged in at this point.
NOTE:
If you are setting up a recurring subscription product, then after completing the above Login Xpress set up, next step is to set up DAP to process RECURRING payment notifications from 1SC as described here.
13
DAP’s Built-In Shopping Cart vs 1ShoppingCart vs WooCommerce
DAP has a built-in and robust Shopping Cart that allows you to sell digital products. And it comes free with your purchase of DAP.
Plus you can also do 1-click Upsells if you’re using Stripe, Authorize.net or Paypal Payments Pro.
However, DAP’s cart is primarily meant for digital products like memberships, subscriptions, information products, digital downloads, etc.
DAP does not have “real-world” physical product sales features – like size, color, quantity, sales tax, vat, volume discounts, etc.
So, for physical products that require special “physical” features, you’re better off using 1SiteAutomation.com (private label of 1shoppingcart) or WooCommerce.
And since DAP fully integrates with 1SiteAutomation (and all 1ShoppingCart private labels) and WooCommerce, you can still have the buyer of your physical product added to DAP, and use DAP as the “digital content delivery system” – basically, to deliver digital content in the form of WordPress Pages/Posts, Video, Audio, PDF reports, etc.
But if you’re primarily going to be selling subscription-based membership and digital products or one-time info products, then the powerful and free DAP Shopping Cart Plugin will more than serve your purpose.
WooCommerce Integration: Click here
1ShoppingCart BONUS
Click here to find out how you can get DAP for free (for a limited time only).
1
1ShoppingCart Template Update
IMPORTANT: If you downloaded any version of DAP any time after 3 PM PST on August 22, 2010, then you may ignore this post entirely, as this update is already included in your version. This is only for older versions of DAP that were downloaded prior to the above date.
What this is about
1ShoppingCart recently updated their recurring billing email notification format. So we have created a new template so that DAP can process the new format of emails from 1SC.
Who does this affect
Anyone using 1ShoppingCart (1SC), or any private labels of 1SC, including our own 1SiteAutomation.com and have setup a subscription-product through DAP. You could be using 1SC for selling a number of different products through different web sites. This is relevant to you only if you have DAP on your site and have integrated it with 1SC for certain recurring products.
What you need to do
- Log in to the member’s area at http://DigitalAccessPass.com/dap/
- Download the zip file update-1sc.zip from your member’s area.
[NOTE: If you do not see the file in your member’s area, it is possible that you no longer have access to DAP Support & Upgrades, in which case you will have to renew first. If you have already renewed, and still don’t see the file, just open a ticket and we’ll resolve it asap] - Unzip it to your desktop. You will see a file inside by name update-1sc.php
- Upload this directly to the dap folder on your site, via FTP
- Log in to DAP on your web site as DAP Admin
- Run the script, by visiting the following link in your browser:
http://YourSite.com/dap/update-1sc.php
(Please change the text “yoursite.com” in the above link to your actual domain name) - Once you visit the above link in your browser, you will automatically be redirected to your DAP Admin Home Page on your web site.
- Optional: Delete the file update-1sc.php from the dap folder on your web site.
That’s it!
If you have any general questions, feel free to post them in the comments below.
If you have any specific technical questions relating to your web site, please open a ticket at http://DigitalAccessPass.com/support/
[NOTE: If you are a “Membership Site In A Box” (MSIAB) license owner who is paying monthly for support, then please open a ticket with your Site URL, FTP & DAP Admin details, and we’ll install this for you for free]
35
DAP-Supported Shopping Carts
Last updated: 09/02/2014
Direct Integration with Shopping Carts and Payment Processors
UPDATE: We are now authorized resellers for Authorize.net. If you’re in the US or Canada, click here to apply. If you’re in the UK, then click here.
DAP directly integrates with the following Payment Processors without the need for any additional third-party shopping carts:
- Stripe (new!) – via DAP Shopping Cart
- Authorize.net (US/Canada / UK) – via DAP Shopping Cart
- 2Checkout.com
- CCBill.com
- ClickBank
- ClickBank PitchPlus (1-Click Upsells)
- Digiresults
- DealGuardian
- Google Checkout
- e-Junkie (FYI: e-J does not allow recurring payments)
- JVZoo
- Paypal Standard – direct & via DAP Shopping Cart
- Paypal Express Checkout – direct & via DAP Shopping Cart
- Paypal Website Payments Pro (legacy) – via DAP Shopping Cart
- Plimus
- WorldPay
- WSO Pro (Warrior Plus)
- Zaxaa
DAP also integrates with the following Shopping Carts
- 1SiteAutomation.com (a 1shoppingcart private label)
- InfusionSoft
- Nanacast
- Ontraport (prev. Office Auto Pilot)
- Premium Web Cart
- WooCommerce
- WP eStore
Indirect Integration through 3rd Party Shopping Carts
Since DAP integrates with Shopping carts like WooCommerc, 1SiteAutomation.com (our white label of 1Shoppingcart), e-Junkie, Premium Web Cart and Infusionsoft, that means that it also integrates (albeit indirectly) with all of the Payment processors and gateways that these carts support. So, for example, since DAP works with 1SiteAutomation, it essentially integrates with all payment providers supported by 1SiteAutomation, like:
Bank of America
BluePay
Concord EFSNet
Cybercash
DPI Merchant Services
e-Commerce Exchange
Echo Inc.
ECX QuickCommerce 3.0
Epoch Systems
eProcessing Network
EPS SecureNet
EWAY (Australia)
FastTransact
Firepay
GoRealTime/EPP
GoRealTime
iBill
IntelliPay ExpertLink
IONGate (Costco)
iTransact RediCharge
LinkPoint Secure
MCPS WebLink
MerchantPartners
Moneris
NETbilling
Network Merchants
Paradata
PayCom Processing
Paymentech (direct integration via Authorize.net)
PayPal Payflow Pro (via e-Junkie)
PayReady
Planet Payment
PRIGate
PSiGate
RightConnect
RTWare WebLink
Shift4
SkipJack
StrataPay
Surepay
TrialPay (via e-Junkie)
TrustCommerce
USAEpay
uSight
VeriPayment
VeriSign PayFlow Pro
ViaKlix (Nova Systems)
YourPay
For the full list and more details, click here
1-Click Upsells
If you use the DAP Shopping Cart Plugin, you can do 1-Click Upsells/Downsells like the pros, without the need for any external shopping cart or upsell service provider.
The free DAP shopping cart that comes with your DAP purchase allows you to do unlimited 1-Click Upsells using Stripe, Authorize.net and Paypal Website Payments Pro (legacy).
However, for doing 2-Click Upsells/Downsells with Paypal Standard, you need our Paypal Upsell-Tree plugin that is sold separately. Or you can also get this plugin for free with our Platinum subscription.
Of course, if you need advanced shopping cart features – like ability to calculate shipping, tax, and coupons – then you should consider using 1SiteAutomation.com.
1ShoppingCart & GoDaddy
If you want automated recurring order processing using 1ShoppingCart (1SC) or 1SiteAutomation.com, then DAP needs to be able to process the recurring email notifications sent by 1ShoppingCart, which it does on the back-end when the DAP Cron Job runs every 10 minutes.
However, if you’re using Godaddy as your web host, then because GoDaddy disables a mandatory PHP library (“imap”) on all their servers for some reason, DAP is unable to process the recurring order email notifications from 1ShoppingCart.
This is not an issue if you are using GoDaddy as just your domain name registrar, and using some other service like Liquid Web or Hostgator as your web host.
But if you’re using 1SC & GoDaddy hosting, you will have to end up doing manual cancellations if any member cancels their subscription, or if their credit card fails and their recurring payments don’t get processed.
Please note that 1ShoppingCart order processing works great with all other (non-GoDaddy) hosts.
1
Troubleshooting 1ShoppingCart Integration
There are a few different reasons why this may not be working.
1. Check if Cron is running
The DAP email-processing cron that processes the 1SC emails may not be running. Check your webhost control panel -> Cron job settings. Make sure dap-emailorder.php is setup to run once every 10 minutes.
2. Incorrect Setup of Billing Email Id
The billing email id you have entered in DAP at Setup > Config > Payment Processing , should be entered into the “Order Notice Email – Primary Destination” field in your 1SiteAutomation/1Shoppingcart account, on the Setup > Orders > Notifications section. If by chance you enter it into the “Order Notice Email – Primary Destination” field, it WILL NOT WORK.
3. No Notification Emails from 1SC
The DAP cron is running but 1SC payment notification emails are not reaching your mail server. Check the email account where you expect to receive your 1SC payment notification emails and see if the order notification email from 1SC is in that mail box.
4. Incorrect Mail Server Settings
The cron is running and the 1SC order notification email is reaching your mail server – but you did not configure the mail server settings correctly in DAP Dashboard -> Setup -> Config -> Payment Processing.
Email Server Where Order Emails Come In
Email Server User Name
Email Server Password
5.”Read” Or Deleted Emails
DAP only processes order notification emails that are in the “Unread” status, to prevent previously processed emails and other non-DAP emails from being repeatedly processed.
Also, if you “pop” off the emails from that mail box (means, your email client like Outlook or Thunderbird or Gmail is “removing” your emails from the server when it retrieves them), it means that when DAP logs in to that billing email address, there are no emails there to be processed – the mailbox is empty, or the 1SC payment notification emails have somehow gotten deleted from that mailbox.
So it is possible that DAP is able to connect to your email server, but DAP is not finding any “unread” emails. Please login to your email server and mark all the payment emails that you want DAP to process… as “unread”. And also make sure that your email client does not remove the emails from that mail box.
6.Product Name Mismatch
There might be a “Product Name” mismatch. The product name has to be EXACTLY the same (including case, spaces, etc) in both DAP as well as in 1ShoppingCart. So if you have created a product by name “Widget A”, make sure your 1shoppingcart product also has the exact same name “Widget A”.
If everything is setup correctly, DAP cron will run every 10 minutes and try to process all 1SC emails.
The next time the DAP cron will run (every 10 minutes), it will pick up all the unread payment emails from 1SC.
7. Empty “Thankyou-Email Body/Subject”
Welcome email is not getting sent.
Select the product, and make sure there is some text in the “Thankyou-Email Subject” and “Thankyou-Email Body”. Whatever is in these fields is what gets sent immediately after someone purchases that product (or right after you give them access from the backend).
Now go to DAP Dashboard -> Users -> Add .
Select the product and manually add user. Now see if the thankyou email gets sent to that email id. If it got sent, then your product setup is correct.
Also check the DAP Dashboard -> Orders . Search for all orders, look up the order for the particular user in question by email.
Check the payment status and make sure there is no error there.
If you did all this and things are still not working, please do this:
1. Set DAP Dashboard > setup -> Config -> Log Level -> Log All activity
2. Re-run the 1SC test purchase
3. Check the DAP Logs (DAP Dashboard > System > Logs) and send us the log text in there for troubleshooting by pasting it into a new support ticket.
8. Sending Email & Password To Buyer
Make sure you have set the thank-you message with the right merge tags for Email and Password.
9. Manually Running Cron
First set DAP Dashboard > setup -> Config -> Log Level -> Log All activity
If you feel that the orders were not processed in dap, then just login to the 1SC email account where the sales/payment notification emails are sitting, and mark those orders/emails as UNREAD that you want dap to process.
Then manually run the cron script dap-emailorder.php cron by visiting the following link in the browser.
http://www.yoursite.com/dap/dap-emailorder.php
Replace yoursite.com with the name of your site.
It will just display an empty screen when complete.
Then check “Users > Manage” to see if user has been created.
– Veena Prashanth