5
Gmail Integration With DAP
WARNING: Gmail integration may not work for everyone. Many factors – including, but not limited to, your physical location, the location associated with your Gmail account, location of server, IP address, etc – appear to play a role in whether or not this will work for you with your Gmail account. So please note, that if it doesn’t work for you, then there isn’t anything the DAP team can do to overcome or “fix” that. It’s Google, after all. We don’t know what rules and monitoring they have in place for this. So, if Gmail integration doesn’t work for you, then you may want to consider Amazon SES integration, which has a 100% success rate with DAP users at this time.
To increase deliverability of your autoresponder, broadcast and instant emails (like “Welcome” email), you can make DAP completely by-pass your web host’s email server, and send emails out through third-party email servers, like Gmail or Amazon SES. This article is about setting up DAP to send out emails through Gmail’s email servers.
Sending Email Through Google’s Gmail Servers
Before you start sending out mass emails through Google’s Gmail Servers, please note this…
Sending out emails through Gmail instead of your web host, will surely boost your deliverability, no doubt. But remember that Gmail is NOT meant to use for mass emails. It is not really meant to be used as a list service. Plus they have a very strict restriction of 500 emails per 24-hour period.
You exceed that quota even by one, and they probably will temporarily disable your Gmail account for about 24 hours. Sending a large number of un-deliverable emails (resulting in bounces) could also get your entire Gmail account permanently suspended. And if you lose your Google username, it may (no confirmation available) affect your other Google accounts too – like AdWords or AdSense.
Anyway, DAP has a round-robin emailing system – so you could set up and use multiple Gmail accounts – each with its own 500 email limit per day – and combine them to send out a larger broadcast. However, remember – we’re talking about Google here – which means they can suspend/cancel/delete your account for any reason at all, even more so when you’re going against their TOS.
So use Gmail with caution, and only for smaller lists. If you want a larger sending email limit, check out the DAP integration with Amazon SES which allows you to send out tens of thousands of emails a day.
- Log in to your DAP Admin Panel, and go to DAP Admin > Email > SMTP.
- On this screen, use the section Add a New SMTP Serverto create a new SMTP row as follows:Description: Gmail (can be anything really)
Server: tls://smtp.gmail.com (must be exactly that)
Port: 465 (must be exactly that)
SSL: N (must be exactly that)
User Id: youremail@gmail.com (your gmail email id)
Password: yourpassword (your gmail password)
Email Sending Limit Per Hour: 500 (don’t go more – less is ok) - Click on the Add button to create and save the new Gmail SMTP server setting.
- Once it is saved, now you will see 2 rows on the screen: One for “Localhost”, and the other is the new “Gmail”.
- Towards the end of each row, you’ll see a setting called “Activated?”. Set it to “N” for Localhost and “Y” for Gmail.
- That will now make all of your outgoing emails (listed below) go out only through Gmail, totally bypassing your web host’s email server. Which means, your email deliverability will go up substantially.
- List of outgoing emails for which your Gmail account will be used, include:
– Real-time Welcome Emails
– Third-party Notification Emails (to Admin, other third-parties, Aweber, etc)
– All notification and transactional emails to DAP Admin – like payment receipt, new user signup, error notifications, user unsubscription notifications, etc
– All autoresponder and broadcast emails
– etc…
37
Amazon Simple Email Service (SES) Integration With DAP
DAP/Amazon SES Integration
You can hook up DAP to Amazon’s Simple Email Service (Amazon SES) and have all of your emails go through Amazon’s beefed up, high-performance, high-deliverability email servers.
The document below explains how to connect DAP to Amazon SES. (troubleshooting info for DAP/SES integration)
- Go to http://aws.amazon.com/ses/ and sign up for Amazon SES. You must already have an Amazon account and you can add SES to that same account.
- Then go to https://console.aws.amazon.com/console/home , log in if required, and click on the SES link there.
- That will bring you to the SES “Dashboard”.

- When you first sign up for SES, you will be assigned a “Sandbox” account. Which means that you will only be able to send emails TO and FROM verified email addresses (a verified email address is something you add yourself to your SES account and then click on a confirmation link that Amazon sends you, to prove that you are the owner of that email id). Also, Sandbox access allows you to send out a maximum of just 25 emails per day, both FROM and TO verified email id’s only.
- So the first step is to add a Verified Sender. So click on the “Verified Senders” link in the menu on the left.

- That will bring you to this page. Click on the Verify a New Email Address link with the green check-mark next to it.

- In the popup, enter the email id that you wish to use as your FROM email id to send out emails. Please note that you can ONLY use verified email id’s to send out emails from your Amazon SES account. So whatever email id you wish to use in DAP Admin as the sender for outgoing emails (see DAP Admin > Setup > Config > From-Email Id : For all outgoing DAP emails), that’s the email id you should verify.IMPORTANT: The email address is case sensitive. So if you white-listed You@YourSite.com at Amazon SES, then you must enter the email address with the exact same cAsE within DAP Config too (You@YourSite.com is NOT the same as you@yoursite.com for the purposes of Amazon SES. Crazy, we know! But that’s how it is.)

- You will then receive an email from Amazon at that email id which has a confirmation link. Once you click on that link, your email id in your Amazon SES account is now “Verified” (also known as whitelisted). Please note that at this time, you still have Sandbox access. Which means you can send email both FROM and TO the same verified email id. Not very useful, but that’s ok. Now time to go back to the SES Dashboard and Request Production Access.
- Click on Request Production Access and you will be taken to a form that you need to fill out and submit. Amazon then reviews it, and it can take up to 48 hours for your account to be granted Production Access – which basically means, you can now use SES and start sending out real emails, and your per-day limit is now 10,000 emails per day.
- Now, you need to get a SMTP Username and SMTP password for sending out emails. This username & password is NOT the same as your Amazon account email and password. Neither does it have anything to do with your Amazon Public or Secret keys. This is a completely different (and new) username and password used JUST for sending emails, and it needs to be generated newly.
- To generate a new set of SMTP Username and Password, click on the SMTP Settings link in the menu. And then on the next page, click on Create My SMTP Credentials.

- In the resulting popup, click on Create.

- That will create your SMTP credentials. But to see it, you have to click on Show User SMTP Security Credentials

- Once you click on Show User SMTP Security Credentials, you will be shown your SMTP Username and Password.

- Be sure to note down the username and password in a safe place where you can get to it again, because Amazon will not show this same set of username and password ever again. If you lose them, of course, you can always generate a new set of username/password again for free, but you’ll never get the same pair again – it will be a fresh pair.
- Go to the SMTP Settings link in the menu and note down the Server Name.
It will be one of the following:
email-smtp.us-east-1.amazonaws.com (as in the image below)
email-smtp.us-west-1.amazonaws.com
email-smtp.eu-west-1.amazonaws.com (European Union users)
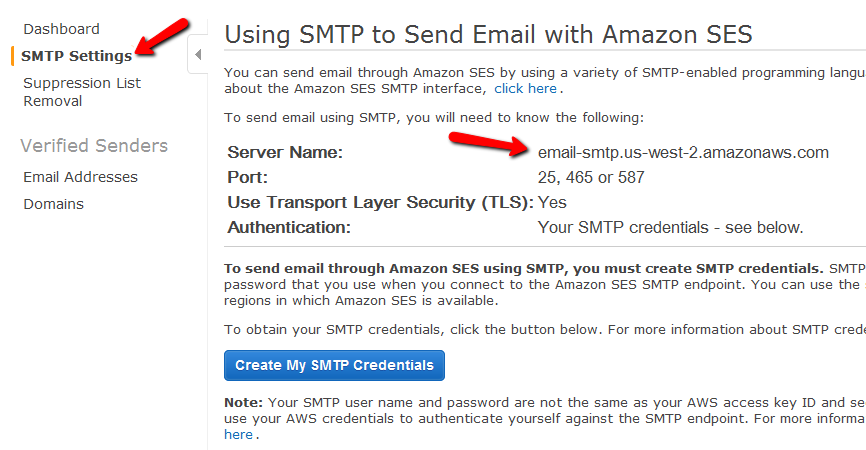 You need to determine what your host name is, and then add the text “ssl://” to it at the front.
So if the server name displayed in your Amazon SES account is this…
email-smtp.us-east-1.amazonaws.com…then the text you would enter into the DAP Email > SMTP page is this…
ssl://email-smtp.us-east-1.amazonaws.com - Now log in to your DAP Admin Panel, and go to DAP Admin > Email > SMTP.
- On this screen, use the section Add a New SMTP Server to create a new SMTP row as follows:

(Click on image above to see full-size screenshot)
Description: Amazon SES
Server: <what you noted down above>
Port: 465 (must be exactly that – ignore port numbers recommended by Amazon SES)
SSL: N (must be exactly that)
User Id: Amazon SMTP Username (that you generated and noted down in Step 15 above)
Password: Amazon SMTP Password (that you generated and noted down in Step 15 above)
Email Sending Limit Per Hour: 500 (ideal number – don’t go more – less is ok)Click on the “Add” button to create and save the new Amazon SES SMTP server setting in DAP. - Once it is saved, now you will see 2 rows on the “Email > SMTP” screen. One is for the server “Localhost”, and the other is the new “Amazon SES”.
- Towards the end of each row, you’ll see a setting called “Activated?”. Set it to “N” for Localhost and “Y” for Amazon SES.
- That will now make all of your outgoing emails (listed below) go out only through Amazon SES, totally bypassing your web host’s email server. Which means, your email deliverability will go up substantially.
- List of outgoing emails include:
– Real-time Welcome Emails
– All transactional emails to DAP Admin – like payment receipt, new user signup, error notifications, user unsubscription notifications, etc
– All autoresponder and broadcast emails
– etc…

Watch this video for details:
8
Testing Autoresponder And Broadcast Emails
Here’s how you test emails in the system before making them live.
Testing Autoresponder Emails
- Create a test DAP Product called “Test Product”
- Set up the email drip for this product
- Give yourself (or a new test user, but with a real email id that belongs to you) access to this DAP Product on the Users > Manage page (for existing users) or Users > Add page for new users
- Run the hourly-cron manually, by going to http://YourSite.com/dap/dap-cron.php . That should send out the day 1 drip for that test user.
- Go to Users > Manage page, and back-date the Access Start Date for this test user for the test product, back by one day. So DAP now thinks he bought the product “Yesterday”.
- Now run the cron manually again. This time, DAP will send out the day #2 drip for this user.
- So every time, move the user’s access start date back by as many days as you want, to trigger that day’s autoresponder email. And each time run the cron manually.
Testing Broadcast Emails
- Create a test DAP Product called “Test Product” (or if you have previously created one above, then use the same one)
- Add 3-4 test users to this product
- On the Emails > Broadcast page, schedule a broadcast email to be sent to “All Users of Product <<Test Product>>”
- Run the hourly-cron manually, by going to http://YourSite.com/dap/dap-cron.php . That should send out the broadcast to that test product.
- Log in to the email id’s of all the test users that you added to this product, and make sure the email arrived in the inbox.
Troubleshooting Email Broadcasts
* When you schedule a broadcast email, it’s added to the job queue with a status of NEW
* When the cron job runs at the top of the hour, then the job status changes to COMPLETE (C) and the emails get sent.
So to test it, do this.
- set up an email broadcast to a test user using the CSV format (option # 5)
- Go to DAP Admin > System > Job Queue and see if the job was added with a status of NEW
- Now manually run the cron by running this cron script in a browser (just for testing)
http://yoursite.com/dap/dap-cron.php (replace yoursite.com with the name of your site) - Then go back to the job queue and see if the status for the email job has changed to ‘C’ (complete)
- If yes, check if the email was received.
Troubleshooting “Payload Format Incorrect” Error
If you see this error when trying to send out a broadcast to a default group from the Email > Broadcast page, then the most plausible cause for this is that there are some special, non-standard characters in the body of the email that you’re trying to broadcast.
This could happen if you copied text that you composed in a Microsoft Word doc, or you cut/pasted from a WordPress blog post. And both Word and WordPress (some themes) are famous for creating special characters out of normal characters.
Example:
If you take a closer look at the body of your email, especially the single quotes and double-quotes characters, you will find that these may not be the standard single quote and double quote characters that you get from a plain text editor.
And these special characters trip up the DAP email broadcasting system.
So please take a closer look at all of the following characters:
- Single quotes
- Double quotes
- Hyphens
- Special symbols like trademark and copyright
And just type over them again just to be sure with the normal equivalent using your keyboard, and try the broadcast again.
And this time, it should work.
Email Body Showing Up Partially On Job Queue
When you view the broadcast emails that you just scheduled on the System > Job Queue page, if you see that the email body in the saved job has been randomly cut off at one point (usually at the point where there would normally be a single or double quote), then that’s also an indication of non-standard characters in the email that you tried to send out. So see the above example for how to weed out any non-standard single or double quotes or hyphens, and try the test again with just one test email, and see if it goes out to just that one email. Because if it fails for one email, then it will fail for all emails being sent via the DAP Broadcast system.
3
Troubleshooting: Paypal Coupon Error Emails
Problem: You see emails sent to your DAP Admin email account that look like this:
paypalCoupon.php: missing item_name
-or-
paypalCoupon.php: No such Product found – SomeProductNameHere
This could be happening because….
a) Some robot software somewhere is auto-posting to that URL.
b) It’s possible that a search engine spider or spambot is hopping from link to link, submitting the form repeatedly from the backend, and because the form is being submitted in an illegal/invalid fashion, DAP is complaining about a missing coupon code.
So for now, if everything else is working ok, and the annoying email is the the only issue, then you can just ignore those emails. Or better yet, simply put a filter on that email subject and have it directly sent to the trash folder in your email client.
Strange Characters In Emails
If you or your members are noticing strange characters in emails – especially where there should normally be a single or double quote, then these are due to what are known as “Smart Quotes”.
These special characters always show up when you copy text from a WordPress blog (some themes use these characters) or a Microsoft Word document.
Single quote:
'(correct)
`(incorrect)Double quote:
"(correct)
``(incorrect)
The single quote that works correctly is located next to the “Enter” key.
The incorrect one is located next to the “1” number key.
So copy your email text to a text editor, like notepad. Then change all single quotes to be ‘ and all double-quotes to be “ in your emails. Then put them back into DAP, and then test.
The “strange characters” issue should then be resolved.
NOTE: In a future version, we will implement an enhancement in DAP so that DAP can handle this automatically, but for now, the above solution is your only option.
Troubleshooting Cron
The Problem
- Your autoresponder or broadcast emails are not going out (hourly cron job dap-cron.php)
- Your Affiliates aren’t being credited with sales (hourly cron job dap-cron.php)
- Your 1SiteAutomation/1ShoppingCart Orders are not being processed. (10-minute cron job dap-emailorder.php)
The Solution
One possible solution is that your cron job(s) aren’t running correctly.
DAP has two cron jobs. One that runs once an hour (dap-cron.php), and one that runs every 10 minutes (dap-emailorder.php).
You can see how to set them up here.
But in this post, we will see how to make sure your cron is actually set up correctly, or if it’s running correctly.
How To Know If Cron Is Running
- Go to System > Logs and click on “Empty Logs”. That will fully clear out all logs.
- Go to Setup > Config and set “Log Level” to “Log All Activity (during troubleshooting)” and click “Update“.
- Wait for the top of the hour for the hourly cron job to run. So if the time when you’re doing this, is say 11:20 AM, then wait for 12:00 Noon. If time is 3:45 PM, then wait for 4:00 PM.
- A few minutes past the top of the hour and go back to the System > Logs screen.
- If you see hundreds of lines of text in the logs, then that means your cron job is running correctly. If you only see maybe 10-20 lines of text, then your cron job is NOT running correctly, and you need to make sure the cron job is actually set up correctly.
18
GetResponse Integration
DAP integrates with GetResponse very easily.
DAP to GetResponse Integration
If you are on DAP 4.1, then DAP can connect with getresponse using the APIs provided by getresponse.
So when someone buys or signs up for that Product, then DAP will automatically notify your GetResponse list, and add the buyer or subscriber (if it’s a free sign-up) to your GetResponse list.
So basically, user gets added to DAP first, and then DAP adds them to GetResponse.
If you want the other flow (subscriber gets added to GR first, and then GR adds them to DAP, then see this GetResponse-to-DAP flow)
1) Retrieve the getresponse API Key from this URL:
http://www.getresponse.com/my_api_key.html
2) Then go to DAP > Products > Manage, select the product, go to “Notifications” tab, then in the Plugin Notification upon User “Add” field, add the following:
getresponse:<API Key>:<campaign name>
For example:
getresponse:89kjhjgjfh1734dap:fbsecrets
That’s it.
Now go to DAP admin -> add users page and add a brand new user / email and see what happens.
The added user should first receive the confirmation email from GetResponse, and upon confirmation, the user should get added to GetResponse.
If it does not work, then…
- Set the dap log level to 5,
- Go to DAP > System > Logs.
- Empty logs, and rerun the test.
- Then send us the log text from DAP > Sytem > Logs.
31
Mailchimp Integration
Subscriber Flow
The flow of subscriber is “FROM DAP TO Mailchimp“. User signs up at DAP first, then DAP automatically adds the user to Mailchimp list.. Admin removes the user’s access to a product, and DAP automatically removes the user from Mailchimp list. This feature is available starting DAP v4.1.
How it works
[s3mv]mailchimp.mp4,640,378,false,false[/s3mv]1. Login to your account at http://admin.mailchimp.com/account/api/ and note down the API Key.
Image 1:

2. Go to http://admin.mailchimp.com/lists/ and grab your List’s Unique Id. Click the “settings” link for the list – the Unique Id is at the bottom of that page.
Image 2:

3. Log in to your DAP Admin Dashboard -> Products Page and select the product (whose members you wish to add automatically to your Mailchimp list.
4. If the list Id of the mailchimp list that you want to integrate with a DAP product/membership is say “ffffffffff”, and say your Mailchimp API Key is ‘ffffffffffffffffffffffffffffff-us2’ then add the following to the “Notify Plugin upon User -> Product Activation (Add)” in DAP products page and HIT Save/Update Product.
mailchimp:ffffffffffffffffffffffffffffff-us2:ffffffffff
Image 3:

That’s it!
Save the product and this completes the DAP->Mailchimp integration.
How This Works
So let’s say you picked the list “ffffffffff” in your Mailchimp account, and the DAP Product “Example Subscription Product” (as shown in the screenshots above).
So once you add “mailchimp:ffffffffffffffffffffffffffffff-us2:ffffffffff” to the product’s “Notify plugin upon user->product activation” and “Notify plugin upon user->product de-activation” field and save it, every time someone gets access to the “Example Subscription Product” product (regardless of whether they buy it, or you give them access on the backend), DAP will automatically add them to the list – ffffffffff. And everytime you remove the user’s access to product (click on ‘Remove’ in DAP manage users page), DAP will automatically remove the user from the list.
df11c84ab4
22
Sending HTML Email
DAP allows you to send out HTML content in all of the following:
- Double-optin email body
- Thank-you email body
- Autoresponder email body, and
- Broadcast email body
DAP can send out “Multi-part” emails – that is, emails that have both a “text” portion, and an “HTML” portion. If there are any email clients out there that cannot handle HTML email (in the year 2010, there are really no such clients, really), then the “text” portion of the same email will be shown to the recipient.
To send out HTML emails, it is very important that you insert the HTML Email Start Tag – [HTML_START] – into the body of your email before you insert any HTML tags.

The same goes for any email that you want to send out in HTML format: Just before you insert your HTML code, just be sure to insert the HTML Email Start Tag [HTML_START].
And the HTML you insert should be full-blown HTML, starting with the <html><body>…. and ending with </html></body> tags.
NOTE: DAP does not have a built-in editor to create the HTML yet. So you will have to create the HTML code outside of DAP – either using a HTML editor like Dreamweaver, or you could even compose a draft page in WordPress, and use that as the source of your HTML code that you would then use within DAP to send out HTML email.