Drip is one of the most intuitive and easy-to-use Email Marketing Automation Platform. Drip's visual workflow builder (Mailchimp, ConvertKit does not have one) is one of the best out there. You can also take a Drip campaign and reuse the emails in that sequence in different workflows. Drip also tracks all events that affect a subscriber. The events are recorded in the subscriber activity log along with the date and time.
Special Deal for Dappers
We've worked out a special deal for YOU with the Drip team. The coupon-enabled link below will allow DAP users an Extended 60-day Free Trial of Drip.
Please NOTE:
You can only access the special coupon-enabled link if you are a DigitalAccessPass.com (DAP) customer. If you're already logged-in to our site, you'll find the special coupon-enabled link below. If not, just login below to access your special coupon-enabled link.
Click HERE for your Coupon-Enabled Link that’ll allow an extended 60-day free trial of Drip.
[/DAP]Login to our site (DigitalAccessPass.com) below for your Extended 60-day FREE Trial of Drip:
[DAPLoginForm template=”template4″ redirect=”https://www.digitalaccesspass.com/blog/2016/11/dap-integration-with-drip/#special”] [/DAP]DAP Integration with Drip
If you need CRM like features, Drip is not for you. However, if you are looking for a platform to manage and completely automate your Email Marketing, place the right message in front of the right person at the right time, Drip is a great choice.
You might not find a more powerful combination than DAP and Drip to manage your entire online business - DAP to power your membership site and Drip to completely automate your email marketing campaigns.
DAP supports full-fledged two-way integration with Drip:
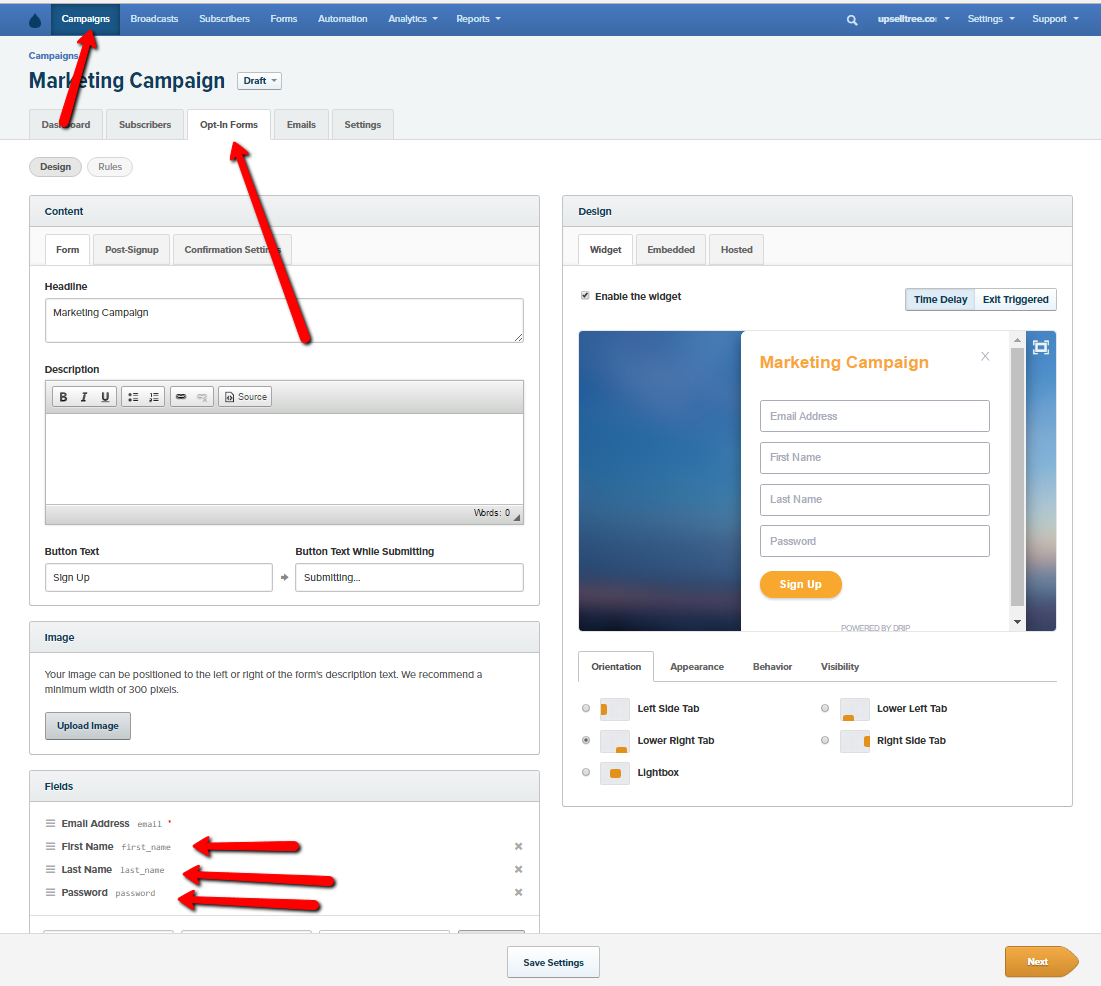
1) Connect your Drip Generated Opt-In form with your DAP Free Product
You can connect your Drip generated signup form with your DAP product. When your subscribers opt-in, they'll be automatically added to your free DAP product. More details on this integration later in this post.
2) Connect your DAP Paid Products with your Drip Campaigns
You can also connect your paid products from DAP to Drip. When your users purchase your products, they'll be automatically added to the configured Drip Campaign. Each product in DAP can be configured to add subscribers to a different campaign in Drip. More details on this integration later in this post.
Send Membership Credentials to Drip
You can even send membership credentials to Drip from DAP and have Drip send out the Welcome email with the login credentials to your members. You just need to define a custom field called "password" in Drip. This will allow DAP to send the member password to Drip and store it in the custom "password" field in Drip.
Upgrade DAP to v5.3.x / LiveLinks to v2.3.x
You need to be on DAP v5.3.x (or above) and LiveLinks v2.3.x (or above) to integrate DAP => Drip. You can use our easy installer plugin to install or upgrade DAP on your site. If the easy installer plugin does not work on your site (due to server permission issues or security settings on your site), you can use regular ftp to upgrade dap.
Integration Steps:
Please follow these steps to connect your DAP product to your Drip Campaign:
Step 1: Get your Drip Account ID
Login to your Drip account and find your account ID.
You'll find your account ID in your Drip Dashboard => Settings => Site Setup page (under 3rd-Party Integrations).
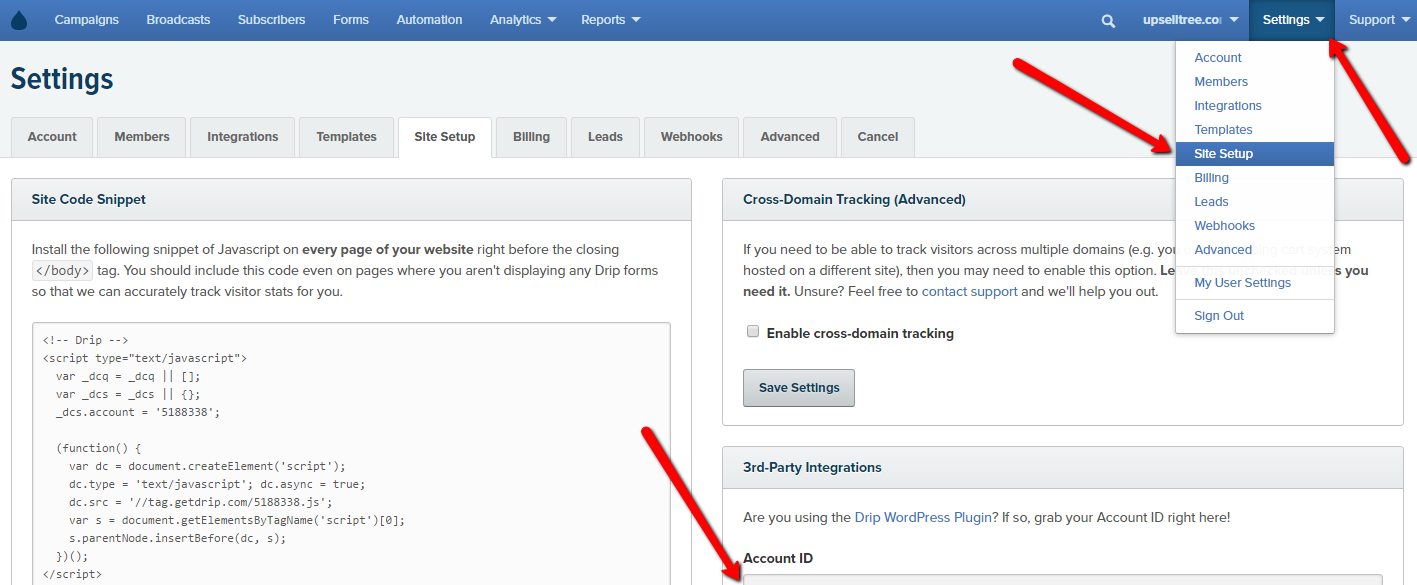
Save your Drip Account Id somewhere. You'll need it to integrate your DAP Product with Drip.
Step 2: Get your API Token
You'll find your API Token in your Drip Dashboard -> Settings -> My User Settings -> API Tokens.

Step 3: Get your Drip Campaign ID
You'll find your Drip campaign Id in your Drip Dashboard => Campaigns page. The campaign ID is the last part of your Drip Campaign URL. For ex - if you Campaign URL is https://www.getdrip.com/9288121/campaigns/25325422, your Campaign Id is 25325422.
Save your Drip Campaign Id somewhere. You'll need it to integrate your DAP Product with Drip.
Step 4: Send Name & Password to Drip (define custom fields in Drip)
If you want DAP to send the subscriber's first name, last name and member password to Drip, you'll have to define Custom Fields in Drip for each of these fields - first_name, last_name, password .
Step 5: Create the Integration String
To connect your DAP product with your Drip campaign, you need to create an integration string in this format:
drip:AccountID:APIToken:CampaignID:TagIds
Replace AccountID with your Drip Account Id.
Replace APIToken with your Drip API Token.
Replace CampaignID with your Drip Campaign Id.
You can also add a single tag or a "|" delimited list of tag Ids. If you don't want to add a tag (or tags), leave the TagIds field empty.
Use a colon (:) delimiter to separate each field.
Here's an example of an integration string:
drip:7865112:wtx2ssnx5tisisyq6:25325422:goldmember
Save your integration string. You'll need it in the next step to integrate your DAP Product with your Drip campaign.
Step 6: Connect your DAP Product to your Drip Campaign
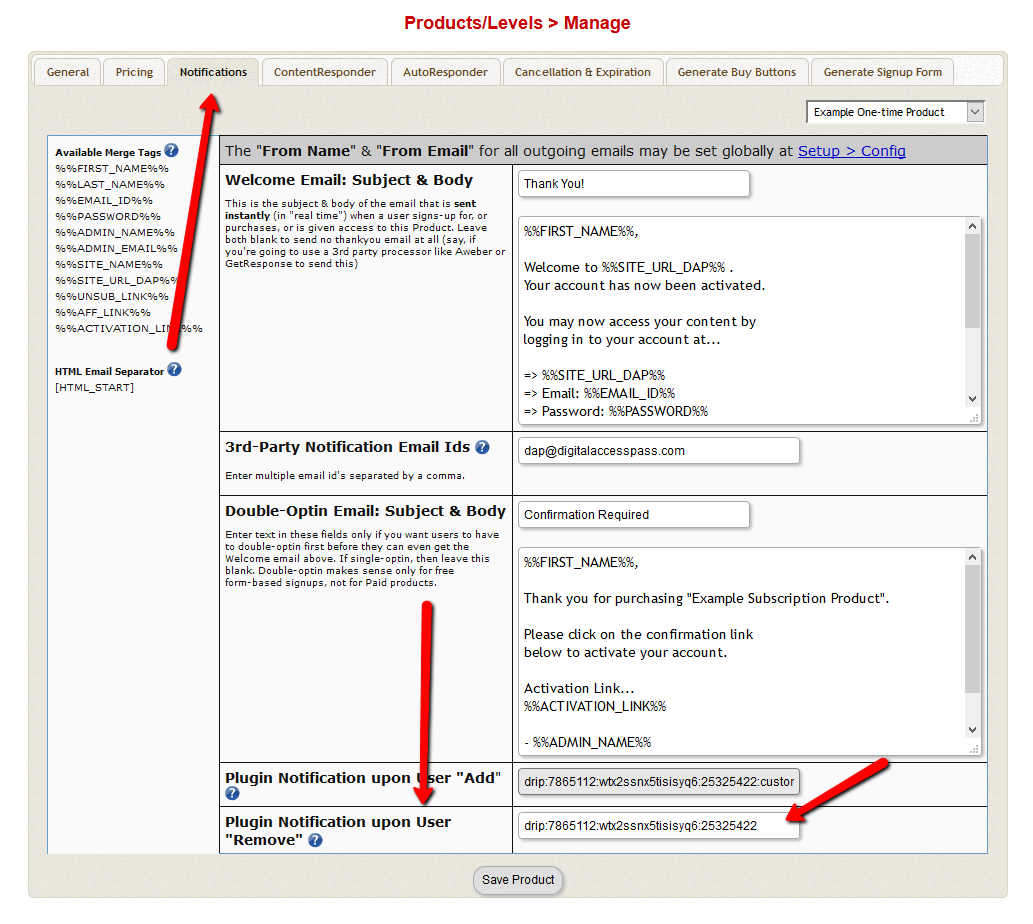
Visit your DAP Admin Dashboard => Manage Products / Levels Page => Select the product that you want to integrate with Drip => Click on the Notifications tab => In the Plugin Notification upon User "Add" field, enter the integration string you created above in Step 5.
See an example below:
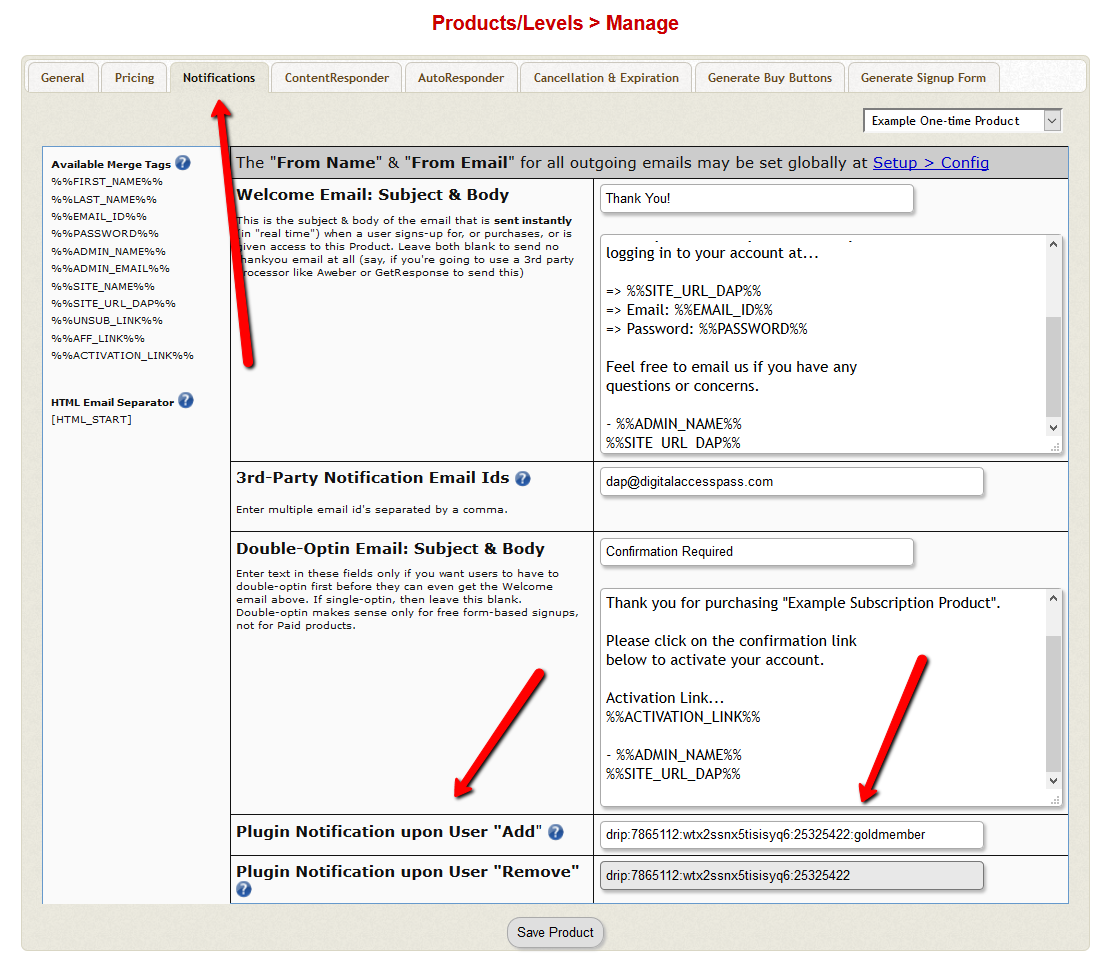
Save the product settings.
That's it. Your DAP product is now integrated with Drip.
Step 7: Test the Integration
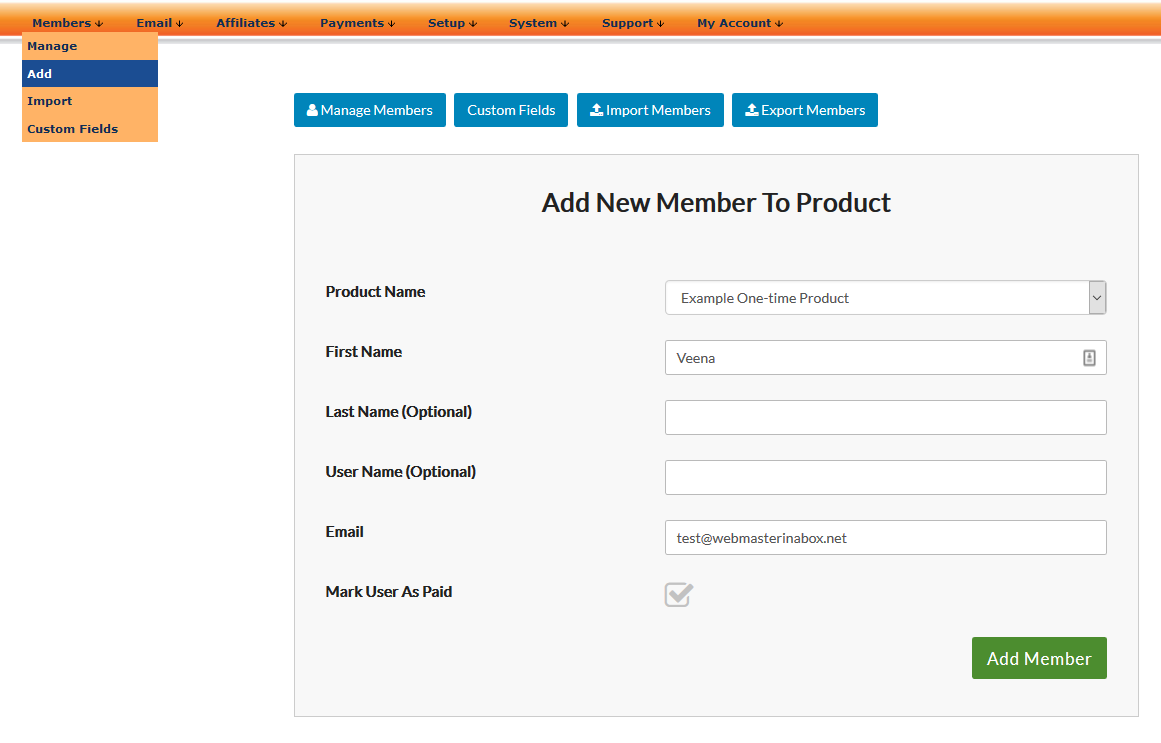
Visit your DAP Admin Dashboard => Members => Add Page => Add a New User to the Product that you've integrated with Drip.
See an example below:
After you add the member, see if the member made it to the configured Drip campaign. And if you've defined custom fields for first_name, last_name and password in Drip, these fields will be populated by DAP when it adds a new subscriber to Drip. You can use the Drip personalization tags for these custom fields in the emails that you send from Drip.
Step 8: Send Membership Password from Drip
DAP will store the member password in your Drip custom field for "password".
See this article for more details on how you can use the Drip custom fields in the emails that you send from Drip.
Step 1: Set the post submission URL in Drip to point to the DAP script.
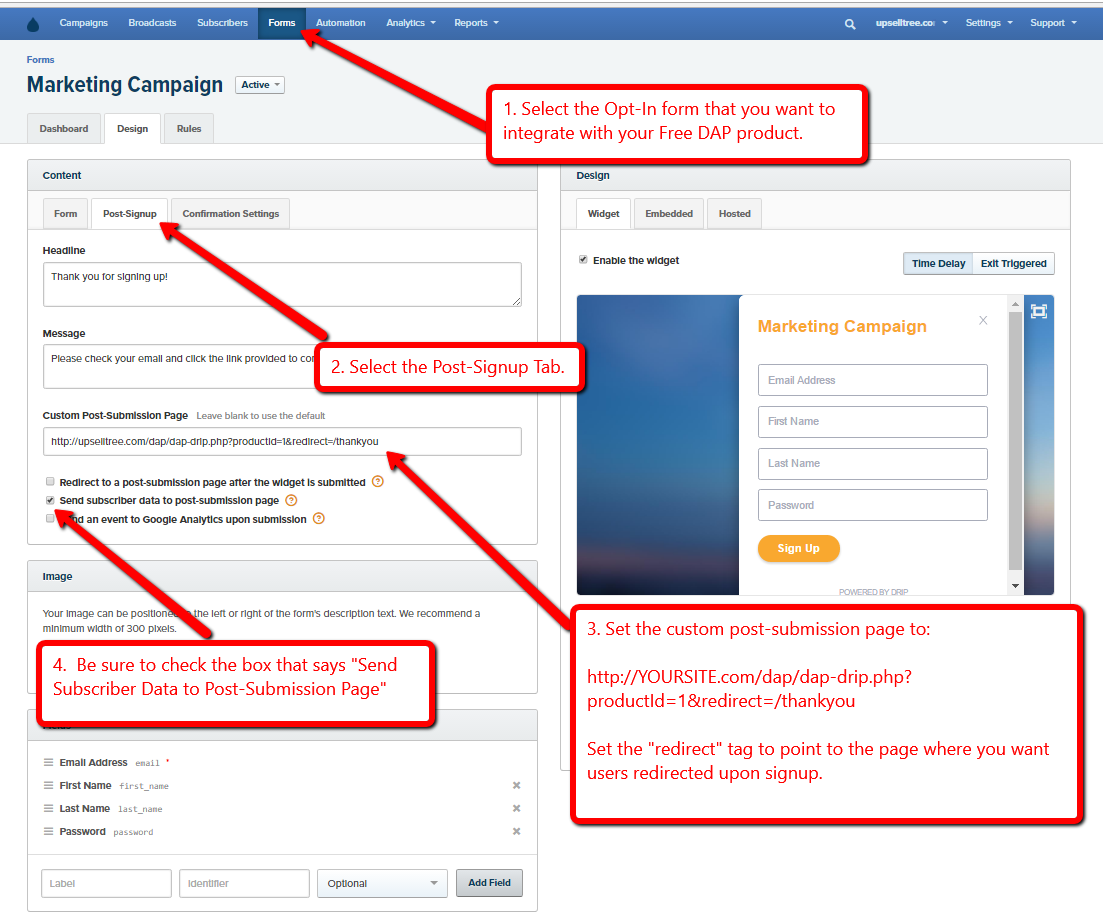
In your Form Settings, select "Post-Signup" tab and set the Custom Post-Submission Page to:
http://YOURSITE.com/dap/dap-drip.php?productId=1&redirect=/thankyou
Replace the number 1 in the URL above with your actual DAP Product Id. You'll find your DAP product Id in your DAP dashboard -> Manage Products page.
Replace YOURSITE.com with your domain name.
Replace /thankyou with the URL of the page to which you want your users redirected upon signup. You could specify relative path for e.g. /thankyou or full URL - http://YOURSITE.com/thankyou
Be sure to check the box that says "Send Subscriber Data to post-subscription page".
Step 2: Save your Drip Account Id & Token in DAP Setup => Config Page
Enter your Drip Account Id and Drip API Token in DAP Admin => Setup => Config Page => Drip Email Marketing Platform section.
You'll find your Drip Account ID in your Drip Dashboard => Settings => Site Setup page (under 3rd-Party Integrations).
You'll find your Drip API Token in your Drip Dashboard -> Settings -> My User Settings -> API Tokens.

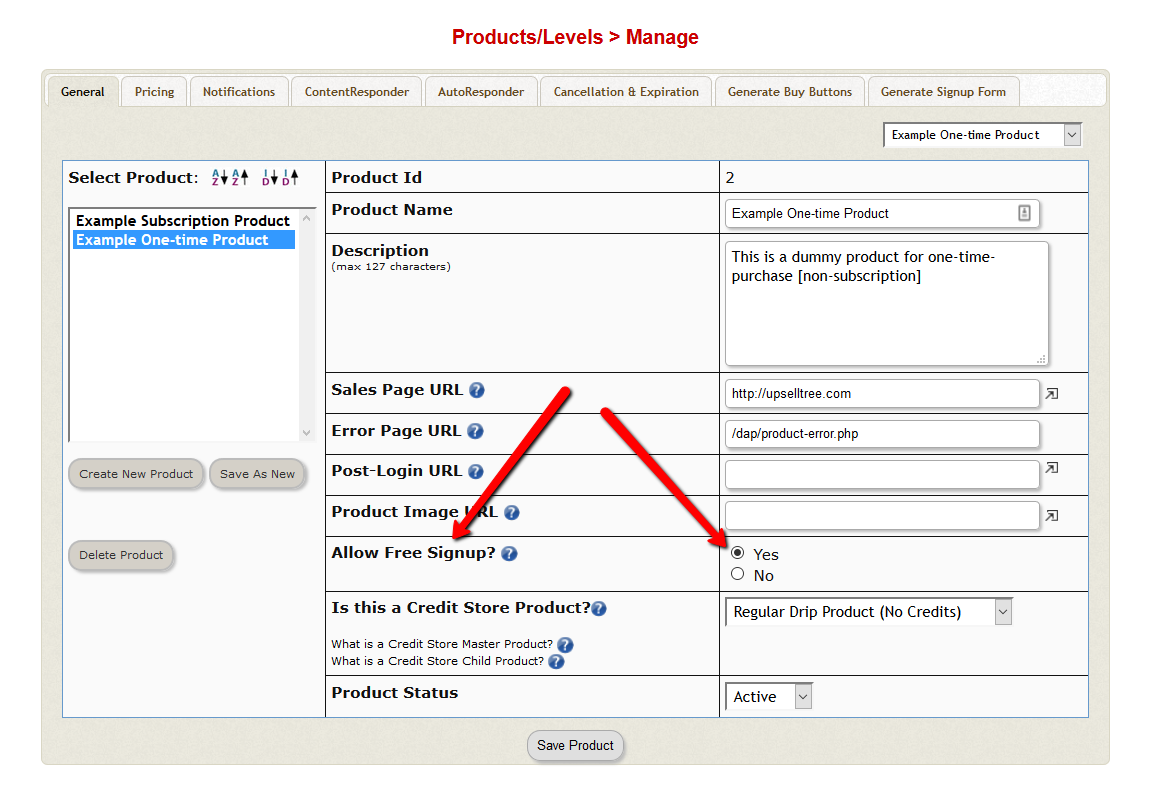
Step 3: Allow Free Signup
PLEASE NOTE: Your DAP product must allow free signups for this integration to work (see the image below):
That's it.
When your subscribers signup (and complete activation if it's a double-opt-in form), they'll be automatically added to your DAP product and redirected to the configured thank you page.
You can configure DAP to automatically unsubscribe users from your Drip Campaign if they lose access to the DAP product. Here are the steps to automate this:
Step 1: Get your Drip Account ID
Login to your Drip account and find your account ID.
You'll find your account ID in your Drip Dashboard => Settings => Site Setup page (under 3rd-Party Integrations).
Save your Drip Account Id somewhere. You'll need it to integrate your DAP Product with Drip.
Step 2: Get your API Token
You'll find your API Token in your Drip Dashboard -> Settings -> My User Settings -> API Tokens.
Step 3: Get your Drip Campaign ID
You'll find your Drip campaign Id in your Drip Dashboard => Campaigns page. The campaign ID is the last part of your Drip Campaign URL. For ex - if you Campaign URL is https://www.getdrip.com/9288121/campaigns/25325422, your Campaign Id is 25325422.
Save your Drip Campaign Id somewhere. You'll need it to integrate your DAP Product with Drip.
Step 4: Create the Integration String
To automatically unsubscribe a member from a Drip campaign, you need to create an integration string in this format:
drip:AccountID:APIToken:CampaignID
Replace AccountID with your Drip Account Id.
Replace APIToken with your Drip API Token.
Replace CampaignID with your Drip Campaign Id.
Use a colon (:) delimiter to separate each field.
Here's an example of an integration string:
drip:7865112:wtx2ssnx5tisisyq6:25325422
Save your integration string. You'll need it in the next step to integrate your DAP Product with your Drip campaign.
Step 5: Unsubscribe members from Drip Campaign
Visit your DAP Admin Dashboard => Manage Products / Levels Page => Select the product that you want to integrate with Drip => Click on the Notifications tab => In the Plugin Notification Upon User "Remove" field, enter the integration string you created above in Step 4.
See an example below:
Save the product settings. That's it. When a user loses access to the DAP product, DAP will automatically unsubscribe the user from the configured Drip Campaign.
Step 6: Test the Integration
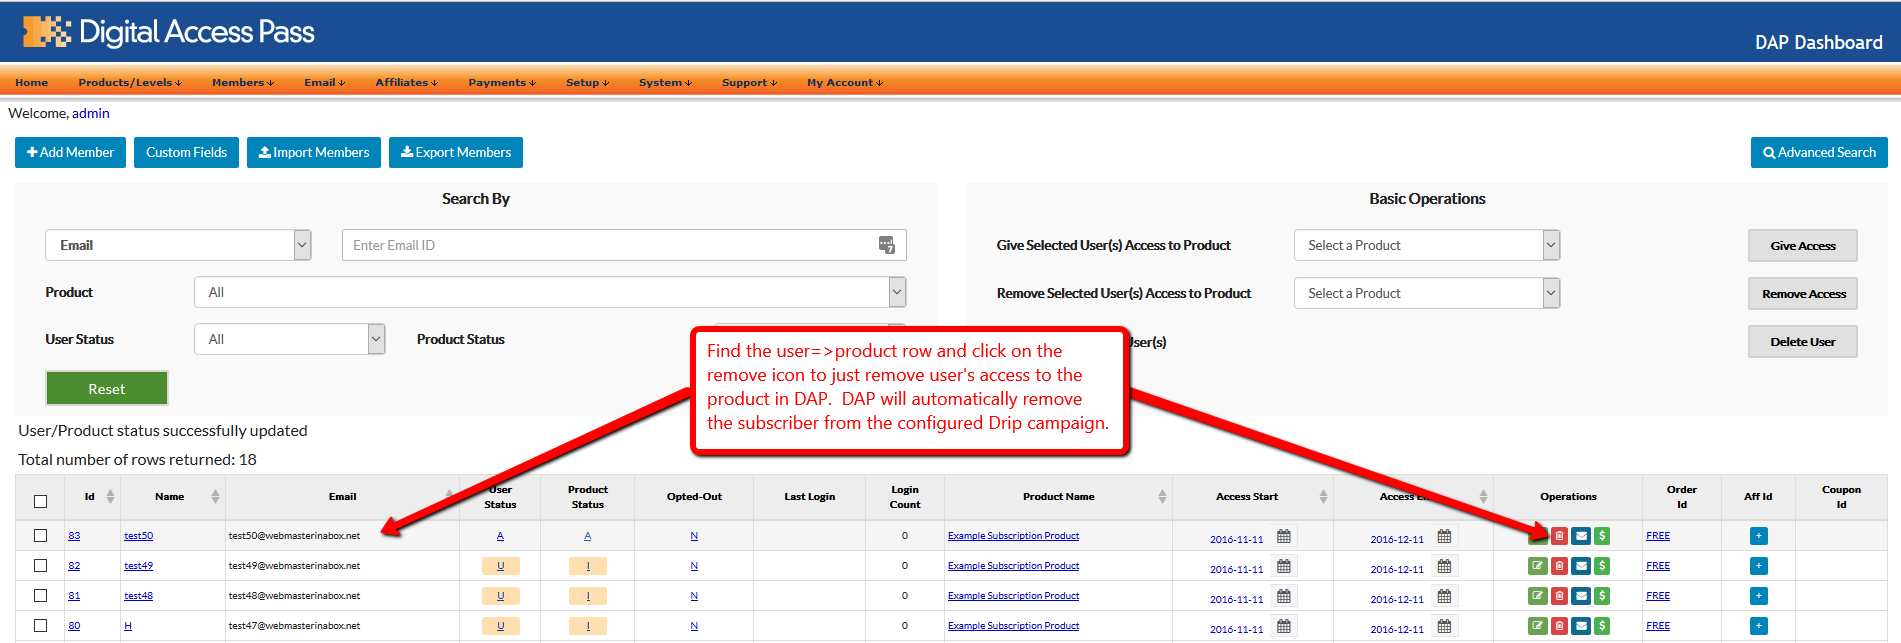
Visit your DAP Admin Dashboard =>Members => Manage Page => Click on the "remove" icon to remove user's access to the DAP product. DAP will automatically remove the subscriber from the Drip campaign.
See an example below:
Login to your Drip Dashboard and see if the subscriber was automatically removed from the campaign.
Questions/Comments?
Join my Free, Private Facebook group for any generic (non-support related) Membership Site questions and I'll be happy to answer them for you!
And as always, we would love to hear from you. Please leave your comments & feedback below :).